
Handle A Voice Call
In this lesson, you will learn how to accept an inbound voice interaction by using Workspace. Also, you will learn how to use the Team Communicator feature to call a contact or an internal target.
The Team Communicator enables you to find a contact or an internal target, send an Instant Message (IM) to an internal target, call a contact or an internal target, email a contact, initiate a conference call, or transfer a call.

This chapter contains the following sections:
Receiving a Voice Interaction
If you are the selected internal target for an inbound interaction, you receive a notice on your workstation desktop. You can decide to accept or reject the interaction. If you accept it (answer it), the interaction window is displayed. The interaction window contains information about the call and the controls that you need to complete the interaction.
Lesson: Handling an inbound voice interaction
Purpose: To handle an inbound voice interaction properly.
Prerequisites
- You are logged in to Workspace (see Getting Started).
- Your status is Ready for the voice-media channel (see Lesson: Going Ready in the Workspace Main window).
- You are the internal target for the inbound interaction.
Start
- Your hard phone or soft phone rings, and a preview of the inbound interaction is displayed on your workstation desktop in an interactive-notification view (see the Voice Interaction Preview interactive notification figure).
The Interaction Preview contains a summary of call information, including contact information and call metrics. The Interaction Preview might also contain Case Information, which is part of the case data regarding the call.
TipIf you are using a screen reader, your system might be configured to give the focus to the Interaction Preview window. In this scenario, your screen reader will automatically read the window title to you. Navigate to the content area to have your screen reader read the Interaction Preview content. However, if your system is not configured to give the focus to the Interaction Preview window, to have your screen reader read the contents of the Interaction Preview window, you must use screen navigation to give the focus to the Interaction Preview. (Added: 8.5.101.14)If your account is configured for auto-answer, the Interaction Preview is not displayed and the call is answered automatically unless your account is configured to enable you to preview the case information before the interaction is auto-answered. In this case, when you receive an auto-answer interaction, the Interaction Preview is displayed on your desktop. A timer that counts down the number of seconds until you are connected to the contact is displayed in the Accept button (refer to the following figure). You can click Accept before the timer runs out or wait for the timer to run out. The Reject button might also be displayed if your administrator wants you to have the option of rejecting an interaction before it is auto-answered.[Added: 8.5.105.12]

- You can choose to accept or reject the interaction in the Interaction Preview by performing one of the followings steps:
- Click Accept to answer the interaction.
- Click Reject to return the interaction to the queue.
- Do nothing. The interaction will time-out and be redirected.
- If you accept the interaction, the call is answered in your hard phone or soft phone, and the Voice Interaction window is displayed (see the Voice Interaction window figure).
- You can use the Voice Interaction window to do the following:
- View contact records. See Lesson: Finding and viewing an interaction in the contact database.
- View contact history. See Managing Contact History.
- Your account might be configured to let you assign an interaction with an unknown contact to a known contact in the contact database by using the Manual Contact Assignment feature.
- Launch the Team Communicator. See Starting a Voice Conference, Transferring a Voice Call, and Blending a voice consultation with an IM consultation.
- Set a disposition code. See Assigning Disposition Codes.
- Use the Note to add information about the interaction to the interaction history. See Managing Contact History.
- View and edit the case information for the interaction. See Managing Contact History.
- Link to a web-page from a hyperlink in the Case Information view. The case information might contain a hyperlink to enable you to view a web-page that is related to the interaction, such as customer records. Click the hyperlink in the Case Information view to open a new browser window and view the link. Place your mouse pointer over the hyperlink to preview the web page from the Case Information view. The hyperlink might be a URL or highlighted anchor text.
- If there are interactions in progress for the current contact, the number of interactions is displayed beside the connection status of the interaction (see the Dynamic Contact History Matrix displaying the number and type of interactions in progress for the current contact figure). Place your mouse pointer over the icon to display the number and type of interaction(s) in progress (except voice interactions) for the current contact.
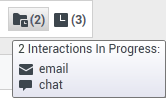 Dynamic Contact History Matrix displaying the number and type of interactions in progress for the current contact
 - You might be configured to be notified if there are recent interactions for the current contact; if so, the number of recent interactions is displayed beside the connection status of the interaction (see the Recent interactions matrix displaying the list of interactions with the current contact within the last day figure). Place your mouse pointer over the icon to display the number and type of recent interactions for the current contact. If you click the icon, the Contact view is opened and the History tab is displayed. Your system administrator defines the contents as interactions during the last-specified number of days.
 Recent interactions matrix displaying the list of interactions with the current contact within the last day
Place your mouse pointer over the icon to display the number and type of recent interactions for the current contact. If you click the icon, the Contact view is opened and the History tab is displayed. Your system administrator defines the contents as interactions during the last-specified number of days.
- If you connect with the contact successfully, you can do any of the following:
- Terminate the call (see Step 6).
- Put the call on hold and retrieve the call. The call status changes to On Hold, and then back to Connected when you retrieve the call.
- Use the keypad to send DTMF to the contact.
- Start a voice or IM consultation.
- Conference the call (see Starting a Voice Conference).
- Transfer the call (see Transferring a Voice Call).
- View and read standard responses (see Lesson: Using The Standard Response Library).
- For SIP enabled agents, additional call actions are available:
- Record the call (see Lesson: Record Interactions).
- Mute and unmute the call.
- Adjust the microphone and speaker volumes.
Tip- For information about how to use the functionality in the interaction window, see the Workspace 8.5 Help.
- For a demonstration of the various call timers, including Total Duration, Hold Duration, and Post Call (After Call Work) Duration that might be available for you to use, see the Call Timers section in the Workspace 8.5 Help. [Added: 8.5.111.21]
- When the interaction is complete, either you or the contact can end the call. If you want to terminate the call, click the End Call button.
- If required by your configuration, specify a disposition code that qualifies the outcome of the interaction by selecting an outcome from the disposition code drop-down list or radio button list in the Disposition Code view (see Assigning Disposition Codes).
- Click Mark Done.
- If the Voice Interaction window does not close automatically, close the Voice Interaction window after you have clicked Mark Done for each of the active interactions.
- Complete your after-call work.


End
Next Steps
- Set your status to Ready. See Lesson: Going Ready in the Workspace Main window.
Lesson: Dealing with a stuck interaction
Purpose: To close the Interaction window if the interaction has become stuck in the system.
Prerequisites
- You are logged in to Workspace (see Getting Started).
- You are unable to close the Interaction window because the interaction has become stuck in the system.
Start
- If you are unable to close the Interaction window because the interaction has become stuck in the system, right-click the tab in the Interaction window that represents the interaction (see the Force Close This Case menu figure). Select Force Close This Case from the pop-up menu.
- In the Close Case dialog box, confirm that you want to force-close the interaction (see the Close Case dialog box figure):
- Click Yes to force-close the case. The Interaction window closes. The status of the interaction remains as In Progress in the history until you mark it as Done.
- Click No to cancel the action and return to the Interaction window.
- Complete your after-call work.

End
Making a Voice Call
Workspace enables you to call either an internal target or a contact after you find the target/contact in your company directory by using the Team Communicator feature of the Workspace Main Window.
This section contains the following lessons:
Lesson: Calling an internal target
Purpose: To make a voice interaction with an internal target. The Voice Interaction window enables you to view all the information that is necessary to handle a voice interaction with an internal agent. The window contains tabs that enable you to handle more than one interaction simultaneously.
The information that is displayed to you in this view depends on your assigned role and the case information that is available about the internal target.
Prerequisites
- You are logged in to Workspace (see Lesson: Logging in to Workspace).
- You have found the internal target and have selected an Internal Voice Interaction (see Lesson: Using the Team Communicator feature to find an internal target).
Start
- When you choose to call an internal target (see Lesson: Using the Team Communicator feature to find an internal target), the Voice Interaction window opens. The status is Establishing. Wait for the internal target to accept your invitation.
- If the internal target accepts your invitation, the status in the Interaction window changes to Connected (see the Voice Interaction window displaying status as Connected figure). You are now connected to the internal target.
If the internal target rejects or fails to accept your invitation, then the call status changes to Ended. To try to call the internal target again or to call a different internal target, repeat Step 1.
TipYou can click the Team Communicator My Recents button to try to call the internal target again. For more information, see the Workspace 8.5 Help. - If you successfully connect with the internal target you can do one of the following:
- Terminate the call (see Step 4).
- Put the call on hold, and then resume the call. The call status changes to On Hold when you put the call on hold, and then back to Connected when you resume the call.
- Use the keypad to send DTMF to the internal target.
- Start a voice or IM consultation.
- Conference the call (see Starting a Voice Conference).
- Transfer the call (see Transferring a Voice Call).
- For SIP-enabled agents, additional call actions are available:
- Record the call (see Record Interactions).
- Mute and unmute the call
- Adjust the microphone and speaker volumes
Tip- For information about how to use the functionality in the interaction window, see the Workspace 8.5 Help.
- For a demonstration of the various call timers, including Total Duration, Hold Duration, and Post Call (After Call Work) Duration that might be available for you to use, see the Call Timers section in the Workspace 8.5 Help. [Added: 8.5.111.21]
- When you have finished speaking with the internal target you can terminate the call or wait for the internal target to terminate the call.
- After a call is released, one or more of the following actions might be available to you, depending on your assigned role or the configuration of your system:
- Click Mark Done to close the Interaction window.
- Select a disposition (call outcome).
After a call has been released and you have completed any required post-call tasks, the Voice Interaction window closes.TipYour system might be configured so that you cannot click Mark Done until you have selected a disposition code. See Assigning Disposition Codes for more information about Disposition Codes.

If you want to terminate the call, click the End Call button. The call status changes to Ended, and the call is released (see the Voice Interaction window displaying status as Ended figure).

End
Lesson: Calling a contact
Purpose: To make a voice interaction with a contact. When you choose to call a contact, the Voice Interaction window is displayed. It enables you to view all the information that is necessary to handle a voice interaction with a contact.
The information that is contained in this view depends on your assigned role and the case information that is available about the contact.
Prerequisites
- You are logged in to Workspace (see Lesson: Logging in to Workspace).
- You have found the contact and have selected an External Voice Interaction (see Lesson: Using the Team Communicator feature to find a contact).
Start
- When you choose to call a contact (see Lesson: Using the Team Communicator feature to find a contact), the Voice Interaction window is displayed. The Status is Establishing. Wait for the contact to accept your invitation.
- If the contact accepts your invitation, the status in the Voice Interaction window changes to Connected (see the Voice Interaction window displaying status as Connected figure). You can now talk to the contact. If the contact rejects or fails to accept your invitation, the call status changes to Ended (see Step 1).
- If you connect with the contact successfully, you can do one of the following:
- Terminate the call (see Step 4).
- Put the call on hold and retrieve the call. The call status changes to On Hold, and then back to Connected when you retrieve the call.
- Use the keypad to send DTMF to the contact.
- Start a voice or IM consultation.
- Conference the call (see Starting a Voice Conference).
- Transfer the call (see Transferring a Voice Call).
- For SIP-enabled agents, additional call actions are available:
- Record the call (see Record Interactions).
- Mute and unmute the call.
- Adjust the microphone and speaker volumes.
Tip- For information about how to use the functionality in the interaction window, see the Workspace 8.5 Help.
- For a demonstration of the various call timers, including Total Duration, Hold Duration, and Post Call (After Call Work) Duration that might be available for you to use, see the Call Timers section in the Workspace 8.5 Help. [Added: 8.5.111.21]
- When you have finished talking to the contact you can terminate the call or wait for the contact to terminate the call. If you want to terminate the call, click the End Call button. The call status changes to Ended, and the call is released.
- After a call is released, one or more of the following actions might be available to you, depending on your assigned role:
- Click Mark Done to close the Interaction window.
- Select a disposition (call outcome).
After a call has been released and you have completed any required post-call tasks, the Voice Interaction window closes.TipYour system might be configured so that you cannot click Mark Done until you have selected a disposition code. See Assigning Disposition Codes for more information about Disposition Codes.

End
Lesson: Directly dialing a contact
Purpose: To make a voice interaction with a contact by directly dialing a phone number.
When you choose to call a contact, the Voice Interaction window is displayed. It enables you to view all the information that is necessary to handle a voice interaction with a contact.
The information that is contained in this view depends on your assigned role and the case information that is available about the contact.
Prerequisites
- You are logged in to Workspace (see Lesson: Logging in to Workspace).
- You have the number of the party that you want to call.
- You have found the contact and have selected an External Voice Interaction (see Lesson: Using the Team Communicator feature to find a contact).
Start
- In the Main Window or an interaction window, click in the Team Communicator Quick Search field (see the Main Window Team Communicator control and Quick Search field figure).
- Enter the telephone number that you want to directly dial (see the Team Communicator displaying a directly dialed number figure).
As you enter text, Workspace searches the internal and contact database and lists potential matches (see the Team Communicator displaying an unknown directly dialed number figure).
- To dial the number, click the phone icon that is next to the number that you entered in the Action menu. If the party is reached, the Voice Interaction window is displayed (see the Voice Interaction window for a directly dialed call figure).
- Handle and complete your call (see Lesson: Calling a contact).


End
Handling a Voice Call with Video
Calls that originate from smart phones, tablets, and computers might also contain a video stream sent from the webcam of the device. If you are the selected internal target for an inbound voice with video interaction, you receive a notice on your workstation desktop. You can decide to accept or reject the interaction. If you accept it (answer it), the interaction window is displayed. The interaction window contains information about the call and the controls that you need to complete the interaction.
Lesson: Handling an inbound voice interaction with video
Purpose: To handle an inbound voice with video interaction properly.
Prerequisites
- You are logged in to Workspace (see Getting Started).
- Your status is Ready for the voice-media channel (see Lesson: Going Ready in the Workspace Main window).
- You are enabled to receive voice and video interactions.
- You are the internal target for the inbound interaction.
Start
- A preview of the inbound interaction is displayed on your workstation desktop in an interactive-notification view (see the Voice and Video Interaction Preview interactive notification figure). The Interaction Preview contains a summary of call information, including contact information and call metrics. The Interaction Preview might also contain Case Information, which is part of the case data regarding the call.
- You can choose to accept or reject the interaction in the Interaction Preview by performing one of the followings steps:
- Click Accept to answer the interaction.
- Click Reject to return the interaction to the queue.
- Do nothing. The interaction will time-out and be redirected.
- If you accept the interaction, the Voice Interaction view is displayed in the interaction bar (see the Voice and Video Interaction view figure). Refer to Receiving a Voice Interaction for more information about handling a voice interaction and using the voice controls.
- If the video stream that is associated with the call is not configured to open automatically, click Start Video:
 .
.
The video view is displayed in a separate window. Use the following controls during a voice and video call: /
/ — Click to start or stop your video stream component of a video-enabled voice call. Use this feature to prevent the contact from seeing the video stream from your webcam; you will continue to see the video stream from the contact. This has no effect on the voice call. The video stream sends a message to your contact that says "On Hold". If you put the voice call on hold, the video call is also put on hold.
 — Put the call on hold and retrieve the call. The call status changes to On Hold, and then back to Connected when you retrieve the call. When you put the call on hold, the video stream is also put on hold. You and the contact can no longer see each other's video streams. A "Video on Hold" video message is displayed to the contact.
 /
/ — Click to show or hide in the Video Interaction window the thumbnail view of your video stream.
 — Click to toggle the view of the Video Interaction window between the inbound video stream and the video stream from your webcam.
You can resize or maximize the Video Interaction window by clicking and dragging the edges of the window. Workspace remembers the size and position of the last Video Interaction window that you used.
Click Stop Video:
 to close the Video Interaction window. This does not end the call, it only stops the video stream from being displayed and stops sending your video stream to the contact.
- When the interaction is complete, either you or the contact can end the call. If you want to terminate the call, click the End Call button. When you end the voice call, the video stream will also end and the Video Interaction window is closed.
- If required by your configuration, specify a disposition code that qualifies the outcome of the interaction by selecting an outcome from the disposition code drop-down list or radio button list in the Disposition Code view (see Assigning Disposition Codes).
- Click Mark Done.
- If the Voice Interaction window does not close automatically, close the Voice Interaction window after you have clicked Mark Done for each of the active interactions.
- Complete your after-call work.


End