Handle Outbound-Campaign Voice Interactions
[Modified: 8.5.115.17, 8.5.145.06]
In this lesson, you will learn how to handle an outbound-campaign voice interaction by using Workspace. This lesson contains the following sections:
Outbound Campaigns
As an agent, you might be working on calling campaigns (for example: collections, telemarketing, or fund raising) in which the contact interactions are outbound voice calls that are based on calling a predetermined list of contacts.
There are two delivery modes of outbound calls, manual and automatic. Your supervisor determines in which mode you will work.
In manual mode, you make outbound calls by requesting an interaction from a preset calling list. Manual delivery has one dialing mode:
- Preview—The system displays contact-related data to you, and then you make the call to the contact.
In automatic mode, outbound calls are directed to your desktop. Automatic delivery has three dialing modes:
- Push Preview—The system displays contact-related data to you, and then you make the call to the contact.
- Progressive—The system dials customer numbers automatically and transfers a call to you only if the connection was successfully established.
- Predictive—The system estimates the number of free agents on the basis of current statistics, and might start to dial before any agents are free.
Starting and Stopping an Outbound Campaign
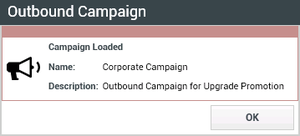
If your supervisor or someone else at your company loads into Genesys Outbound Contact Manager an Outbound Campaign to which you are assigned, you will receive a warning message that informs you that a specific campaign has begun and that you are assigned to that campaign (see the Outbound Campaign Loaded message box figure).
The message box contains information about the Outbound Campaign. Your administrator determines the content of the message box and the information that is provided to you.
Click OK to close the message box.
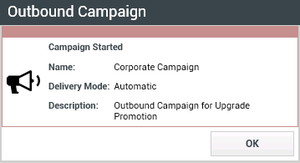
When the Outbound Campaign begins and outbound interactions are going to be directed to your desktop (or made available to you in the case of Preview campaigns), the Campaign Started message is displayed on your desktop (see the Outbound Campaign Started message box figure).
Click OK to close the message box.
When the Outbound Campaign ends and no more outbound interactions are going to be directed to your desktop, the Campaign Stopped message is displayed on your desktop (see the Outbound Campaign Stopped message box figure).
Click OK to close the message box.
When your administrator unloads the Outbound Campaign from Genesys Outbound Contact Manager, the Campaign Unloaded message box is displayed (see the Outbound Campaign Unloaded message box figure). You will no longer receive interactions from the unloaded campaign unless it is loaded and started again.
Click OK to close the message box.
Handling an Outbound-Campaign Voice Interaction
This section shows you how to handle interactions for the four types of Outbound Campaign that are supported by Workspace. The agent workflow for Predictive and Progressive campaigns are identical; only the timing of the arrival of the interaction on your desktop and the connection to the contact are different.
In Preview interactions (also called pull-preview), you must request the next contact record. In push-preview interactions you are given the opportunity to view the Outbound Campaign interaction and connect manually to the contact or send the record back to the calling list.
This section contains the following procedures:
- Lesson: Handling a predictive or progressive Outbound-Campaign voice interaction
- Lesson: Handling an ASM predictive or progressive Outbound-Campaign voice interaction
- Assured Connection calls
- Lesson: Handling a preview Outbound-Campaign voice interaction
- Lesson: Handling a push-preview Outbound-Campaign voice interaction
- Lesson: Rescheduling a call as a callback
Lesson: Handling a predictive or progressive Outbound-Campaign voice interaction
Purpose: To handle a predictive or progressive Outbound Campaign voice interaction properly.
Prerequisites
- You are logged in to Workspace (see Getting Started).
- You are not logged in to the Instant Messaging channel.
- Your status is Ready for the voice-media channel (see Lesson: Going Ready in the Workspace Main window).
- You are part of a predictive or progressive Outbound Campaign.
- You have been notified that the campaign is loaded and running (see Starting and Stopping an Outbound Campaign).
Start
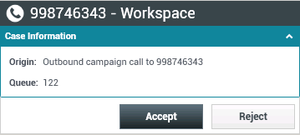
- Your hard phone or soft phone rings, and a preview of the outbound interaction is displayed on your workstation desktop in an interactive-notification view (see the Outbound Predictive/Progressive Voice Interaction Preview interactive notification figure).
The Interaction Preview contains a summary of call and campaign information. The Interaction Preview might also contain Case Information, which is part of the case data related to the call. Contact your system administrator for more information about the contents of this window.
TipIf you are using a screen reader, your system might be configured to give the focus to the Interaction Preview window. In this scenario, your screen reader will automatically read the window title to you. Navigate to the content area to have your screen reader read the Interaction Preview content. However, if your system is not configured to give the focus to the Interaction Preview window, to have your screen reader read the contents of the Interaction Preview window, you must use screen navigation to give the focus to the Interaction Preview. (Added: 8.5.101.14) - You can choose to accept or reject the interaction in the Interaction Preview by performing one of the followings steps:
- Click Accept to call the contact.
- Click Reject to return the interaction to the queue.
- Do nothing. The interaction will time out and be redirected.
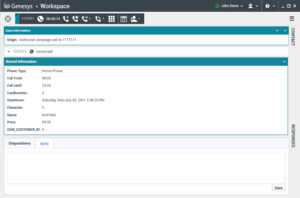
- If you accept the interaction, the call is connected in your hard phone or soft phone, and the Outbound Voice Interaction window is displayed (see the Predictive/Progressive Outbound Campaign Voice Interaction window figure).
You can use the Outbound Campaign Voice Interaction window to do the following:
- View contact records (see Lesson: Finding and viewing an interaction in the contact database).
- View contact history (see Managing Contact History).
- Set a call result and a disposition code, or add the contact to the Do Not Call list (see Step 5).
- Use the Note to add information about the interaction to the interaction history (see Managing Contact History).
- View and edit the Case Information—Summary information about the campaign. It might contain the name of the campaign, a description of the campaign, the phone number of the contact, and so on.
- View and edit the Record Information—Specific information about the record. It might contain a range of time for which the contact has indicated availability, the name of the contact, or information about the nature of the call.
- View and read responses (see Lesson: Using The Standard Response Library).
- Terminate the call (see Step 4).
- Put the call on hold and retrieve the call. The call status changes to On Hold, and then back to Connected when you retrieve the call.
- Use the keypad to send DTMF to the contact.
- Start a voice consultation (see Starting a Voice Consultation).
- Transfer the call (see Transferring a Voice Call).
Important
- When you transfer an ASM call, the outbound record is also transferred. The ownership of the record might also be transferred to the target agent, depending on how your system is set up.
- You might have to set a call result or disposition before you complete a transfer or a conference to another agent, for example to a back office worker. If you forget, an error message is displayed and you are prevented from transferring the call unless you set the call result. After this action, the Call Result and Record Information becomes read-only. [Added: 8.5.117.18]
- Reschedule a call as a callback (see Lesson: Rescheduling a call as a callback).
Note: For information about how to use the functionality in the interaction window, see the Workspace 8.5 Help.
- When the interaction is complete, either you or the contact can end the call. If you want to terminate the call, click the End Call button.
- If required by your configuration, specify a call result and/or a disposition code that qualifies the outcome of the interaction.
- Click the Dispositions tab to make it active.
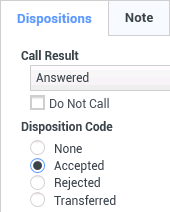
- (Optional) In the Call Result drop-down list, select a call result (see the Outbound Campaign Interaction window Call Result drop-down list figure).
- (Optional) Select an outcome from the Disposition Code drop-down list or radio-button list in the Disposition Code view (see the Outbound Campaign Interaction window Call Result and Disposition Code views figure and also Assigning Disposition Codes).
- (Optional) If the contact requests to be put on the Do Not Call list, select Do Not Call in the Call Result view (see the Outbound Campaign Interaction window Call Result and Disposition Code views figure).
- Click Mark Done. This step might be performed for you automatically when you end the call or set a disposition code.
- If the Voice Interaction window does not close automatically, close the Voice Interaction window after you have clicked Mark Done for each of the active interactions.
- Complete your after-call work.
- Set your status on the Voice channel to Ready to receive the next call.
End
Next Steps
- Set your status to Ready. See Lesson: Going Ready in the Workspace Main window.
Lesson: Handling an ASM predictive or progressive Outbound-Campaign voice interaction
Purpose: To handle an ASM predictive or progressive Outbound Campaign voice interaction properly.
Prerequisites
- You are logged in to Workspace (see Getting Started).
- You are not logged in to the Instant Messaging channel.
- Your status is Ready for the voice-media channel (see Lesson: Going Ready in the Workspace Main window).
- You are part of an ASM predictive or progressive Outbound Campaign.
- You have been notified that the campaign is loaded and running (see Starting and Stopping an Outbound Campaign).
Start
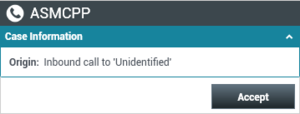
- Your hard phone or soft phone rings, and a preview of the outbound interaction is displayed on your workstation desktop in an interactive-notification view (see the Outbound ASM mode Predictive/Progressive Voice Interaction Preview interactive notification figure).
The Interaction Preview contains a summary of call and campaign information. The Interaction Preview might also contain Case Information, which is part of the case data related to the call. Contact your system administrator for more information about the contents of this window.
TipIf you are using a screen reader, your system might be configured to give the focus to the Interaction Preview window. In this scenario, your screen reader will automatically read the window title to you. Navigate to the content area to have your screen reader read the Interaction Preview content. However, if your system is not configured to give the focus to the Interaction Preview window, to have your screen reader read the contents of the Interaction Preview window, you must use screen navigation to give the focus to the Interaction Preview. (Added: 8.5.101.14) - You can choose to accept or redirect the interaction in the Interaction Preview by performing one of the followings steps:
- Click Accept to call the contact.
- Do nothing. The interaction will time out and be redirected.
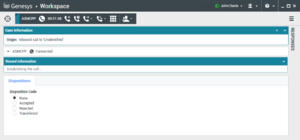
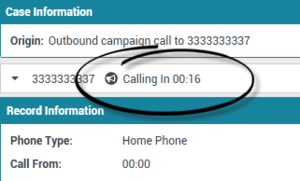
- If you accept the interaction, the Outbound ASM voice-interaction window is displayed (see the Outbound ASM Voice Interaction Window in Establishing state figure). The call is in Establishing state, which means that the call is not yet connected to the contact. However, you are connected to the call and are reserved for the call.
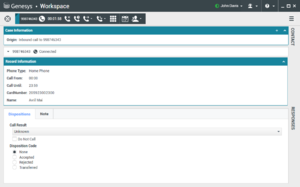
- As soon as the contact answers you are connected to the contact. The call is connected in your hard phone or soft phone, and the Outbound Voice Interaction window is displayed (see the Predictive/Progressive Outbound ASM Campaign Voice Interaction window figure).
You can use the Outbound Campaign Voice Interaction window to do the following:
- View contact records (see Lesson: Finding and viewing an interaction in the contact database).
- View contact history (see Managing Contact History).
- Set a call result and a disposition code, or add the contact to the Do Not Call list (see Step 5).
- Use the Note to add information about the interaction to the interaction history (see Managing Contact History).
- View and edit the Case Information—Summary information about the campaign. It might contain the name of the campaign, a description of the campaign, the phone number of the contact, and so on.
- View and edit the Record Information—Specific information about the record. It might contain a range of time for which the contact has indicated availability, the name of the contact, or information about the nature of the call.
- View and read responses (see Lesson: Using The Standard Response Library).
- Terminate the call (see Step 4).
- Put the call on hold and retrieve the call. The call status changes to On Hold, and then back to Connected when you retrieve the call.
- Use the keypad to send DTMF to the contact.
- Start a voice consultation (see Starting a Voice Consultation).
- Transfer the call (see Transferring a Voice Call).
Important
- When you transfer an ASM call, the outbound record is also transferred. The ownership of the record might also be transferred to the target agent, depending on how your system is set up.
- You might have to set a call result or disposition before you complete a transfer or a conference to another agent, for example to a back office worker. If you forget, an error message is displayed and you are prevented from transferring the call unless you set the call result. After this action, the Call Result and Record Information becomes read-only. [Added: 8.5.117.18]
- Reschedule a call as a callback (see Lesson: Rescheduling a call as a callback).
Note: For information about how to use the functionality in the interaction window, see the Workspace 8.5 Help.
- When the interaction is complete, either you or the contact can end the call. If you want to terminate the call, click the End Call button.
- If required by your configuration, specify a call result and/or a disposition code that qualifies the outcome of the interaction.
- Click the Dispositions tab to make it active.
- (Optional) In the Call Result drop-down list, select a call result (see the Outbound Campaign Interaction window Call Result drop-down list figure).
- (Optional) Select an outcome from the Disposition Code drop-down list or radio-button list in the Disposition Code view (see the Outbound Campaign Interaction window Call Result and Disposition Code views figure and also Assigning Disposition Codes).
- (Optional) If the contact requests to be put on the Do Not Call list, select Do Not Call in the Call Result view (see the Outbound Campaign Interaction window Call Result and Disposition Code views figure).
- Click Mark Done. This step might be performed for you automatically when you end the call or set a disposition code.
- If the Voice Interaction window does not close automatically, close the Voice Interaction window after you have clicked Mark Done for each of the active interactions.
- Complete your after-call work.
- Set your status on the Voice channel to Ready to receive the next call.
End
Assured Connection calls
Some Progressive and Predictive campaigns use Assured Connection mode to reserve an agent before the call is connected to a contact. Reserving an agent ensures that there is no delay for a contact when he or she answers the call. This mode is typically used for VIP or high-value customers in a calling list.
In Assured Connection mode, you are called by the campaign before the contact is dialed. This is known as the Engaging Phase. When you Accept an Assured Connection call, the interaction is displayed on your desktop and the status is Connected. During the Engaging Phase you hear call waiting music to let you know that the call is engaged.
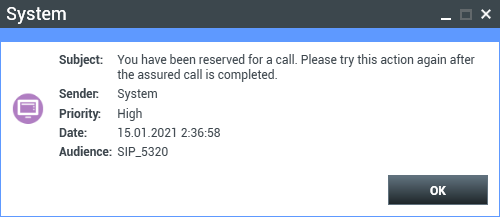
If you are reserved for a call, you are restricted from performing certain tasks, including logging off the Voice channel, starting a new call, and exiting Workspace. If you attempt to perform certain actions during the Engaging phase, you might see a message like this one:
Once you are connected to your contact, you handle the call as a normal Outbound Campaign call.Lesson: Handling a preview Outbound-Campaign voice interaction
[Modified: 8.5.115.17]
Purpose: To handle a preview Outbound-Campaign voice interaction properly.
Prerequisites
- You are logged in to Workspace (see Getting Started).
- You are not logged in to the Instant Messaging channel.
- You are part of a preview Outbound Campaign.
- You have been notified that the campaign is loaded and running (see Starting and Stopping an Outbound Campaign).
Start
- When a Preview Outbound Campaign is started, you are notified by an interactive message (see the Outbound Campaign Started message box for Preview mode campaigns figure).
Perform one of the following steps:- Click Get Record to retrieve and preview the next available campaign record (see Step 6).
- Click OK to close the message box (see Step 2).
- Do nothing. The message box closes after a specified time interval (see Step 2).
- When you are ready to get a contact record, open your Workspace view (refer to the Workspace 8.5 Help to learn about how to display your Workspace view from the Main Window).
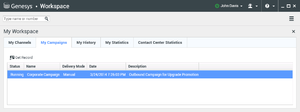
- Select the My Campaigns view (see the My Campaigns view in the Main Window figure).
- Select the Preview campaign to which you are assigned (see the My Campaigns view in the Main Window figure).
- Click Get Record.
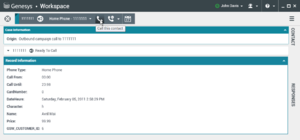
- A preview of the outbound interaction is displayed on your workstation desktop (see the Outbound Preview Voice Interaction Preview window figure).
The Interaction Preview contains a summary of call and campaign information. The Interaction Preview might also contain Case Information, which is part of the case data related to the call. Contact your system administrator for more information about the contents of this window.
[+] Show: Auto-dial and timed auto-dial
- If your account is not configured for auto-dial, you can choose to do any of the following:
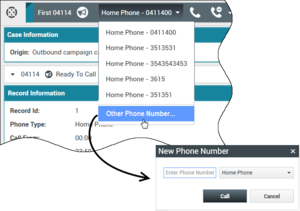
- Change the contact phone number—Click the phone number, and select a new one from the drop-down list or choose Other Phone Number ([Added: 8.5.115.17]) if this feature is available in your environment to open the New Phone Number dialog box.
If you have to change the phone number and the number you want to call is not part of the phone number selection menu, do the following:
- Select Other Phone Number to open the New Phone Number dialog box. If your account is configured for timed auto-dial, the timer pauses until you click Call or Cancel.
- Enter the new phone number.
- Select a phone number type.
- Click Call to call the contact or Cancel to close the New Phone Number dialog box without dialing a new number.
[Added: 8.5.115.17]
- Call the contact—Click Call to display the Outbound Campaign Voice Interaction window (see Step 8).
- Decline the call—Click the Decline button and choose either to send the record back into the queue by selecting Call this contact later or to cancel the record by selecting Do not call this contact for this campaign.
- Change the contact phone number—Click the phone number, and select a new one from the drop-down list or choose Other Phone Number ([Added: 8.5.115.17]) if this feature is available in your environment to open the New Phone Number dialog box.
If you have to change the phone number and the number you want to call is not part of the phone number selection menu, do the following:
- If you choose to call the contact, the call is connected in your hard phone or soft phone, and the Outbound Voice Interaction window is displayed (see the Outbound Campaign Voice Interaction window figure).
You can use the Outbound Campaign Voice Interaction window to do the following:
- Set a call result and a disposition code, or add the contact to the Do Not Call list (see Step 10).
- View and edit the Case Information—Summary information about the campaign. It might contain the name of the campaign, a description of the campaign, the phone number of the contact, and so on.
- View and edit the Record Information—Specific information about the record. It might contain a range of time for which the contact has indicated availability, the name of the contact, or information about the nature of the call.
- View and read responses (see Lesson: Using The Standard Response Library).
- Terminate the call (see Step 9).
- Put the call on hold and retrieve the call. The call status changes to On Hold, and then back to Connected when you retrieve the call.
- Use the keypad to send DTMF to the contact.
- Start a voice consultation (see Starting a Voice Consultation).
- Transfer the call (see Transferring a Voice Call).
Important
- When you transfer an ASM call, the outbound record is also transferred. The ownership of the record might also be transferred to the target agent, depending on how your system is set up.
- You might have to set a call result or disposition before you complete a transfer or a conference to another agent, for example to a back office worker. If you forget, an error message is displayed and you are prevented from transferring the call unless you set the call result. After this action, the Call Result and Record Information becomes read-only. [Added: 8.5.117.18]
- Conference the call (see Starting a Voice Conference).
Important
You might have to set a call result or disposition before you transfer or conference a call to another agent, for example to a back office worker. If you forget, an error message is displayed and you are prevented from transferring the call unless you set the call result. After this action, the Call Result and Record Information becomes read-only. [Added: 8.5.117.18]
- Reschedule a call as a callback (see Lesson: Rescheduling a call as a callback).
Note: For information about how to use the functionality in the interaction window, see the Workspace 8.5 Help.
- When the interaction is complete, either you or the contact can end the call. If you want to terminate the call, click the End Call button.
- If required by your configuration, specify a call result and/or a disposition code that qualifies the outcome of the interaction.
- Click the Dispositions tab to make it active.
- (Optional) In the Call Result drop-down list, select a call result (see the Outbound Campaign Interaction window Call Result drop-down list figure).
- (Optional) Select an outcome from the Disposition Code drop-down list or radio-button list in the Disposition Code view (see the Outbound Campaign Interaction window Call Result and Disposition Code views figure and also Assigning Disposition Codes).
- (Optional) If the contact requests to be put on the Do Not Call list, select Do Not Call in the Call Result view (see the Outbound Campaign Interaction window Call Result and Disposition Code views figure).
- Click Mark Done. This step might be performed for you automatically when you end the call or set a disposition code. The Done button contains a drop-down list that you can use to do the following:
- Click Done to mark the interaction as Done, and to get the next record from the campaign calling list.
- Click Done and Stop to mark the interaction as Done, and not have another record open automatically. To get a new record, see Step 2.
- Click Done to mark the interaction as Done, and to get the next record from the campaign calling list.
- If the Voice Interaction window does not close automatically, close the Voice Interaction window after you have clicked Mark Done for each of the active interactions.
- Complete your after-call work.
End
Next Steps
- Set your status to Ready. See Lesson: Going Ready in the Workspace Main window.
Lesson: Handling a push-preview Outbound-Campaign voice interaction
Purpose: To handle a push-preview Outbound Campaign voice interaction properly.
Prerequisites
- You are logged in to Workspace (see Getting Started).
- You are not logged in to the Instant Messaging channel.
- Your status is Ready for the voice-media channel (see Lesson: Going Ready in the Workspace Main window).
- You are part of a push-preview Outbound Campaign.
- You have been notified that the campaign is loaded and running (see Starting and Stopping an Outbound Campaign).
Start
- Your hard phone or soft phone rings, and a preview of the outbound interaction is displayed on your workstation desktop in an interactive-notification view (see the Outbound Push-Preview Voice Interaction Preview interactive notification figure).
The Interaction Preview contains a summary of call and campaign information. The Interaction Preview might also contain Case Information, which is part of the case data related to the call. Contact your system administrator for more information about the contents of this window.
TipIf you are using a screen reader, your system might be configured to give the focus to the Interaction Preview window. In this scenario, your screen reader will automatically read the window title to you. Navigate to the content area to have your screen reader read the Interaction Preview content. However, if your system is not configured to give the focus to the Interaction Preview window, to have your screen reader read the contents of the Interaction Preview window, you must use screen navigation to give the focus to the Interaction Preview. (Added: 8.5.101.14)If your account is set up for auto-answer, the Interaction Preview is not displayed and the call is answered automatically unless your account is set up to enable you to preview the case information before the interaction is auto-answered. In this case, when you receive an auto-answer interaction, the Interaction Preview is displayed on your desktop. A timer that counts down the number of seconds until you are connected to the contact is displayed in the Accept button (refer to the following figure). You can click Accept before the timer runs out or wait for the timer to run out. The Reject button might also be displayed if your administrator wants you to have the option of rejecting an interaction before it is auto-answered.[Added: 8.5.105.12]

- You can choose to accept or reject the interaction in the Interaction Preview by performing one of the followings steps:
- Click Accept to call the contact.
- Click Reject to return the interaction to the queue.
- Do nothing. The interaction will time out and be redirected.
- If you accept the interaction, a preview of the outbound interaction is displayed on your workstation desktop (see the Outbound Preview Voice Interaction Push-Preview window figure).
The Interaction Preview contains a summary of call and campaign information. The Interaction Preview might also contain Case Information, which is part of the case data related to the call. Contact your system administrator for more information about the contents of this window.
[+] Show: Auto-dial and timed auto-dial
- You can choose to do any of the following:
- Change the contact phone number—Click the phone number and select a new one from the drop-down list.
- Call the contact—Click Call to display the Outbound Campaign Voice Interaction window (see Step 5).
- Decline the record—Click the Decline button and choose either to send the record back into the queue by selecting Call this contact later or to cancel the record by selecting Do not call this contact for this campaign.
- Click Done to get the next record from the campaign calling list.
- View contact records (see Lesson: Finding and viewing an interaction in the contact database).
- View contact history (see Managing Contact History).
- If you choose to call the contact, the call is connected in your hard phone or soft phone, and the Outbound Voice Interaction window is displayed (see the Push-Preview Outbound Campaign Voice Interaction window figure).
You can use the Outbound Campaign Voice Interaction window to do the following:
- View contact records (see Lesson: Finding and viewing an interaction in the contact database).
- View contact history (see Managing Contact History).
- Set a call result and a disposition code, or add the contact to the Do Not Call list (see Step 7).
- Use the Note to add information about the interaction to the interaction history (see Managing Contact History).
- View and edit the Case Information—Summary information about the campaign. It might contain the name of the campaign, a description of the campaign, the phone number of the contact, and so on.
- View and edit the Record Information—Specific information about the record. It might contain a range of time for which the contact has indicated availability, the name of the contact, or information about the nature of the call.
- View and read responses (see Lesson: Using The Standard Response Library).
- Terminate the call (see Step 6).
- Put the call on hold and retrieve the call. The call status changes to On Hold and then back to Connected when you retrieve the call.
- Use the keypad to send DTMF to the contact.
- Start a voice consultation (see Starting a Voice Consultation).
- Transfer the call (see Transferring a Voice Call).
Important
- When you transfer an ASM call, the outbound record is also transferred. The ownership of the record might also be transferred to the target agent, depending on how your system is set up.
- You might have to set a call result or disposition before you complete a transfer or a conference to another agent, for example to a back office worker. If you forget, an error message is displayed and you are prevented from transferring the call unless you set the call result. After this action, the Call Result and Record Information becomes read-only. [Added: 8.5.117.18]
- Conference the call (see Starting a Voice Conference).
Important
You might have to set a call result or disposition before you transfer or conference a call to another agent, for example to a back office worker. If you forget, an error message is displayed and you are prevented from transferring the call unless you set the call result. After this action, the Call Result and Record Information becomes read-only. [Added: 8.5.117.18]
- Reschedule a call as a callback (see Lesson: Rescheduling a call as a callback).
Note: For information about how to use the functionality in the interaction window, see the Workspace 8.5 Help.
- When the interaction is complete, either you or the contact can end the call. If you want to terminate the call, click the End Call button.
- If required by your configuration, specify a call result and/or a disposition code that qualifies the outcome of the interaction.
- Click the Dispositions tab to make it active.
- (Optional) In the Call Result drop-down list, select a call result (see the Outbound Campaign Interaction window Call Result drop-down list figure).
- (Optional) Select an outcome from the Disposition Code drop-down list or radio-button list in the Disposition Code view (see the Outbound Campaign Interaction window Call Result and Disposition Code views figure and also Assigning Disposition Codes).
- (Optional) If the contact requests to be put on the Do Not Call list, select Do Not Call in the Call Result view (see the Outbound Campaign Interaction window Call Result and Disposition Code views figure).
- Click Mark Done. This step might be performed for you automatically when you end the call or set a disposition code.
- If the Voice Interaction window does not close automatically, close the Voice Interaction window after you have clicked Mark Done for each of the active interactions.
- Complete your after-call work.
- Set your status on the Voice channel to Ready to receive the next call.
End Next Steps
- Set your status to Ready. See Lesson: Going Ready in the Workspace Main window.
Lesson: Rescheduling a call as a callback
Purpose: To reschedule an Outbound-Campaign voice interaction for a different date and/or time and/or phone number.
Prerequisites
- You have an active Outbound Campaign interaction that you want to reschedule for a different date and/or time.
Start
- You can reschedule an Outbound-Campaign call (for example, if the contact is too busy to respond now) to a different date and/or time by using the Reschedule a Callback function.
In the Outbound Campaign voice interaction window, in the call-action toolbar, click Reschedule a Callback (
 ).
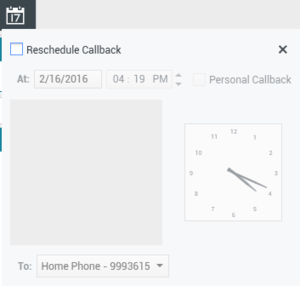
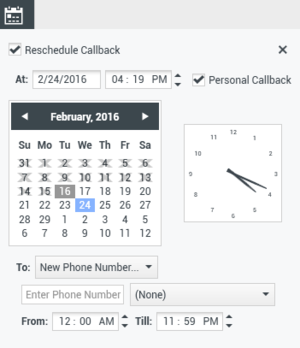
The Reschedule Callback view is displayed (see the Reschedule Callback view figure).
- Click the Schedule Callback check box to reschedule the call.
- To set a new date, perform one of the following steps:
- Enter a new date in the date field.
- Click a new day in the calendar view. Use the left and right arrow buttons to change the month and year.
- To set a new time, perform one of the following steps:
- Enter a new time in the time field.
- Click the up and down arrows to change the hours and minutes.
- To reschedule the call from you personally, click Personal Callback. Leave the Personal Callback check box clear to send the interaction back to the calling queue. [Modified: 8.5.115.17]
- In some environments, all rescheduled calls are personal callbacks. In this case, you will not be able to change the selection.
- In some environments, all rescheduled calls are campaign callbacks (any active agent in the campaign can make the callback). In this case, the Personal Callback check box is not displayed.
- To select a new number for the contact, click the Phone drop-down list and choose a different number.
- To add a new number that is to be used for the callback call, click the To drop-down list and select New phone number. The New Phone Number view is displayed (see the New phone number controls in the Reschedule Callback view figure).
- Enter a new number in the Number field.
- Select a type of number from the Type drop-down list.
- Specify a From time and an Until time in the respective From and Till time displays. These values constrain the time during which the new number is available to accept a callback.
- After you have specified a new date and/or time and, if necessary, a new number, the Reschedule Callback button changes to the Callback Scheduled button (
 ).
Click End Call to disconnect the call.
 - Click Mark Done to reschedule the callback.
End

