
Handle A Chat Interaction
[Modified: 8.5.115.17, 8.5.113.11, 8.5.128.07, 8.5.142.05]
In this lesson, you will learn how to handle inbound chat interactions, and how to check the spelling of your chat messages before you send them.

This lesson contains the following sections:
- Receiving and Handling an Inbound Chat Interaction
- Spelling Check
- Handling a chat interaction that includes chat bot Rich Media
- How do I continue a chat interaction?
Why is the Chat Interaction bar flashing? While your are handling a chat interaction, sometimes you change your focus to another interaction, such as a chat with a different contact, a phone call, or an email, or you might start using another application and its windows block the Workspace windows. [Added: 8.5.113.11]
In these situations you might notice that the Chat Interaction bar in the Interaction Bar begins to flash yellow and that the Workspace icon in the task bar also flashes yellow.
This flashing notifies you that something has changed. Here are some of the reasons that the chat interaction might flash in the Interaction Bar:
- The pending response has reached the warning stage.
- Another agent has joined or left the chat (such as your supervisor or someone involved in a consultation).
- The contact has left the chat.
- The chat session is about to timeout due to inactivity by you and your contact.
- The chat session has timed out due to inactivity by you and your contact.
- The chat session is about to close because the contact has disconnected. Your administrator might specify that chat interactions close automatically after a contact disconnects. They might also specify a timer before the chat closes to let you finish after call work. Once a chat closes, you cannot add a disposition or a note. [Added: 8.5.128.07]
Receiving and Handling an Inbound Chat Interaction
If you are the selected internal target for an inbound chat interaction, you receive a notice on your workstation desktop. You can decide to accept or reject the interaction. If you accept it, the Chat Interaction window is displayed. The Chat Interaction window contains information about the interaction and the controls that you need to complete the interaction.
Lesson: Handling an inbound chat interaction
[Modified: 8.5.115.17, 8.5.121.03]
Purpose: To handle an inbound chat interaction properly.
Prerequisites
- You are logged in to Workspace (see Lesson: Logging in to Workspace).
- Your status is Ready for the chat-media channel (see Lession: Going Ready in the Workspace Main window).
- You are the internal target for the inbound interaction.
Start
- A preview of the inbound interaction is displayed on your workstation desktop in an interactive-notification view (see the Chat Interaction interactive notification figure).
The Interaction Preview contains a summary of information that pertains to the interaction, including contact information and interaction-type. The Interaction Preview might also contain Case Information, which is part of the case data about the interaction.
TipIf you are using a screen reader, your system might be configured to give the focus to the Interaction Preview window. In this scenario, your screen reader will automatically read the window title to you. Navigate to the content area to have your screen reader read the Interaction Preview content. However, if your system is not configured to give the focus to the Interaction Preview window, to have your screen reader read the contents of the Interaction Preview window, you must use screen navigation to give the focus to the Interaction Preview. (Added: 8.5.101.14)If your account is configured for auto-answer, the Interaction Preview is not displayed and the chat is answered automatically unless your account is configured to enable you to preview the case information before the interaction is auto-answered. In this case, when you receive an auto-answer interaction, the Interaction Preview is displayed on your desktop. A timer that counts down the number of seconds until you are connected to the contact is displayed in the Accept button (refer to the following figure). You can click Accept before the timer runs out or wait for the timer to run out. The Reject button might also be displayed if your administrator wants you to have the option of rejecting an interaction before it is auto-answered.[Added: 8.5.105.12]

- You can choose to accept or reject the interaction in the Interaction Preview by performing one of the followings steps:
- Click Accept to display the interaction.
- Click Reject to return the interaction to the queue.
- Do nothing. The interaction will time-out and be redirected.
- If you accept the interaction, the inbound Chat Interaction window is displayed (see the Chat Interaction window figure).
The Inbound Chat Interaction window provides the following functionality:
- Read messages from the contact in the transcript area of the Chat Interaction window.
- Compose a message/response.
- Check the spelling of your message/response (see Lesson: Using Spelling Check to find potentially misspelled words in a chat message).
- Send a message/response.
- Select, verify, and send a URL (see the Workspace 8.5 Help).
TipSometimes URLs (links to websites) are sent to you by a contact. URLs in the Chat transcript are always displayed as the actual address. Contacts cannot send you a disguised URL in an attempt to direct you to a malicious website. You will be able to read the URL before clicking on it. If you hover your mouse pointer over the URL, a tooltip is displayed that lets you see the address. - To begin interacting with your contact, enter a message in the message area, and then click Send.
Your message is displayed to the contact in the chat interface that the contact is using to communicate with you. Your message is also added to the transcript area of the Chat Interaction window. You might see a small circle in the bottom right of your message in the transcript. When the circle disappears, you know that your message has been read by the contact.

Your system administrator configures how your name appears to your contacts. It might be your real name, your user name, or a nickname.
When your contact is typing in their chat interface, a small notice appears next to the contact's name in the chat transcript to notify you that they are typing. Your system might be configured to let you see what the contact is entering before they send it (see the following figure). [Modified: 8.5.108.11]
Be careful not to respond to what the contact is typing before they have sent it to you!
Sometimes while you are chatting with a contact, you want to view earlier chat interactions with the contact, particularly if you are working on an ongoing issue with the contact. For example, sometimes a contact might disconnect from a chat interaction because the chat timed out or they lost connection on their device before the session was complete. When they reconnect, it is important to have the earlier session for reference so that you do not ask for information that they have already provided.
You can access the entire history of interactions with a contact by clicking the History tab in the Contact view of the interaction window; see: Lesson: Finding and viewing an interaction in the contact view of the Interaction window.
Your account might be configured so that older chat interactions with the contact are displayed, in chronological order, directly above the current chat interaction. If your account is set up for this feature, in the transcript you will see text above the current chat session indicating where the current chat begins and a message informing you that to see older chat sessions you must scroll up. It might take a few seconds for older chat sessions to load and be displayed in the chat transcript. [Added: 8.5.122.08]
When you scroll up, each older chat session is divided by a day, for example Yesterday or November 29, to make it easier for you to find a specific session.
Once all the older chat sessions have loaded a notice is displayed informing you from how long ago older chat sessions are available.
- Your account might be set up to let you send emojis (emoticons or 'smileys') to your contact as part of the text of a chat interaction. Emojis are little faces and other symbols that you can use to let your contact know how you are feeling or to help them to know when something is good, funny, bad, or sad. Ask your supervisor or administrator about when to use emojis.
To send an emoji do the following:
- Click the Choose an emoji button (
 ) that appears next to the Send button to display the menu of emojis that you can send.
 - Click an emoji to copy it to the message composition area.
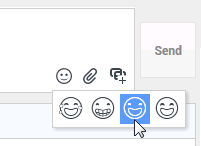
- Click Send.
[Added: 8.5.115.17]
- Click the Choose an emoji button (
- Messages that are sent by your contact are displayed together with your messages in the message transcript area (see the Chat Interaction window progress bar and message area figure).
When you receive a message from the contact, a small progress bar is displayed near the top of the Chat Interaction window, on the Chat icon. The progress bar expands from left to right. It begins as green, changes to yellow, and finally changes to red, to indicate that a response is expected from you. See the Workspace 8.5 Help for more information about the behavior of the Chat Interaction window.
While you are interacting with your contact, you can use the following functionality in the Chat Interaction window:- Use the Note to attach a note to the interaction history. See Managing Contact History.
- View and edit Case Information for the current interaction.
- Link to a web-page from a hyperlink in the Case Information view. The case information might contain a hyperlink to enable you to view a web-page that is related to the interaction, such as customer records. Click the hyperlink in the Case Information view to open a new browser window and view the link. Place your mouse pointer over the hyperlink to preview the web page from the Case Information view. The hyperlink might be a URL or highlighted anchor text.
- View and manage contact history. See Managing Contact History.
- View and manage contact information. See Lesson: Finding and viewing an interaction in the contact database.
- Your account might be configured to let you assign an interaction with an unknown contact to a known contact in the contact database by using the Manual Contact Assignment feature.
- View the Standard Response Library if you decide to call the sender instead of replying to the email. See Inserting a Standard Response into an Email Interaction
- Call the sender by clicking the Action menu drop-down list that is displayed next to the contact name.
- Your account might be set up to let you receive files, including PDFs, .doc, images, and other types, from your contact as an attachment to the chat interaction. The received file is displayed as a thumbnail or as an icon that corresponds to the file type in the chat transcript.
If there is a problem with the transferred file, you will see the following icon and tooltip. You might have to request that the sender check that they sent the correct file and then ask him or her to resend it.
You might be allowed to save file attachments to your workstation or network:
- Click the save button on the thumbnail/icon, or,
- Right-click to open the file attachment action menu and select Save As. If more than one file has been transferred, you can choose Save All to save all the files, including the files that you transferred.
You might be allowed to open file attachments in the appropriate application, for example: Paint.
- Double-click the thumbnail/icon to open the file in the default application, or,
- Right-click to open the file attachment action menu and select Open.
[Added: 8.5.115.17]
- Your account might be set up to let you send files, including PDFs, .doc, images, and other types, to your contact as an attachment to the chat interaction. There are two possible modes that might be enabled for this feature: From your workstation or network, and from the Responses tab.
- To attach a file to a chat from your workstation or network, perform the following steps:
- In the chat text composition field, Click
 Add Attachments.
Note: You can also drag and drop a file to the message composition area. - In the Open window, navigate to the file that you want to attach and select the file.
- Click Open. The file name appears below the chat text composition field with a paperclip icon next to it. You can click the file name to open a menu that lets you open and save the attachment.
- Click Send to transfer the file to your contact. The file appears as a thumbnail or as an icon that corresponds to the file type in the chat transcript, and is sent to your contact.
Note: If there is a problem with the transferred file, you will see the following icon and tooltip. Check that you sent the correct file and then resend it.
- In the chat text composition field, Click
- To attach a file to a chat from a standard response, perform the following steps:
- Open the Responses tab and navigate to the file that you want to transfer.
- Double-click a response that contains an attachment or click Insert Standard Response Text to add the file as an attachment.
Before or after you transfer the file, you might have the ability to open, save, save all, delete (remove from the list of files to send), delete all, or print the file. Click the file name to display the drop-down menu. - Click Send to transfer the file.
[Added: 8.5.115.17]
- To attach a file to a chat from your workstation or network, perform the following steps:
- If there are interactions in progress for the current contact, the number of interactions is displayed beside the connection status of the interaction (see the Dynamic Contact History Matrix, displaying the number and type of interactions in progress figure). Place your mouse pointer over the icon to display the number and type of interaction(s) in progress (except voice interactions) for the current contact.
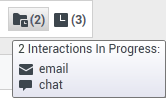
You might be configured to be notified if there are recent interactions for the current contact; if so, the number of recent interactions is displayed beside the connection status of the interaction (see the Recent interactions matrix displaying the list of interactions with the current contact within the last day figure). Place your mouse pointer over the icon to display the number and type of recent interactions for the current contact. If you click the icon, the Contact view is opened and the History tab is displayed. Your system administrator defines the contents as interactions during the last-specified number of days.

- If you want to transfer the interaction to another internal target or consult with another internal target about the interaction, you can perform the following functions:
- Instant Transfer the chat to another internal target. See Transferring a Chat Interaction.
- Start a consultation with another party:
- Start an Instant Messaging consultation. See Lesson: Initiating an Instant Messaging session.
- Start a Voice consultation. See Starting a Voice Conference.
- Start a Chat Consultation. See Starting or Receiving a Chat Consultation.
- When you are finished interacting with your contact, click End Chat to stop the current chat interaction.
After you or the contact has ended the chat session, you can perform the following functions:
- Select Mark Done for the current interaction. The transcript is saved in the contact history and the Chat Interaction window is closed.
- Set a disposition code. See Assigning Disposition Codes.


End
Spelling Check
You might be enabled to use the Spelling Check functionality. The Chat Interaction window has automatic spelling-check capabilities that enable you to correct misspelled words or add words to your personal dictionary.
Lesson: Using Spelling Check to find potentially misspelled words in a chat message
Purpose: To verify the spelling of the content of an outbound chat message.
Prerequisites
- You are logged in to Workspace (see Lesson: Logging in to Workspace).
- You have an active Chat interaction (see Receiving and Handling an Inbound Chat Interaction).
Start
- Begin entering text in the message area of a Chat Interaction window (see Lesson: Handling an inbound chat interaction). You can enter text by typing at the insertion point, pasting content from another document, or inserting a standard response (Lesson: Using The Standard Response Library).
- When Spelling Check is on, words in the message area that are not in the specified dictionary are underlined by a red, wavy line. The Chat message composition area, displaying a misspelled word that is underlined in red figure shows a chat message that contains a word that is not in the English (United States) dictionary (the default dictionary for this user). The misspelled word is happening, which is misspelled as happppening.
- You can correct the spelling by using one of two methods:
- Edit the word(s) manually.
- Right-click the word to display the Spelling Check menu.
- If you right-clicked the misspelled word to display the Spelling Check menu, you can do one of the following:
- Select the correct spelling from the list of suggestion (bold text).
- Ignore--Select to ignore this instance of the word that is not in the specified language dictionary.
- Ignore All--Select to ignore all instances of the word that is not in the specified language dictionary for this interaction only.
- Add to My Dictionary--Select to add the spelling to your personal dictionary (not your corporate dictionary).
- Spell Checking--Select to turn the Spelling Check functionality off or on.
- Languages--Select to open the list of available language dictionaries. You can select a different language dictionary.
- If you try to send a message that contains misspelled world, your system might be configured to display a warning dialog box that asks you to confirm that you want to send the message without correcting the potential misspelled words. Click Yes to send the message anyway, or click No to return to the message and correct the misspelled words. [Added: 8.5.105.12]


End
Handling a Chat interaction that includes chat bot Rich Media
[Added: 8.5.142.05] In some Genesys Environments chat bots might be used to automatically interact with your organization's contacts. Chat bots are programs that send information to contacts through a chat widget when a contact visits your organization's website. Chat bots often handle the initial exchange with a contact to determine whether or not the chat should be redirected to a live agent as a new Chat interaction. Chat bots might also participate in an active chat session. Chat bots can use Rich Media such as Quick Replies and Offer templates. Offer templates can include images or video organized as a list, a selection list, or a carousel. Offer templates might leverage Mark Down capabilities to enhance the appearance of the chat bot message.
Lesson: Handling a chat interaction that includes chat bot rich media
Purpose: To take over a conversation with a contact from a chat bot.
Prerequisites
- You are logged in to Workspace (see Lesson: Logging in to Workspace).
Start
- A chat interaction is directed to you from your organization's system. The chat transcript contains one or more messages exchanged between the contact and a chat bot. The transcript might include one of the following Rich Media types:
Rich Media might also be available for you to review in the Responses tab.
- Review the transcript. If the contact made a selection, such as one of the Quick Reply choices or one of the offers in a contact action Offer template, the selection is displayed to you below the Rich Media. You cannot interact with the Rich Media or make selections yourself. Use the transcript to know what the contact is looking for so that you do not have to repeat the questions that were asked by the chat bot.
- Continue to interaction with the contact according to the practices and requirements of your organization.
End
Quick Replies
Chat bots might present your contact with a set of "quick reply" buttons that let the contact choose a reply rather than typing a reply. The chat transcript will contain the standard question posed by the chat bot and the text of the quick reply button clicked by the contact. Click the thumbnail to see an example of what a quick reply might look like.

The bot presented the contact with three options for ordering tea, Black, Green, and Mint. The contact selected Black.
Contact actions
Chat bots can display descriptive text, pictures, videos, selection lists, and selection buttons, such as Buy now, to contacts. If your company uses offer/information templates to enable contact actions, such as clicking a button or selecting an item from a list, the chat transcript will contain the content that was presented to the contact along with text telling you what the contact did. For example, if the contact clicked the Buy now button, the transcript might say The contact clicked Buy now.
When a contact clicks on a button, list item, or other element, a corresponding action is executed. For example, additional information is displayed or an order placement is initiated. Often actions might send text back to the contact. All this information and the actions taken are displayed to you.
Click the thumbnail to see an example of what an offer/information template might look like and how a contact action is displayed.

The bot presented three different travel options with radio buttons to choose one. The contact chose Thailand.
If a carousel offer template was displayed to the contact, you will see forward and backward navigation buttons next to the templates that enable you to page back and forth through the displayed templates. This is called a carousel template because clicking the navigation buttons simulates flipping through a carousel of images or videos. Click the thumbnail to see an example of a carousel template.

In this example, the contact navigates through the carousel until they see an offer of interest. The buttons below the video of Norway enable the contact to either get more details about the offer or book the offer immediately.
Lists
Chat bots might present your contact with a list of items, such as sales offers, that the contact can review. Some lists are for information only, others might have selections set up by your administrator. The transcript will include the list that was displayed to the contact, including any images or other media, and any selections they might have made. Click the thumbnail to see an example of a list of items presented to a contact.

Markdown templates
Rich Media uses text markdown to enable your organization to format bot content. Click the thumbnail to see some of the different ways that text can be formatted for presentation to contacts.

This example shows a display image, headings, bold text, bulleted and numbered lists, hyperlinks, and an embedded image.
Rich Media in the Responses tab
All the different rich media types can also be viewed in the Responses tab if your administrator sets them up. You cannot transfer Rich Media from the Responses tab into the chat text field. They are view-only. Click the thumbnail to see an example of a carousel template in the Responses tab.

How do I continue a chat interaction?
- Some environments have asynchronous chat available. This feature keeps chats open after the last agent leaves the session, and the agent can rejoin the session until the session is marked Done. Here's how it works if it is available in your environment: