
Handle A Chat Interaction
Contents
In this lesson, you will learn how to handle inbound chat interactions, and how to check the spelling of your chat messages before you send them. This lesson contains the following sections:
Receiving and Handling an Inbound Chat Interaction
If you are the selected internal target for an inbound chat interaction, you receive a notice on your workstation desktop. You can decide to accept or reject the interaction. If you accept it, the Chat Interaction window is displayed. The Chat Interaction window contains information about the interaction and the controls that you need to complete the interaction.
Lesson: Handling an inbound chat interaction
- To handle an inbound chat interaction properly.
Prerequisites
- You are logged in to Interaction Workspace (see Lesson: Logging in to Interaction Workspace).
- Your status is Ready for the chat-media channel (see Lession: Going Ready in the Interaction Workspace Main window).
- You are the internal target for the inbound interaction.
Start
- A preview of the inbound interaction is displayed on your workstation desktop in an interactive-notification view (see the Chat Interaction interactive notification figure).
The Interaction Preview contains a summary of information that pertains to the interaction, including contact information and interaction-type. The Interaction Preview might also contain Case Information, which is part of the case data about the interaction.
 Chat Interaction interactive notification
 - You can choose to accept or reject the interaction in the Interaction Preview by performing one of the followings steps:
- Click Accept to display the interaction.
- Click Reject to return the interaction to the queue.
- Do nothing. The interaction will time-out and be redirected.
- If you accept the interaction, the inbound Chat Interaction window is displayed (see the Chat Interaction window figure).
The Inbound Chat Interaction window provides the following functionality:
- Compose a message/response.
- Check the spelling of your message/response (see Lesson: Using Spelling Check to find potentially misspelled words in a chat message).
- Send a message/response.
- Select, verify, and send a URL (see the Interaction Workspace 8.1 Help).
 Chat Interaction window
 - To begin interacting with your contact, enter a message in the message area, and then click Send. Your message is displayed to the contact in the chat interface that the contact is using to communicate with you. Your message is also added to the transcript area of the Chat Interaction window. Your system administrator configures how your name appears to your contacts. It might be your real name, your user name, or a nickname.
- Messages that are sent by your contact are displayed together with your messages in the message transcript area (see the Chat Interaction window progress bar and message area figure).
When you receive a message from the contact, a small progress bar is displayed near the top of the Chat Interaction window, on the Chat icon. The progress bar expands from left to right. It begins as green, changes to yellow, and finally changes to red, to indicate that a response is expected from you. See the Interaction Workspace 8.1 Help for more information about the behavior of the Chat Interaction window.
While you are interacting with your contact, you can use the following functionality in the Chat Interaction window:- Use the Notepad to attach a note to the interaction history. See Managing Contact History.
- View and edit Case Information for the current interaction.
- View and manage contact history. See Managing Contact History.
- View and manage contact information. See Lesson: Finding and viewing an interaction in the contact database.
- Link to a web-page from a hyperlink in the Case Information view. The case information might contain a hyperlink to enable you to view a web-page that is related to the interaction, such as customer records. Click the hyperlink in the Case Information view to open a new browser window and view the link. Place your mouse pointer over the hyperlink to preview the web page from the Case Information view. The hyperlink might be a URL or highlighted anchor text.
- View the Standard Response Library if you decide to call the sender instead of replying to the e-mail. See Inserting a Standard Response into an E-Mail Interaction
- Call the sender by clicking the Action menu drop-down list that is displayed next to the contact name.
 Chat Interaction window progress bar and message area
 - If there are interactions in progress for the current contact, the number of interactions is displayed beside the connection status of the interaction (see the Dynamic Contact History Matrix, displaying the number and type of interactions in progress figure). Place your mouse pointer over the icon to display the number and type of interaction(s) in progress (except voice interactions) for the current contact.
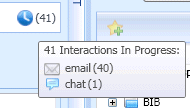 Dynamic Contact History Matrix, displaying the number and type of interactions in progress
You might be configured to be notified if there are recent interactions for the current contact; if so, the number of recent interactions is displayed beside the connection status of the interaction (see the Recent interactions matrix displaying the list of interactions with the current contact within the last day figure). Place your mouse pointer over the icon to display the number and type of recent interactions for the current contact. If you click the icon, the Contact view is opened and the History tab is displayed. Your system administrator defines the contents as interactions during the last-specified number of days.
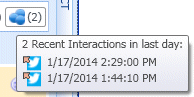 Recent interactions matrix displaying the list of interactions with the current contact within the last day
 - If you want to transfer the interaction to another internal target or consult with another internal target about the interaction, you can perform the following functions:
- Instant Transfer the chat to another internal target. See Transferring a Chat Interaction).
- Start a consultation with another party:
- Start an Instant Messaging consultation. See Lesson: Initiating an Instant Messaging session.
- Start a Voice consultation. See Starting a Voice Conference.
- Start a Chat Consultation. See Starting or Receiving a Chat Consultation.
- When you are finished interacting with your contact, click End Chat to stop the current chat interaction.
After you or the contact has ended the chat session, you can perform the following functions:
- Select Mark Done for the current interaction. The transcript is saved in the contact history and the Chat Interaction window is closed.
- Set a disposition code. See Assigning Disposition Codes.


End
Spelling Check
You might be enabled to use the Spelling Check functionality. The Chat Interaction window has automatic spelling check capabilities that enable you to correct misspelled words or add words to your personal dictionary.
Lesson: Using Spelling Check to find potentially misspelled words in a chat message
- To verify the spelling of the content of an outbound chat message.
Prerequisites
- You are logged in to Interaction Workspace (see Lesson: Logging in to Interaction Workspace).
- You have an active Chat interaction (see Receiving and Handling an Inbound Chat Interaction).
Start
- Begin entering text in the message area of a Chat Interaction window (see Lesson: Handling an inbound chat interaction). You can enter text by typing at the insertion point, pasting content from another document, or inserting a standard response (Lesson: Using The Standard Response Library).
- When Spelling Check is on, words in the message area that are not in the specified dictionary are underlined by a red, wavy line. The Chat message composition area, displaying a misspelled word that is underlined in red figure shows a chat message that contains a word that is not in the English (United States) dictionary (the default dictionary for this user). The misspelled word is happening, which is misspelled as happppening.
 Chat message composition area, displaying a misspelled word that is underlined in red
 - You can correct the spelling by using one of two methods:
- Edit the word(s) manually.
- Right-click the word to display the Spelling Check menu.
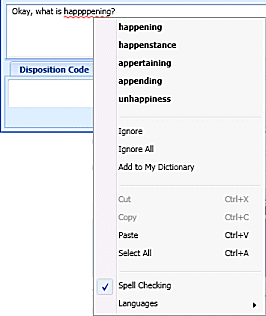 Chat Interaction window Spelling Check menu
 - If you right-clicked the misspelled word to display the Spelling Check menu, you can do one of the following:
- Select the correct spelling from the list of suggestion (bold text).
- Ignore--Select to ignore this instance of the word that is not in the specified language dictionary.
- Ignore All--Select to ignore all instances of the word that is not in the specified language dictionary for this interaction only.
- Add to My Dictionary--Select to add the spelling to your personal dictionary (not your corporate dictionary).
- Spell Checking--Select to turn the Spelling Check functionality off or on.
- Languages--Select to open the list of available language dictionaries. You can select a different language dictionary.


End