
Contents
Contact Directory
[Modified: 8.5.112.08]
The Contact Directory view enables you to do the following:
- Manage contact information
- Find contacts
- Manage or call contacts by using contact actions
- Assign interactions with unknown contacts to a known contact
The following are examples of the type of the fields that are available in the Contact Directory view:
- Title
- First name
- Last name
- Address
- E-mail address
- Phone number
- Other criteria
To view the contact directory, in the Main Window click the Access and use Workspace supporting views button (![]() ) to display the Supporting Views menu, then select Contact Directory. The Contact Directory view is contained in a tab that opens below the Main Window.
) to display the Supporting Views menu, then select Contact Directory. The Contact Directory view is contained in a tab that opens below the Main Window.

Contact Actions
Select a contact from the search results, list view, or grid view to perform any of the following actions:
- Delete the contact
- Call the contact if there is a phone number in the contact database
- Create an outbound email if there is an email address in the contact database
- Merge or unmerge the contact
- View contact information
- Edit contact information (you might not have this capability enabled)
- View contact history
To open the contact Information and History views, double-click a contact in the search results, list view, or grid view.
Finding Contacts
The search behavior is dependent on the search result-type that you select:
- Grid View: searches each field of the contact database for the phrase that you specify and displays a list of records where at least one record field contained the search phrase.
- List View: searches each field of the contact database for the keywords that you specify and displays an unsorted list of all of the contacts in the contact database that match the search criteria.
For each search type, you can search the contact database in one of two ways:
Your administrator might configure your system to enable you to search only the contacts that are related to your work.
To find interactions, use the Interaction Search view.
Quick Search
To search the contact directory, type the name, phone number, email address, or any contact attribute allowed by your Administrator for quick search, of a contact in the Quick Search field. The quick search function uses the starts with and match any condition criteria of the Advanced Search view applied to all the attributes allowed by your administrator in the scope of quick search. Please refer to the Grid and List results for information about each result type and the expected search behavior.
![]()
Click the magnifying glass to search for the value that you have entered.
The contact database is searched based on your criteria and the search results are displayed in the Contact Directory.
Click the X to clear the Quick Search field.
Genesys does not support wildcard characters in contact database searches.
Advanced Search

Click the Add Condition link to add more search criteria. Remove criteria from consideration by clicking the X next to the option.
Select Match All Conditions if all the specified criteria must be matched or Match Any Conditions if only one matching criteria is enough.
Click the magnifying glass to search for the value(s) that you have entered.
The contact database is searched based on your criteria and the search results are displayed in the Contact Directory.
Please refer to the descriptions of each result-type to get information about the expected search behavior.
Click the X to clear all search field.
Your administrator configures the default search criteria for this view; however, you can add or remove search criteria as needed. Workspace remembers the last search criteria that you used and displays these when you use the Advanced Search feature again. [Added: 8.5.112.08]
Genesys does not support wildcard characters in contact database searches
Search Results
Search results are displayed in a list or in a tabular grid.
The search behavior is determined by the search result-type that you select (see descriptions of the List View and Grid View results below).
Use the Show Contacts View (![]() ) button to toggle back and forth between the Grid and List views.
) button to toggle back and forth between the Grid and List views.
Page Controls
Page through the list of search results by doing any of the following:
- Click the Go to the Next Page button (
 ) to view the next page.
 - Click the Go to the Previous Page button (
 ) to view the previous page.
 - Click the Go to First Page button (
 ) to return to the start of the list of search results.
 - Click the Go to Last Page button (
 ) to return to the start of the list of search results.
 - Specify the number of items that are displayed on each page by using the per page drop-down list.
List View
Click the Show Contacts in List View button (![]() ) to display the Contact Directory List view.
) to display the Contact Directory List view.
The List view displays an unsorted list of all of the contacts in the contact database that match the search criteria.
The search is a 'keyword' search that searches each field of the contact database (name, phone number, email address, or other criteria) for the word or words that you provide in the search field. The search engine tries to match any word of each field specified in the search criteria.
Examples:
- Quick search using the keywords John Daly as the criteria in a quick search defined to apply to only the First Name and Last Name fields will match a contact where First Name=John and Last Name=Daly
- Quick search using the keywords John Junipero as the criteria in quick search defined to apply to only First Name, Last Name, City, and Address, will match a contact where First Name=Johnny and Address = 2001, Junipero Serra Blvd.
- Advanced search set to Match all criteria using the First Name' equals Johnny and Address contains pero will also match the contact where First Name = Johnny and Address = 2001, Junipero Serra Blvd.
Results are returned in a list that is not sortable. If the result set is too large, you can refine the search results by adding more keywords to your search criteria (the sort order in this context is undefined).
Genesys does not currently support mixed character sets in contact database searches, so, for example, it is not possible to search for words in Chinese Simplified characters and Latin characters in the same search string, and the sequence of Chinese Simplified characters immediately followed by Latin characters will not be considered as two words.
Use the page controls to navigate the list. Click a contact to select it for an action. Use the Grid view to sort the search results based on contact attributes.
Grid View
Click the Show Contacts in Grid View button (![]() ) to display the Contact Directory Grid view.
) to display the Contact Directory Grid view.
Grid mode performs a search that considers each field of the contact database (name, phone number, email address, or other criteria) as a phrase (as opposed to the list view mode that considers each field as a tokenized list of words) and uses the search criteria that you provide as a phrase, not as a list of words.
Examples:
- Quick search using the phrase John Pa as the criteria in a quick search defined to apply to only the First Name and Last Name fields will match a contact where First Name=John Paul and Last Name=Doe
- Quick search using the phrase John Daly as the criteria in quick search defined to apply to only the First Name and Last Name will not match a contact where First Name=John and Last Name=Daly
- Advanced search set to Match all criteria using First Name equals Johnny and Address starts with 2001, Junip as the criteria will match a contact where First Name = Johnny and Address = 2001, Junipero Serra Blvd.
Results are returned in tabular form and sorted according to the default search field, such as Last Name.
The Grid view can be used to help to refine your search by sorting the results.

Click a column head in the Grid view to sort the list based on that criterion. Click a column head a second time to switch between ascending and descending sort order. Use the page controls to navigate the list. Click a contact to select it for an action.
Call or E-Mail Contacts
To call or email the contact that you have selected in the search results, do one of the following:
- Click the Contact icon next to the contact name and select the number that you want to call from the Action drop-down list.

- Click the Call icon (
 ) to call the contact using the primary phone number associated with that contact. Click the Call icon drop-down list to select the number that you will use to call the contact. If you are sending an email, click the E-Mail icon.
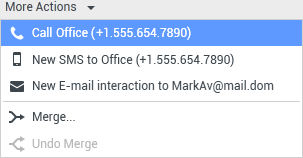
- In the More Actions drop-down menu, select the number or email address that you will use to call or send an email message to the contact.

Any of these actions launches the outgoing Voice Interaction view. Use this view to handle the voice interaction.
Add Contacts
If your account is configured to do so, you can add new contacts to the contact database by clicking the Add Contact button (![]() ) to launch the Add Contact view in the Contact Information tab.
) to launch the Add Contact view in the Contact Information tab.

Enter the contact information in the fields. A small red triangle appears in the top left hand corner of the text field to indicate that the information is not saved. Do one of the following:
- Click the Save button (
 ) to save the information in the contact database.Important(Added: 8.5.101.14) Once you create a contact, you might not have permissions to make further changes after clicking Save. In this scenario, a message box is displayed asking you to confirm that you want to save the information. Review the content carefully before clicking Save.
 - Click the Reset button (
 ) to clear any unsaved changes from the Add Contact view.
If you want to add additional phone numbers and email addresses for the new contact, click the Add Phone Number or Add E-mail Address button. A new set of fields is added into which you can enter this information.
To specify a phone number or email address as the primary contact number or address, click the Primary button next to the phone number or email address that you want to specify as the primary for the contact.

Delete Contacts
To delete a contact, you must first find the contact in the contact database and then select it in the Contact Directory.
Select one or more contacts that you want to delete, then click the Delete button (![]() ).
).
A confirmation dialog box is displayed. Click OK to remove the contact from the contact database permanently. Click Cancel to cancel the delete contact function; this leaves the contact in the contact database.
Merge Contacts
To Merge a contact, you must first find the contact in the contact database and select it in the Contact Directory.
If there are two contact entries in the contact database for the same contact, you can merge the two entries into a single entry.
First, find the contact in the contact database, then select it in the Contact Directory.
Click the More Actions menu and select Merge.

The Merge Contact dialog box is displayed. Use the search tools to find the duplicate contact, and then do one of the following:
- Click Merge to complete the merge of the two contact entries.
- Click Cancel to cancel the merge and return to the Main Window.

You might be required to enter a Description and/or Reasons for the merge. Use the fields after selecting the duplicate contact.
Unmerge Contacts
To Unmerge a contact, you must first find the contact in the contact database and select it in the Contact Directory.
If there are two contact entries in the contact database that have previously been merged, you can unmerge them into their original contact entries.
First, find the contact in the contact database, then select it in the Contact Directory.
Click Undo Merge. A confirmation dialog box is displayed. Click Yes to unmerge and No to keep the contact merged.
Contact Information and Contact History
Click the Show Details Panel on Bottom/Hide Details Panel button to show or hide contact information and contact history for the currently selected contact.

The Contact Information view enables you to view and, if you are configured to do so, edit information for the currently selected contact. You might also be configured to assign an unknown interaction to a contact in the contact database by using the Manual Contact Assignment feature.

The Show Details Panel on Bottom/Hide Details Panel (![]() ) button in the Contact Information view specifies where the Contact Information view is placed in the Contact Directory view: next to the directory or below the directory.
) button in the Contact Information view specifies where the Contact Information view is placed in the Contact Directory view: next to the directory or below the directory.
The Contact History view tab enables you to view and, if you are configured to do so, edit current and archived interactions that are associated with the currently selected contact.

Change Contact
The Change Contact view enables you to assign a different contact for the selected interaction.
If an interaction has been incorrectly assigned to a specific contact, or if a new contact was created for an interaction when the contact already existed in the contact database, you can assign an open interaction to a specific contact by using the Change this interaction to contact view.
In the Information tab of the Contact view of an interaction, select Change Contact (![]() ). The Change this interaction to contact view is displayed.
). The Change this interaction to contact view is displayed.
Use the Quick Search or the Advanced Search to find the Contact to whom you want to assign the interaction that you selected in the My History view or the Contact History view.

Select the contact from the result list and then click Assign to assign the interaction to the Contact History for the selected contact. Click Cancel to return to the My History view or the Contact History view without assigning the interaction to a contact.
You can verify that the update to the interaction record was completed correctly by selecting the interaction in the My History view or the Contact History view and checking the Details tab. You can also search for the interaction in the contact database.
You can also use the Assign Another Contact to This Interaction button to manually reassign an interaction that has been incorrectly assigned to the wrong contact.
Related Resources
The Workspace Desktop Edition User's Guide (English only) provides detailed lessons for using all the features of Workspace. You might find the following lessons useful: