Using Blocks
Contents
This chapter provides information about the blocks that are available in Designer.
Build Logic
Using the Palette
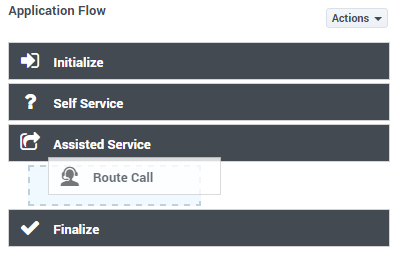
The blocks are grouped into various categories on the Palette. You can drag any block from the Palette into the Application Flow and place it under the phase in which you want it to execute. If the block can be used in that phase, a blue placeholder block appears and you can drop the block to place it in that phase.
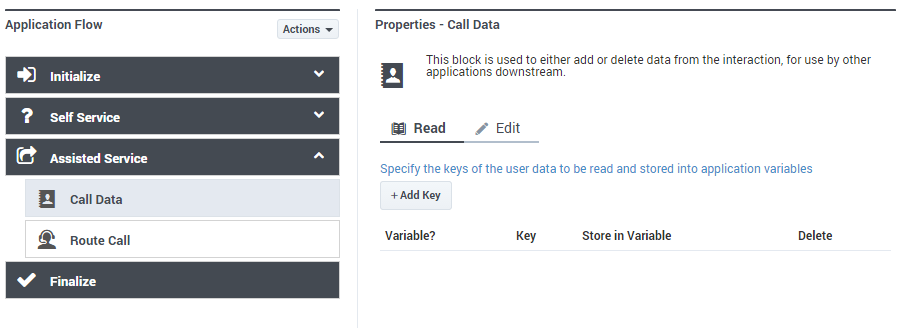
After placing a block, its details are shown in the Property view and you can configure the block and provide your application logic.
Click a block in the Application Flow at any time to select it, highlight it, and show its details.
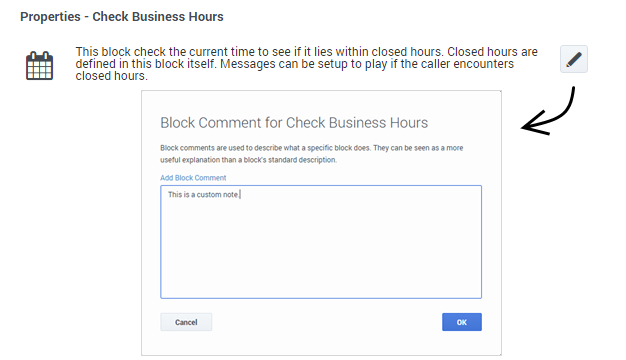
Each block has a default description, which you can edit to add your own description or comment.
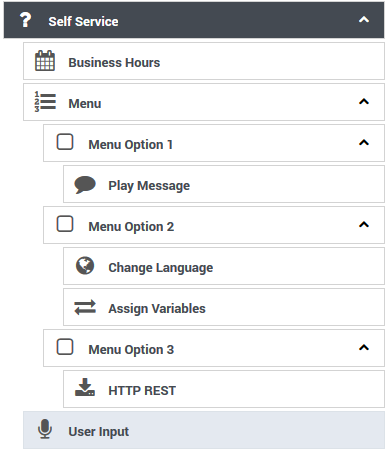
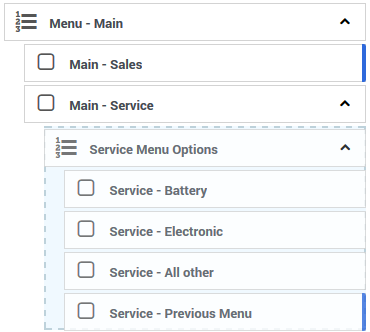
You can place child blocks underneath some blocks. Child blocks are indented underneath their parent block. With the Menu and Segmentation blocks, this indicates that several outcomes are possible but only one path is followed when the application runs.
In the above image:
- A user hears a menu prompt.
- The user enters input corresponding to one of the available menu options.
- The child blocks of that menu option execute before the application continues with the next block after the Menu block.
In this case, if the user chooses Menu Option 2, the Change Language block runs, followed by Assign Variables, and then the menu completes and moves onto User Input. The child blocks under Menu Option 1 and Menu Option 3 do not execute in this scenario.
In general, an indentation on the Application Flow canvas indicates that a decision or branch occurs, and one of several mutually exclusive paths is followed.
It is also possible for Menu or Segmentation blocks to be nested within one another - that is, a top-level menu option can lead to a second menu. This is indicated with multiple levels of indentation on the Application Flow. Once an option or a branch completes, the application returns one level higher and continues execution.
Moving and arranging blocks
To rearrange the order of blocks, you can drag and drop blocks around the Application Flow. Moving a parent block also moves any child blocks under it, so you can move entire groups of blocks together in one operation.
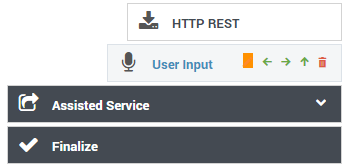
You can also move groups of blocks by clicking the arrows that appear when you hover over a block. This is useful if an application becomes large enough that dragging and dropping is unfeasible. These arrows show allowable operations on a block: up and down to move a block backward and forward within a phase, and left and right to change the indentation of a block underneath a parent block.
You can also use the Copy and Paste functions (under Actions) to copy a block to another location in the flow, or to another module or application. Copying a parent block also copies any child blocks under it, so you can copy entire groups of blocks together in one operation. Keep in mind that blocks can only be copied to locations where that type of block is permitted.
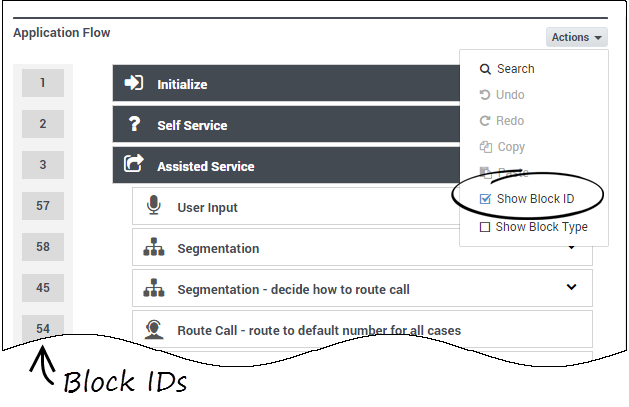
Under Actions, you can select Show Block ID or Show Block Type to toggle the visibility of those attributes. For example:
Searching
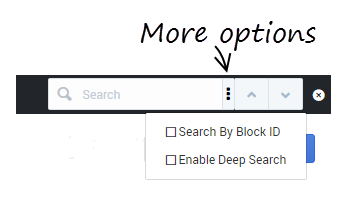
To search the blocks in the application flow, select Search from the Actions menu. The search box appears in the main navigation bar and you can start typing the search term you are looking for.
If you click the more options button, you can also select the option to search for blocks by their numeric Block ID.
The results are highlighted in the application flow, and you can use the up/down buttons to jump to the next or previous result.
Limiting Application Indentation
Although Designer allows you to use several levels of indentation, you might not be able to access the block properties element if you have more than 10 levels of indentation.
To prevent your application from becoming too deeply indented, use Menu and Segmentation blocks to jump to specific points in the application. This takes control back to the main trunk and prevents the application from being too indented and difficult to understand. Menu and Segmentation blocks that do not terminate the application within a reasonable depth should include a Go To block to jump to a different part of the application.
ECMAScript Expressions
Some block properties accept ECMAScript expressions that are executed by the application at runtime. This allows the application to perform dynamic operations, such as calling an ECMAScript function or combining the values of other variables.
In general, block properties do not support ECMAScript expressions unless otherwise stated. If ECMAScript expressions are not supported, you must enter a value (a string that is taken as a literal). This value is not evaluated at runtime. For example, in the Play Message block, the value of a TTS prompt is taken as a literal string.
Supported Properties
The following lists blocks properties that support ECMAScript expressions:
- Initialize phase - User Variables
- Activity block - Values in key-value pairs
- Assign block - Assignments
- Data Table block - Lookup Key
- Menu Option block - Set Variables
- Milestone block - Values in key-value pairs
- Return block - Assigning values to output variables
- Shared Module block - Assigning values to input variables
Tips
- See ECMAScript Documentation for more information on using ECMAScript expressions.
- Strings must be quoted. For example, 'hello' is a string, whereas hello is a reference to a variable called hello.
- Single quotes (') are recommended, as opposed to double quotes (").
- When specifying an object in JSON notation, surround the JSON with parentheses. For example: ({'abc': 'def'}).
Examples
Below are examples of how you might use an ECMAScript expression in a Designer application.
Building a Dynamic TTS Prompt
You can use the Assign block to concatenate a string to be spoken by the application. The expression below reads the caller's phone number or ID.
'You are calling from ' + ANI
Control the Application Flow
A Segmentation block can take ECMAScript expressions that evaluate to a Boolean value, and thus control the flow of the application. For example, you might want to inform your customers about upcoming seasonal events and you need a way to determine the current season and whether the event is occurring within the coming week. The expression below determines whether the call was received within seven days of the event, and whether the current season is summer or autumn.
numDays > 7 && (isSummer || isAutumn)
ECMAScript User Functions
Designer also has built-in ECMAScripts that you can invoke from a Designer application, such as from an Assign or Segmentation block, to perform certain functions at runtime.
isDataTableValueValid
You can use this function to determine if a value returned from a data table query is valid. For example, you might use the following function in an Assign block:
isDataTableValueValid(value, datatype)
This function has two arguments:
- value is a single value returned from a data table query
- datatype is the data type of the data table column, such as 'string', 'boolean', 'integer', 'announcement', or 'numeric' (this argument is optional)
If the data table value is valid, the script returns true. Here is a list of values that this function can return:
- isDataTableValueValid(varStr, 'string') on a valid (or empty) string returns true. Anything else returns false.
- isDataTableValueValid(varNum, 'numeric') on a valid number or 0 returns true. Anything else returns false.
- isDataTableValueValid(varNum, 'integer') on a valid integer or 0 returns true. Anything else returns false.
- isDataTableValueValid(varBool, 'boolean') on true or false returns true. Anything else returns false.
- isDataTableValueValid(varAudio, 'announcement') on a valid (or null) announcement returns true. Anything else returns false.
Busy Treatments
A busy treatment is a special form of voice call handling that tells Designer what to do while a caller is waiting for their call to be connected with an agent. For example, you can play music for callers or provide them with updates about their estimated wait times.
Certain blocks allow you to specify audio files or self-service type shared modules as busy treatments.
Route Call and Route Agent blocks
The Route Call and Route Agent blocks both have a Treatments tab where you can specify an audio file or a shared module as a busy treatment.
If you choose to add an audio-based treatment, a Play Message block is automatically nested below the routing block. Use this block to select and configure the audio options.
If you choose to add a module-based treatment, a Shared Module block is automatically nested below the routing block. Use this block to select the shared module that will be used as a busy treatment.
Busy treatments defined in routing blocks will loop automatically until a certain condition is met – such as the call is routed, the caller hangs up, or the timeout specified in the routing block expires – at which point the next block in the application is triggered.
Start Treatment block
The Start Treatment block also lets you specify a busy treatment, but it works a bit differently than the treatments used in the routing blocks.
Typically, you would use this block in the Assisted Service phase when you want to start a busy treatment — for example, play an audio file to callers while they wait to speak with an agent — and then move on to the routing blocks, all without interrupting the playback to the caller.
Things to keep in mind when using this option:
- Don't define any additional treatments in the routing blocks that directly follow the Start Treatment block.
- You want the audio started by the Start Treatment block to continue playing while the routing blocks do their job. If a routing block starts another treatment, the treatment that is playing stops.
- The Start Treatment block does not loop a module automatically.
- If you want to set up looping, you might need to use a GoTo block in the module or find another way to loop it back. For example, you might add additional logic in the module to detect which mode it is being used in. This will expose an input parameter that controls whether the module loops internally or not. Or, you could clone the module and have a different looping logic defined in the cloned module. (However, take note that this option creates copies of the same logical module and might make maintenance more difficult.)
Validation
Designer enforces a drag-and-drop policy to ensure that you can only place blocks into applicable phases. In rare scenarios, a block might be placed in an invalid phase. In these cases, the validation process that occurs after you click Publish will report this failure with an error that includes the blocks placed into invalid phases.
You can update many options without regenerating the code:
- In the Business Hours block, you can:
- change business hours of operation.
- determine whether to terminate the call if it is outside business hours.
- change the closed message (prompts).
- Update the Emergency block.
- Update prompts in the Menu block.
- Update prompts in the Play Message block.
- Specify the audio in the Play Audio tab of the Route Call block.
- Update the Special Day block.
- Update the input and retry prompts in the User Input block.
Block Categories
The blocks are grouped into the following categories:

