User Input Block
Contents
You can use the User Input block in the Self Service phase to collect information from the user, such as an account number or credit-card information, and store it in a variable for processing. In the Assisted Service phase, you can use this block to gather more information from the user.
Optionally, you can specify whether retries are allowed if the input is not recognized, and whether to play a retry message, along with the original prompt message.
Prompts tab
Disable barge-in
Select this option to prevent callers from interrupting a prompt while it is still playing. For example, you might want a "Welcome" message to play all the way through before the caller can enter another command and skip to the next menu prompt.
If this option is not selected, barge-in is enabled, and the prompt can be interrupted by the caller.
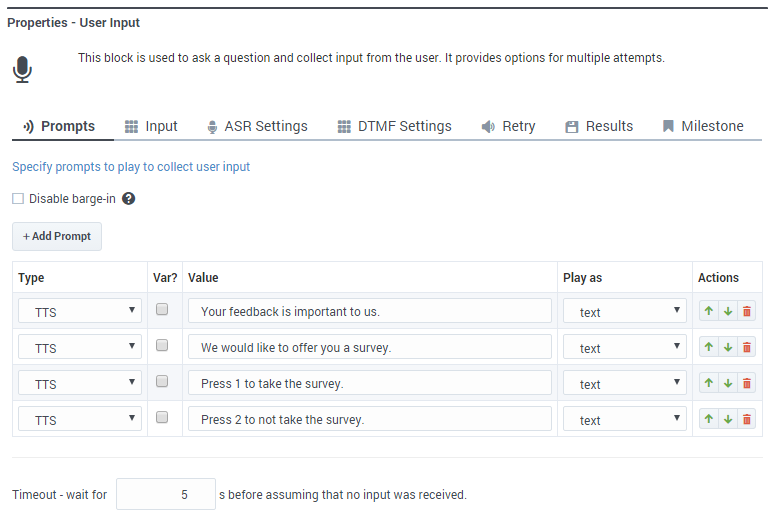
Click Add Prompt to play prompts when the menu starts.
Set the timeout period, in seconds, to wait before assuming that no input was received from the caller. Refer to the Retry tab to specify which actions are taken if the timeout period is reached. If retries are not permitted and the timeout period is reached, the application moves onto the next block.

Input Tab
Choose one of the following options:
Built-in Grammar
Select this option to use a built-in grammar. You can select from the following types:
- boolean
- currency
- date
- digits
- number
- phone
- time
If you select digits, you can also set the following options:
- Minimum number of input digits — Specify the minimum number of digits that the caller must enter.
- Maximum number of input digits — Specify the maximum number of digits that the caller can enter.
Next, specify the input mode for the grammar. You can select DTMF, Speech, or both. (If you select only Speech mode, DTMF grammars remain active but are not matched.)
Languages for built-in grammars can be managed using the AppLanguageName system variable (see System variables) or the Change Language block.
External Grammars
Select this option if you have created your own speech grammar. Next, click Add Grammar to add one or more speech grammars to use with this block. Provide the following information:
- Var? - Enable this check box to indicate that the selected speech grammar will be determined by a variable.
- Dynamic? - Enable this check box to indicate that the selected speech grammar contains dynamic values that can change over time (for example, an employee directory). For more information, see Dynamic Grammars.
- Name - Select the speech grammar name (or variable) that you want to add to this block.
- Mode - Specifies whether this speech grammar is for voice or DTMF.
ASR Settings tab
Use application-wide ASR settings
Enable this check box to use the default ASR (Automatic Speech Recognition) settings for your application. You can view or change these settings by clicking Settings in the Toolbar.
If you disable the Use application-wide ASR settings check box, you can set the following options for this block:
- Confidence Level - Specifies the speech recognition confidence level. If the caller's input is below this threshold, the input is determined as No Match. A value of 0.0 specifies that minimum confidence is needed for a match. A value of 1.0 specifies that maximum confidence is required before a match is determined.
- Sensitivity - Specifies the sensitivity level. A value of 1.0 specifies that speech recognition is highly sensitive to quiet input. A value of 0.0 specifies that speech recognition is least sensitive to noise.
- Speed vs. Accuracy - Specifies the balance between how fast the application responds to the input versus how accurate the response is interpreted. A value of 0.0 specifies that quick recognition is preferred. A value of 1.0 specifies that high accuracy is preferred.
- Complete Timeout - Specifies the required length of silence, in seconds, following user speech before the application determines a result (match, No Match, or No Input).
- Incomplete Timeout - Specifies the required length of silence, in seconds, following user speech before the application determines a result. This property is used in the following situations:
- If the speech prior to the silence does not match all active grammars, this property specifies how long to wait before the partial result is rejected as No Match.
- If the speech prior to the silence matches an active speech grammar, but it is still permissible to continue speaking and match the speech grammar. By contrast, Complete Timeout applies when the speech prior to the silence matches an active speech grammar and no further words are permissible.
- Max Speech Timeout - Specifies the maximum amount of time, in seconds, for which speech input is allowed before it is determined to be No Match.
DTMF Settings tab
Configure the following settings for DTMF input:
- Input termination character - Specify a termination character that the caller can enter to mark the end of the input string. Commonly, * or # are used as termination characters. If the caller does not enter a termination character, the application waits until the Terminating Timeout period has passed before processing the input.
Example: You set this value to #. The caller enters 1234#. The input is 1234 and # signals that no more characters will be entered. - Interdigit Timeout is the amount of time, in seconds, that the application waits between digit inputs before assuming the end of the input string. If the user entered too few or too many digits, a retry is attempted. If retries are not allowed, the application moves on to the next block.
Example: You set this value to 3 and specify that the input can be between three and five digits. The caller enters 1234. The application waits 3 seconds before assuming a fifth digit will not be entered. - Terminating Timeout is the amount of time, in seconds, that the application waits for the Input Termination Character before processing the input string. If the input is always a static length (for example, four characters), then you can set this value to 0 for the application to immediately process the input after the last digit is entered.
Example: If this value is 5 and the caller enters 1234, the application waits 5 seconds before processing the input.
Retry tab
Use application-wide retry
Enable this option to use the default retry settings for your application. You can view or change these settings by clicking Settings in the Toolbar.
Allow retries
If you disable the Use application-wide retry check box, you can enable Allow retries to specify retry rules for this block. You can set the following options:
- Number of No Input retries allowed
- Select the number of retries to allow for callers whom do not provide input. For each retry, you can specify whether a prompt is played by clicking the corresponding section beneath this field. For example, if you allow two no-input retries and you want to play a prompt after the first retry, select the No Input #1 line and add a prompt. Enable the Play original menu prompt after this retry prompt check box to repeat the menu prompts for the caller.
- Number of No Match retries allowed
- Select the number of retries to allow for callers whom do not provide a match for a Menu Block. For each retry, you can specify whether a prompt is played by clicking the corresponding section beneath this field. For example, if you allow two no-input retries and you want to play a prompt after the first retry, select the No Match #1 line and add a prompt. Enable the Play original menu prompt after this retry prompt check box to repeat the menu prompts for the caller.
- After Final No Input
- Add the prompt to play after the maximum number of permitted No Input retries is reached. If this block is in the Self Service phase, you can also specify a target destination for the application to jump to, such as another block in the Self Service phase or to the Assisted Service or Finalize phase of the application.
- After Final No Match
- Add the prompt to play after the maximum number of permitted No Match retries is reached. If this block is in the Self Service phase, you can also specify a target destination for the application to jump to, such as another block in the Self Service phase or to the Assisted Service or Finalize phase of the application.
Results tab
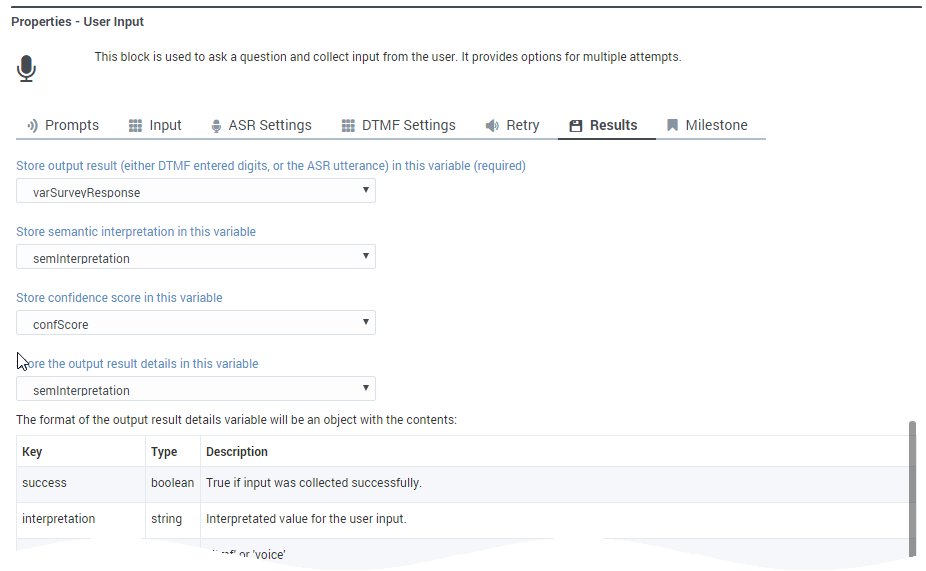
Specify the variables in which to store the results of the interaction, semantic interpretation, confidence score, and output result for speech recognition (such as the Confidence Level value).
Example
Milestone tab
Specify a milestone for this block.
Example scenario
If you want to:
- Collect a single digit and allow for two retries. The caller can start collecting input only after the entire audio prompt has finished playing.
- Disable barge-in: Enabled
- Minimum number of input digits: 1
- Maximum number of input digits: 1
- Allow retries: Enabled
- Number of No Input retries allowed: 2
- Number of No Match retries allowed: 2
Dynamic Grammars
A dynamic grammar contains an array of values that automatically update in response to external input. Whereas traditional grammars are static and must be updated manually for each change, dynamic grammars are always current and do not require manual updates. This is useful for situations in which the grammar contents change frequently, such as employee or customer lists.
Consider the following example. You have created a voice application with a User Input block that allows the caller to contact specific employees in your company. You are using an external grammar that contains the names of all of your employees as valid inputs for this block. However, if an employee leaves the company or your company hires a new employee, the grammar is no longer current and must be updated. A dynamic grammar, however, can use an array of values from a variable and update itself based on external input. You do not need to manually update a dynamic grammar each time there is a change to the list.
There are two ways to create an array for use with dynamic grammars:
- Use an HTTP REST block.
- Use an Assign Variables block.
Using an HTTP REST Block
This method uses an HTTP REST block to fetch an array from a web service.
In this example, we are using a web service that returns the following JSON data:
{
	"success": true,
	"employees": ["John", "Julie", "Mark"]
}
Next, in the Output Parameters section of the HTTP REST block, we can assign employees to a User Variable that we previously created, called varEmployees.
Finally, in the User Input block, we can select varEmployees as a dynamic grammar. Each time the application runs, the HTTP REST block fetches the employee list and uses its contents as a dynamic grammar for the User Input block.
Using an Assign Variables Block
This method uses an Assign Variables block to push values to an array.
In this example, we have initialized a variable called varEmployees with a value of '[]' (an empty array).
Next, in the Assign Variables block, we use the expression varEmployees.push('John') to add an employee, John, to the employee list.
You can use multiple Assign Variables blocks to add items to the array.

