Apply Disposition Codes
[Modified: 8.5.108.11, 8.5.146.06]
The Workspace Disposition Code view enables you to assign to an ongoing or terminated interaction a code that qualifies or specifies the outcome of the interaction.
The Disposition Code view is part of the Interaction window. It contains either a checklist of options, or a hierarchy of folders containing options that you can click to specify the outcome of the interaction.
Your system might be configured so that you cannot click Mark Done until you have selected a disposition code, or you might be able to mark an interaction as Done without specifying a disposition. Your system might be configured so that the Disposition Code view is not displayed.
This lesson contains the following section:
This lesson demonstrates assigning a disposition to a voice interaction; however, this procedure is applicable to any type of interaction for which you have been enabled to specify a disposition.
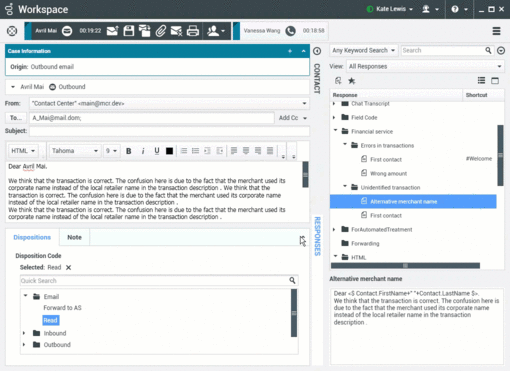
Minimizing and Restoring the Disposition Code and Note views. If you need more space in the Interaction view you can minimize or restore the Disposition tab and Note tab area by clicking the chevron. [Added: 8.5.146.06]
Click the image if animation does not start.
Assigning Disposition Codes
Many contact centers attach data to interactions that specifies the outcome of each interaction. The outcomes are defined by the administrators of the contact center. Each outcome, or disposition, is assigned a disposition code that enables contact center personnel or systems to determine whether an interaction was successful, transferred, or whether a follow-up interaction is required. If you apply a new disposition code to an interaction that already has a disposition code, the old disposition code is overwritten.
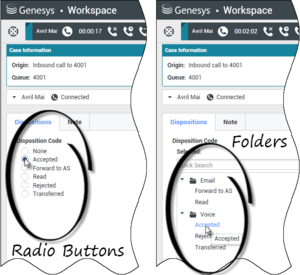
Workspace employs one of two interfaces that enable you to assign a disposition code to your interaction quickly and easily:
- A simple radio-button interface
- A hierarchy of folders that contain codes
Lesson: Applying a disposition code to an interaction
Purpose: To attach information about the outcome of the current or selected interaction.
A disposition code can be set at different times depending on the configuration of your system. Your system might require you to set the disposition code before you click Mark Done to complete an interaction. Your system might require you to set the disposition code before you transfer or conference the interaction.
The following procedure assumes that you must set the disposition code before you click Mark Done.
Prerequisites
- You are logged in to Workspace (see Getting Started).
- You have an open Voice interaction (see Receiving a Voice Interaction).
- Your assigned role requires you to assign disposition codes to interactions.
Start
- If the customer has not ended the call, but you are ready to hang up, in the active Interaction window (see Receiving a Voice Interaction), click End Call (the phone-set button that has a red X; see the Inbound Voice Interaction window, with no disposition code set figure).
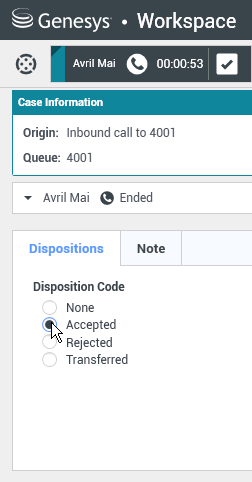
- Click the Dispositions tab (see the Dispositions view figure) to display the Disposition Code selector. You will see either a checklist with radio buttons or a hierarchy of folders.
- To choose a disposition, do one of the following actions:
- If you have the checklist interface, click the Disposition Code radio button to specify the outcome of the call. (The available options are configured by your system administrator, and might not be the same values that are shown in the figures in this lesson.)
- If you have the folder hierarchy interface, perform these steps:
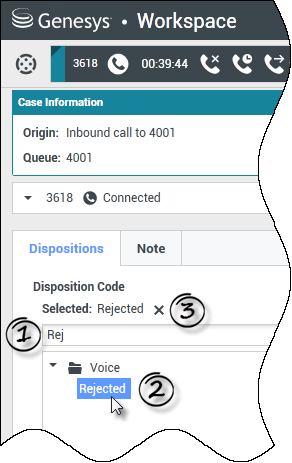
- In the Disposition Code Quick Search field, enter the name of the code that you want to find. Quick search works as a "start typing" search. Results are returned as you type. All folders are opened and the view is filtered to show only codes that match what you entered.
Alternatively, you can just browse through the folder hierarchy to find the disposition code that you want to use. - In the folder hierarchy view, when you select a disposition, its name is displayed next to the Selected label. You can deselect the disposition by clicking the X next to it.
- In the Disposition Code Quick Search field, enter the name of the code that you want to find. Quick search works as a "start typing" search. Results are returned as you type. All folders are opened and the view is filtered to show only codes that match what you entered.
- Click Mark Done.
- If the Interaction window does not close automatically, close the Interaction window after you have clicked Mark Done for each of the active interactions.
- Complete your after-call work.
End


