Partitions
As a Designer Administrator, you can use the Partitions page to control the resources that users have access to through Partition-Based Access Control (PBAC).
With PBAC, you can create a partition and assign certain resources to it. In Designer, "resources" are the various objects used during interaction sessions, such as Applications, Shared Modules, Business Hours, Special Days, Emergency Flags, Data Tables, Speech Grammars, and Audio and Message Resources.
For each partition, you can then select the users who will belong to it. The users will only be able to see and manage those resources that are assigned to the partitions they belong to. All other permissions they have (as defined by their assigned roles within Designer) remain in effect.
Each user's PBAC details are stored in their Workspace settings and retrieved by Designer during login.
Watch this short video to learn how PBAC works:
Watch this short video to see an example of how PBAC can be set up:
In general, partitioning can be set up as follows:
- Define a private partition. Assign it to all resources that you intend to control using PBAC. You can leave out any resources that should remain globally visible.
- Don’t assign this partition to any users. This private partition will ensure that resources under partitioning control will NOT be visible to a user who has at least one partition defined.
- For each department, set up a dedicated partition and assign it to users from that department. Then assign each partition to the resources those users need access to. (Here's an example.)
- New resources inherit the partitions of the users who created them, and remain accessible only to users who belong to that partition.
For example...
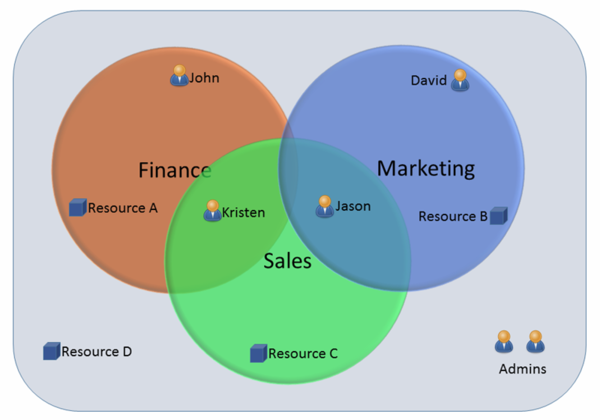
You might create a partition for each of the following departments:
- Sales
- Finance
- Marketing
Then add users as members to their appropriate partitions:
- John to Finance
- David to Marketing
- Kristen to Sales and Finance
- Jason to Sales and Marketing
Remember that users who are Designer Administrators do not need to be assigned to a partition as they already have full access.
You can then assign certain resources to each partition:
- Resource A to Finance
- Resource B to Marketing
- Resource C to Sales
- Resource D to "none" (remember that non-assigned resources are visible to ALL users)
This chart illustrates the relationships between the users, resources, and partitions described in this example:
Partitions tab
Use this tab to add or manage partitions and select the users who can access them.
For example, to add a new partition called Sales:
After the partition is added, you can use the edit users action to select the users who can access it:
Users tab
Use this tab to view the list of users and manage their assigned partitions.
For example, to assign user_sales to the Sales partition and remove them from Finance:
Resources tab
Use this tab to view the list of resource types and their associated partitions.
For example, let's say the Business Hours resource regularhours is already associated with the Service and Sales partitions, but now we want to also associate it with Marketing:


