
Genesys Voice Platform
Also known as GVP. An open-source self-service platform that delivers VoiceXML applications across a variety of networks, by using local media processing in conjunction with industry-leading speech resources. Through GVP, callers are provided with highly personalized self-service offerings. GVP provides greater functionality than traditional Interactive Voice Responses (IVRs) through its extension of existing web personalization and the industry-standard programming language, VoiceXML. GVP also blends self-service with agent-assisted service.
Glossary
Genesys Administrator
The web-based User Interaction Layer component that provides an interface to the Configuration Layer, Management Layer, and other Genesys solutions.
Glossary
Interaction Server
An eServices component that is the central interchange for interaction flow and mediates among media servers, routing components, Knowledge Management, and the desktop. For nonvoice interactions, it is the functional equivalent of T-Server. Interaction queues are actually entities in the database (sometimes called the cache) that is associated with Interaction Server.
Glossary
Universal Routing Server
Also known as URS. The server that is used by Universal Routing that automatically executes routing-strategy instructions and distributes incoming customer interactions among contact-center agents. Previously known as Interaction Router.
Glossary
Stat Server
Stat Server is a Genesys application that tracks information about customer interaction networks (contact center, enterprise-wide, or multi-enterprise telephony and computer networks). Stat Server also converts the data accumulated for directory numbers (DNs), agents, agent groups, and non-telephony-specific object types, such as e-mail and chat sessions, into statistically useful information, and passes these calculations to other software applications that request data. For example, Stat Server sends data to Universal Routing Server (URS) to inform the URS about agent availability. You can also use Stat Server’s numerical statistical values as routing criteria. Stat Server provides contact center managers with a wide range of information, allowing organizations to maximize the efficiency and flexibility of customer interaction networks.
Glossary
SIP Server
SIP Server has the same position in the Genesys Media Layer as all Genesys T-Servers. It is a combination of a T-Server and a call-switching component, in which the call switching element functions as a SIP Back-to-Back User Agent (B2BUA). Because SIP Server supports the Internet Engineering Task Force (IETF) SIP RFC 3261 suite, it is compatible with the most popular SIP-compatible, off-the-shelf hardware or software. SIP Server can operate with or without a third-party softswitch. Genesys SIP Server gives the entire Genesys line of products access to SIP networks, offering a standards-based, platform-independent means of taking full advantage of the benefits of voice/data convergence.
Glossary
T-Server
The Genesys software component that provides an interface between your telephony hardware and the rest of the Genesys software components in your enterprise. It translates and keeps track of events and requests that come from, and are sent to, the Computer-Telephony Integration (CTI) link in the telephony device. T-Server is a TCP/IP-based server that can also act as a messaging interface between T-Server clients. It is the critical point in allowing your Genesys solution to facilitate and track the contacts that flow through your enterprise.
Glossary
Local Control Agent
Also known as LCA. A daemon component of the Management Layer that controls all daemon applications that are running within Genesys Framework. A Genesys-supplied software module that is loaded to each server platform that hosts one or more Genesys server modules. The purpose of LCA is to monitor the operating status of all locally running Genesys software modules, report errors, and restart modules if they stop operating.
Glossary
Solution Control Interface
Also known as SCI. A Genesys Framework component that is used to administer Genesys solutions—for example, to start or stop the solution, view logs, configure event-triggered alarms, and provide real-time status information for all Genesys applications.
Glossary
Solution Control Server
Also known as SCS. The Genesys Framework component that serves as the control point for which SCI is the interface. Together, SCS and SCI provide the services that are described in the definition of SCI.
Glossary
Message Server
The Genesys Framework component that provides centralized processing and storage of every application’s maintenance events. Events are stored as log records in the Centralized Log Database, where they are available for further centralized processing. Message Server can also be set up to produce outbound messages (alarms) that are triggered by configured log events. If it detects a match, it sends the alarm to Solution Control Server for immediate processing.
Glossary
Local Control Agent
Also known as LCA. A daemon component of the Management Layer that controls all daemon applications that are running within Genesys Framework. A Genesys-supplied software module that is loaded to each server platform that hosts one or more Genesys server modules. The purpose of LCA is to monitor the operating status of all locally running Genesys software modules, report errors, and restart modules if they stop operating.
Glossary
Configuration Manager
The Genesys Framework component that provides a user-friendly interface for manipulating the contact-center configuration data that Genesys solutions use and for setting user permissions for solution functions and data.
Glossary
Configuration Server
The Genesys Framework component that stores and manages Configuration Database data, which users access through Configuration Manager and Genesys Administrator. Configuration Server prevents entry of logically incorrect configuration data, enables user-privilege-based control of access to data, and notifies client applications dynamically about changes that are made to the data.
Glossary
DB Server
The Genesys Framework component that provides a single database interface for Genesys servers to use while they connect to a variety of proprietary database engines, such as Oracle, Microsoft SQL Server, DB2, Informix, and Sybase.
Glossary
Contents
- 1 General Deployment
- 1.1 Prerequisites
- 1.2 Deployment Tasks
- 1.3 Creating the ORS Application Object
- 1.4 Configuring an ORS Cluster
- 1.5 Manually Loading an SCXML Application on a DN
- 1.6 Manually Loading an SCXML Application on an Enhanced Routing Script
- 1.7 Configuring the ApplicationParms Section of an Enhanced Routing Script Object
- 1.8 Orchestration Server REST API Security Considerations and Basic Hardening Steps
General Deployment
This topic contains general information for the deployment of your Orchestration Server (ORS). In addition, you may have to complete additional configuration and installation steps specific to your Orchestration Server and devices.
Note: You must read the Framework 8.1 Deployment Guide before proceeding with this Orchestration Server guide. That document contains information about the Genesys software you must deploy before deploying Orchestration Server.
Prerequisites
Orchestration Server has a number of prerequisites for deployment. Read through this section before deploying your Orchestration Server.
Framework Components
You can only configure ORS after you have deployed the Configuration Layer of Management Framework as described in the Management Layer User's Guide. This layer contains DB Server, Configuration Server, Configuration Manager, and, at your option, Deployment Wizards. If you intend to monitor or control ORS through the Management Layer, you must also install and configure components of this Framework layer, such as Local Control Agent (LCA), Message Server, Solution Control Server (SCS), and Solution Control Interface (SCI), before deploying ORS. Refer to the Framework 8.1 Deployment Guide for information about, and deployment instructions for, these Framework components.
When deploying ORS 8.1.3 or later, Local Control Agent and Solution Control Server version 8.1.2 or later are required.
Orchestration Server and Local Control Agent
To monitor the status of Orchestration Server through the Management Layer, you must load an instance of Local Control Agent (LCA) on every host running Orchestration Server components. Without LCA, Management Layer cannot monitor the status of any of these components.
Persistent Storage
- Genesys no longer recommends using Cassandra for session recovery. Refer to Recovery of Voice Calls Without Persistence for more information on voice call processing recovery upon an ORS primary/backup switchover without Cassandra persistence.
- Starting from 8.1.401.10, ORS supports using Redis for session persistence and recovery. For more information, see ORS with Redis Cluster.
Determine whether you will use persistent storage (Apache Cassandra). If you chose to do so, then installing Cassandra should be performed as the first step before you deploy ORS. See the Cassandra Installation/Configuration Guide.
Supported Platforms
For the list of operating systems and database systems supported in Genesys releases 8.x. refer to the Genesys System-Level Guides, such as Supported Operating Environment Reference Guide and Interoperability Guide on the Genesys documentation website at docs.genesys.com/System.
Task Summary: Prerequisites for ORS Deployment
| Objective | Related Procedures and Actions |
| Deploy Configuration Layer and ensure that Configuration Manager or Genesys Administrator is running. | See the Framework 8.1 Deployment Guide for details. |
| Deploy Network objects (such as Host objects). | See the Framework 8.1 Deployment Guide for details. |
| Deploy the Management Layer. | See the Framework 8.1 Deployment Guide for details. Also see the Management Layer User's Guide. |
| Deploy Local Control Agent on every host where Orchestration Server components to be running. | See the Framework 8.1 Deployment Guide for details. Also see the Management Layer User's Guide. |
| Deploy persistent storage. |
About Configuration Options
Configuring Orchestration Server is not a one-time operation. It is something you do at the time of installation and then in an ongoing way to ensure the continued optimal performance of your software. You must enter values for Orchestration Server configuration options on the Options tab of your Orchestration Server Application object in Configuration Manager. The instructions for configuring and installing Orchestration Server that you see here are only the most rudimentary parts of the process. You must refer extensively to the configuration options section of this wiki.
Familiarize yourself with the options. You will want to adjust them to accommodate your production environment and the business rules that you want implemented.
Deployment Tasks
You can configure ORS entirely in Configuration Manager or in Genesys Administrator. This chapter describes ORS configuration using Configuration Manager.
The table below presents a high-level summary of ORS deployment tasks.
| Task | Related Procedures or Actions |
| In Configuration Manager, import the Application Template for ORS.
The file name is OR_Server_814.apd. |
If you need help with this task, consult the Configuration Manager Help available on the Management Framework page. See Configuration Database Objects > Environment > Application Templates. |
| Create the ORS Application object. Configure Server Info and Tenants tabs. | Configure the Server Info tab:
Configure http port:
Configure the Tenants tab: Set up the list of Tenants that ORS works with. See the section on Creating the ORS Application object. |
Create a connection for the ORS Application object to the following servers:
|
Use the Connection tab of the Application object in Configuration Manager to set up connections to other servers. See Creating the ORS Application object. |
| Configure the ORS Application to work with persistence storage. | For Redis:
For Cassandra: Go to the Orchestration Server Application object > Options tab > persistence section:
Examples: If SimpleStrategy: cassandra-strategy-options = replication_factor:2 If NetworkTopologyStrategy: cassandra-strategy-options = DC1:2;DC2:3| |
| Configure ORS cluster. | See Clustering. |
| Manually loading an SCXML application on objects other than ORS. | See the following: |
| Configure the ORS Application to work with multimedia interactions and/or multiple Interaction Servers (if needed). | If the ORS Application should work with multimedia interactions:
To support more than one Interaction Server for the same Switch:
For more information, see Pulling from Multiple Interaction Servers. |
| Set a Redundancy type (if needed). | In the Server Info tab:
See High Availability. |
| Add the ORS Application into the ORS cluster. | See Configuring an ORS Cluster. |
| Install Orchestration Server. | See Installation. |
| Configure the Universal Routing Server Application. | In the default section, configure the following:
option: strategy: Set to ORS. |
| Test your ORS Deployment. | See Debugging SCXML Applications with Composer. |
Note: The above ORS Deployment Tasks assumes you have installed/configured any other Genesys components which interact with Orchestration Server, for example, T-Server/SIP Server, Stat Server, Universal Routing Server, Interaction Server (if needed), Composer (if needed), Genesys Administrator (if needed), Genesys Voice Platform (if needed).
Creating the ORS Application Object
- In Configuration Manager, select Environment > Applications.
- Right-click either the Applications folder or the subfolder in which you want to create your Application object.
- From the shortcut menu that opens, select New > Application.
- In the Open dialog box, locate the template that you just imported, and double-click it to open the ORS Application object. For Configuration Server versions before 8.0.3, the Type field will display Genesys Generic Server.
- Select the General tab and change the Application name (if desired).
- Make sure that the State Enabled check box is selected.
- In a multi-tenant environment, select the Tenants tab and set up the list of Tenants that use ORS.
- Note: Order matters. The first Tenant added will become the default Tenant for Orchestration Server. Please ensure that the list of Tenants is created in the same order for both Orchestration Server and Universal Routing Server.
- Click the Server Info tab and select the following: Host, select the name of the Host on which ORS resides; Ports, select the Listening Port. Note that a default port is created for you automatically in the Ports section after you select a Host. Select the port and click Edit Port to open the Port Info dialog box.
- Enter an unused port number for the Communication Port. For information on this dialog box, see the Port Info Tab topic in the Framework 8.1 Configuration Manager Help.
- For Web Service access to this ORS Application, configure the HTTP port:
- In the New Port Info dialog box, in Port ID, enter http.
- For Communication Port, enter an unused port number.
- For Connection Protocol, select http from the drop-down menu list.
- Click OK.
- Select the Start Info tab and specify the following:
- Working Directory, enter the Application location (example: C:/GCTI/or_server)
- Command Lineenter the name of executable file (example: orchestration.exe).
- Note: If there is a space in the ORS Application name, you must place quotation marks before and after the name of the ORS Application.
- Command Line Arguments, enter the list of arguments to start the Application (example: -host <name of Configuration Server host> -port <name of Configuration Server port>-app <name of ORS Application>
- Note: If you are using Configuration Server Proxy and do not use Management Layer, enter the name of Configuration Server proxy for host and the port of the Configuration Server Proxy.
- Startup time, enter the time interval the server should wait until restarting if the server fails.
- Shutdown time, enter the time interval the server takes to shut down.
- Auto-Restart setting, selecting this option causes the server to restart automatically if the server fails.
- Primary setting, selecting this option specifies the server as the primary routing server (unavailable).
- Select the Connections tab and specify all the servers to which ORS must connect:
- T-Server
- Interaction Server
- Universal Routing Server
Configuring an ORS Cluster
ORS provides a new configuration Transaction of the type List, called ORS in the Environment tenant , to determine the ORS cluster configuration. Each section in the List represents a single Orchestration cluster. Each of the key/value pairs in that section links a specific Orchestration application to a Data Center (legacy method).
Starting with release 8.1.400.64, you can configure an ORS cluster using a dedicated Transaction object of type List.In addition, options for all ORS applications in a cluster may be configured within that object. This eliminates the need to individually configure the options in every ORS application. For more information, see Clustering, Enhanced Cluster Configuration section.
Notes:
- All ORS nodes with the Data Center set to an empty string will belong to one "nameless” Data Center.
- ORS 8.1.3 and later requires creating an ORS Transaction List even if the deployment has only one ORS node.
Adding an ORS Application to Cluster and Data Center
Configure each section to represent a single Orchestration cluster, and each of the key/value pairs to link a specific Orchestration Application to a Data Center.
- In Configuration Manager, select the Tenant Environment and navigate to the Transactions folder.
- Right-click inside the Transactions window and select New > Transaction from the shortcut menu.
- On the General tab, enter the following information:
- Name: ORS
- Alias: ORS
- Type: List (pulldown menu)
- Recording Period: 0
- State Enabled should be checked.
- Click the Annex tab to enter the cluster information.Right-click inside the Section window and select New from the shortcut menu. Enter the name of your cluster.
- Double-click the cluster name.
- Right-click inside the Section window and select New from the shortcut menu.
- In the Option Name field, enter the name of an Orchestration application configured as Primary.
- In the Option Value field, enter the name of the Data Center associated with the Orchestration Node.
- Click OK to save.
- Repeat Steps 7 - 10 for all Orchestration Nodes that belong to this cluster.
- Click Up One Level.
- Repeat Steps 5 - 12 for all clusters.
- Click OK to save and exit. An example is shown below.

In the above example, Cluster1 consists of six nodes presented by Primary instances of Orchestration Servers:
- node001 and node002, which are linked to Data Center London.
- node003 and node004, which are linked to Data Center Paris.
- node005 and node006, which are linked to a "nameless” Data Center.
When a Data Center value is left empty, the nodes default to a "nameless" Data Center.
Note: In ORS 8.1.3 and later, work allocation happens automatically, based on the configuration of the cluster described above.
ORS 8.1.3 and later requires creating an ORS Transaction List even if the deployment has only one ORS node.
Manually Loading an SCXML Application on a DN
This section describes manually loading an SCXML application on a DN. The following types of DNs can be configured: Extension, ACD Position, Routing Point. See DN-Level Options.
- In Configuration Manager, select the appropriate Tenant folder, Switch name, and DN folder.
- Open the appropriate DN object.
- Select the Annex tab.
- Select or add the Orchestration section.
- Right-click inside the Options window and select New from the shortcut menu.
- In the resulting Edit Option dialog box, in the Option Name field, type application.
- In the Option Value field, type the URL of the SCXML document to load.
- Refer to the application option description for a full description of this configuration option and its valid values.
- Click OK to save
Manually Loading an SCXML Application on an Enhanced Routing Script
See Enhanced Routing Script Options.
- In Configuration Manager, select the appropriate Tenant and navigate to the Scripts folder.
- Open the appropriate Script object of type Enhanced Routing Script (CfgEnhancedRouting).
- Select the Annex tab.
- Select or add the Application section.
- Right-click inside the options window and select New from the shortcut menu.
- In the Option Value field, create the url option.
- Refer to the url option description in the Application section for a full description of this configuration option and its valid values.
- Click OK to save
In addition, an option can be used to specify a string that represents a parameter value that is to be passed to the Application. The ApplicationParms section contains the values for data elements that can be referred to within the SCXML application. The Enhanced Routing Script object is named as such to identify SCXML applications and Routing applications. Existing IRD-based IRL applications are provisioned as Script objects.
Configuring the ApplicationParms Section of an Enhanced Routing Script Object
- In Configuration Manager, select the appropriate Tenant and navigate to the Scripts folder.
- Open the appropriate Script object of type Enhanced Routing Script (CfgEnhancedRouting).
- Select the Annex tab.
- Select or add the ApplicationParms section.
- Right-click inside the options window and select New from the shortcut menu.
- In the resulting Edit Option dialog box, in the Option Name field, type a name for the parameter option.
- In the Option Value field, type the value for the option.
- Note: Refer to the option description for {Parameter Name} for a full description of this configuration option its valid values. The table Parameter Elements for ApplicationParms provides useful information about parameters that can be added. The figure below shows an example of the use of the ApplicationParms section.
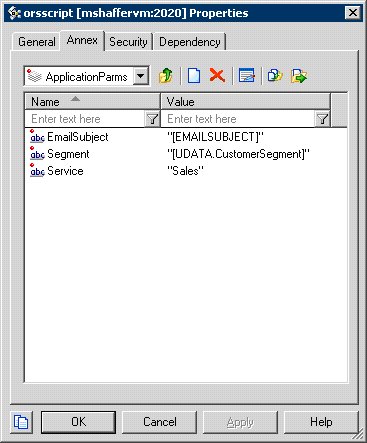
- Click OK to save.
- Repeat from Step 5 to add another option in this section.

Orchestration Server REST API Security Considerations and Basic Hardening Steps
Orchestration Server implements RESTful API via HTTP protocol, described in detail here. It is possible that through this RESTful API, sensitive data stored in the JavaScript context of an active routing strategy might be accessed, and ORS can be forced to perform resource-consuming activities (DoS attack).
Major security vulnerabilities of the RESTful API implementation are:
- No authentication of any kind.
- No ability to provision HTTP responses with security headers of any kind.
- No firewall features of any kind (port filtering, etc.).
Hardening Steps for ORS REST API
You can perform the following steps to harden the ORS REST API (that is, secure the ORS REST API by reducing its surface of vulnerability):
- Provision only one listening port for the REST API (the ORS application in CME must have only one port with the protocol http (named default) in the Server Info tab).
- Provision TLS/SSL transport-level security for communications via that HTTP port as described in the Genesys Security Deployment Guide.
- Configure the firewall to allow connections to ORS ports only from 100% trusted zones with no exceptions. This is very important because, access to the ORS HTTP port means access to all features of the ORS REST API.