Test with GWM Proxy
| Purpose: To configure and run the GWM Proxy. |
This proxy is a development tool, which enables you to test your application without adding the JavaScript Tracking code to your website. Once you have configured this proxy, you can launch it and start the Genesys Web Engagement servers to start testing your application by emulating visit on your website.
Contents
Configure and Start GWMProxy
Retrieve the GWMProxy Port
- Navigate to
C:\Users\<current user>\GWMProxy.
If this folder does not exist, navigate to your Web Engagement installation directory and launchservers\proxy\startserver.bat. GWMProxy appears automatically. - Edit
config.xmland find the tag <proxy>. - Check that the value of <ip> tag is set to your host IP address;
Values 127.0.0.1 or localhost are not allowed! - Note the value of the <port> tag (usually 15001), required to set up your browser.
Start the Proxy
Navigate to your Web Engagement installation directory and launch servers\proxy\startserver.bat
The GWMProxy starts.
Set Up your Web Browser
- Start your Web Browser.
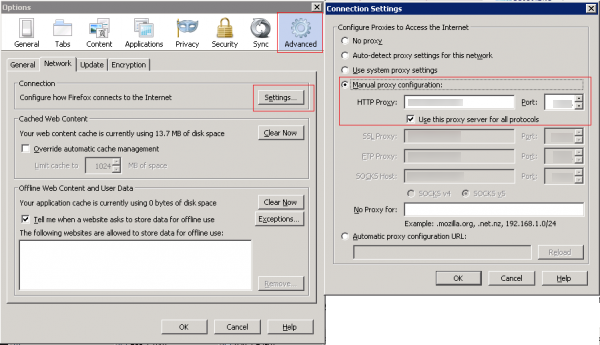
- Open your Internet settings. For instance, in Mozilla Firefox, select
Tools > Options. TheOptionsdialog window appears. - Select
Advanced, and in theNetworktab,click Settings...TheConnection Settingsdialog windows appears. - Select the
Manual proxy configurationoption:- Enter your host IP address in the HTTP proxy text box;
- Enter the port used by the GWMProxy in the Port text box;
- Select the option
Use this proxy server for all protocols.
- Click OK. Now your browser is using the GWMProxy which will inject the Web Engagement tracking code to the webpages of the monitored domain.
Injecting code in the HTTP Response of the GWMProxy
Going further, you can edit the map.xml file available in the /tools/proxy directory to customize the code injected in the HTTP response retrieved through the proxy. In that purpose, you must insert your code under the <content></content> elements of map.xml with CDATA masking.
If you want to browse a secure domain, insert your code under <secure><content>…</content></secure> elements, otherwise, use the <simple><content>…</content></simple> element.
In the root <map> tag, the "replace" attribute uses regular expressions to specify where the code must be injected. For instance, the string "%s </head>" means that the "%s"code must be added before </head> tag "</head>".
The following map.xml file injects the DSL code in the HTTP response.
<?xml version="1.0"?>
<mapping>
<map replace="%s </head>" domains="genesyslab.com;www.genesyslab.com;www-ssl.genesyslab.com;default.proxy.lucent.com">
<simple>
<content>
<![CDATA[<script>
var _gt = _gt || [];
_gt.push(['config', {
'name': 'genesyslab.com',
'domainName' : 'genesyslab.com',
'languageCode': 'en-US',
'mobile': false,
'dslResource': 'http://demosrv:8081/frontend/resources/dsl/domain-model.xml',
'secureDslResource': 'https://demosrv:8443/frontend/resources/dsl/domain-model.xml',
'httpEndpoint': 'http://demosrv:8081',
'httpsEndpoint': https://demosrv:8443'}]);
(function() {
var gt = document.createElement('script'); gt.type = 'text/javascript'; gt.async = true;
gt.src = ('https:' == document.location.protocol ? 'https://demosrv:8443' :
'http://demosrv:8081') + '/frontend/resources/js/GTC.js';
var gts = document.getElementsByTagName('script')[0]; gts.parentNode.insertBefore(gt, gts);
})();
</script>
]]>
</content>
</simple>
</map>
</mapping>Checking Hosts in Window\System32 Configuration
Edit the c:\Windows\System32\drivers\etc\hosts file with a text editor. Make sure that your IP address is correctly associated with your host's complete name.
For instance:
192.168.3.103 MyHostName MyHostName.MyWebSite.com
If you are using a Genesys Demo image and if you changed your machine IP Address, demosrv.genesyslab.com may still be referred in some genesys server configuration and prevent theses servers from working correctly. Add the following declaration to bypass this issue:
127.0.0.1 demosrv.genesyslab.com
In addition, navigate to C:\Users\Administrator\My Documents\Documentation\DemoPlatform\Changing IP Address and read machine.txt for further information.

