
Enable Monitoring
Purpose: To enable the monitoring of your website.
|
You must add a short standardized section of JavaScript code to your pages. This snippet of JavaScript is independent from the Web Engagement Model that you implemented (rules, categories, and DSL). When this code is evaluated at document load time, it loads the JavaScript libraries that implement the three agents, including the DSL-specific rules. These libraries then submit events according to the implemented model. For further information on the high level design of Genesys Web Engagement, see Architecture.
Contents
Retrieve the JavaScript Tracking Code
![]() Purpose: To retrieve the tracking code, available in the Genesys Web Engagement Plug-in for Genesys Administrator Extension that you installed previously.
Purpose: To retrieve the tracking code, available in the Genesys Web Engagement Plug-in for Genesys Administrator Extension that you installed previously.
Prerequisites
Start
- Open Genesys Administrator Extension.
 Main Home Panel of the Genesys Administrator Extension
 - Navigate to
CONFIGURATION > Script Generator. TheScript Generatorinterface opens. - Fill in the following fields:
- Enter your application name for
Name; for instance,genesyslab. - Enter the
Domain name; for instance,genesyslab.com;
Note: These parameters must be identical to the parameters specified when your created your application; see Define the Monitoring Domains - Select the correct Frontend Server. If you deployed Load Balancer and nodes, you must select the Load Balancing Frontend Server, not a node.
- In
Endpoints, enter the IP address and listening ports associated to your Load Balancing Frontend Server; - Enter the paths to the DSL resources; the paths are relative to the
/frontend/resources/dsldirectory of your web engagemennt application; you can add your DSL resources to this directory or sub-directories.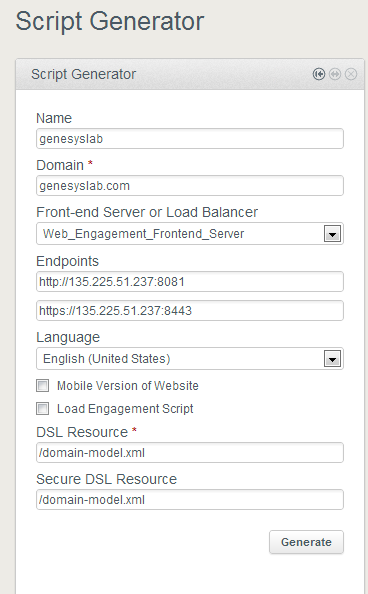 Example for the genesyslab application
- Enter your application name for
- Click on the
Generatebutton. The Generated Script panel opens.


End
- You can generate your script as many time as you need.
- You can customize this script as detailed in Plug-in Help
Next Steps
![]() Add the JavaScript Tracking Code to your Website
Add the JavaScript Tracking Code to your Website
Add the JavaScript Tracking Code to your Website
![]() Purpose: To add the instrumentation script and tracking code to your website or your mobile application and start submitting data to Web Engagement Servers.
Purpose: To add the instrumentation script and tracking code to your website or your mobile application and start submitting data to Web Engagement Servers.
To set up tracking, you need access to the source code for your website.
Prerequisites
- You must remove any former or older tracking code snippet from your webpages.
- You generated a script with the Script Generator interface of the Genesys Web Engagement plug-in for Administrator Extension.
Start
- Select and copy the script generated in the Generated Script Panel of the Administrator Extension.
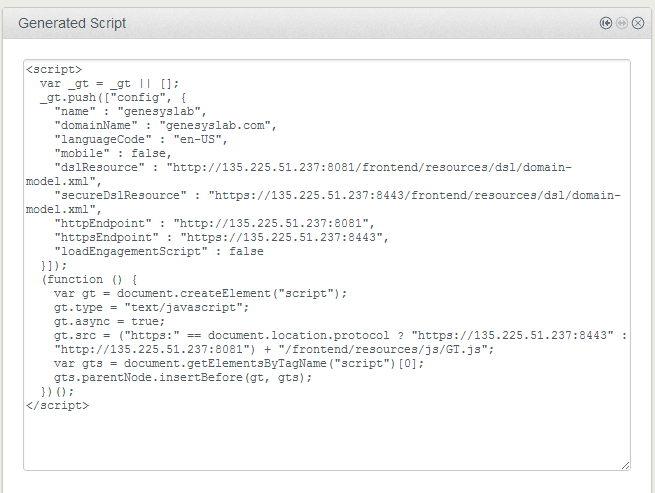 The Tracking Script for genesyslab
 - Paste the JavaScript Tracking Code at the bottom of the
<head></head>section of your webpages:- You can edit manually the webpages that you wish to monitor.
- You can edit the header template of your website if you have one.
- If your website includes additional scripts, modify the position of these scripts, as described here, to ensure best performance across all the browsers.
- Reorder the scripts of the
<head></head>section to ensure that the JavaScript Tracking Code is the last one of the section. - Make sure that additional scripts are located after the webpage contents: at the bottom of the
<body></body>section, or in the<footer></footer>section of your webpage.
- Reorder the scripts of the
End