
Testing with GWM Proxy
The GWM Proxy is a development tool, which enables you to test your application without adding the JavaScript tracking code to your website. Once you have configured this proxy, you can launch it and start the Genesys Web Engagement servers to start testing your application by emulating a visit on your website. In a few clicks, without modifying your website, Genesys Web Engagement features will show up on a set of web pages, according to the rules and categories that you created.
There are two proxy tools available in the Genesys Web Engagement installation: Simple and Advanced. See the appropriate tabs below for details and configuration information.
To use the Simple GWM Proxy, you must first complete a few procedures to configure the tool and your web browser.
Getting the GWM Proxy Port
Complete this procedure to retrieve the GWM Proxy port, which you will need later when you configure your web browser.
Start
- Navigate to C:\Users\current user\GWMProxy.
- If this folder does not exist, navigate to your Web Engagement installation directory and launch servers\proxy\startserver.bat (on Windows) or servers\proxy\startserver.sh (on Linux). The GWMProxy folder appears automatically.
- Edit config.xml' and find the <proxy> tag.
- Check that the value of the <ip> tag is set to your host IP address.
- Note: You cannot use 127.0.0.1 or localhost for this value.
- Note the value of the <port> tag (usually 15001).
- Save your changes.
End
Starting the Proxy
Navigate to your Web Engagement installation directory and launch servers\proxy\startserver.bat (on Windows) or servers\proxy\startserver.sh (on Linux). The Simple GWM Proxy starts.

Setting Up your Web Browser
Configure your web browser to use the Simple GWM Proxy.
Start
- Start your web browser.
- Open your Internet settings. For instance, in Mozilla Firefox, select Tools > Options'. The Options dialog window appears.
- Select Advanced', and in the Network tab click Settings... The Connection Settings dialog windows appears.
- Select the Manual proxy configuration option:
- Enter your host IP address in the HTTP proxy text box.
- Enter the port used by the GWMProxy in the Port text box. This is the value you retrieved in "Getting the GWMProxy Port".
- Select the option Use this proxy server for all protocols.
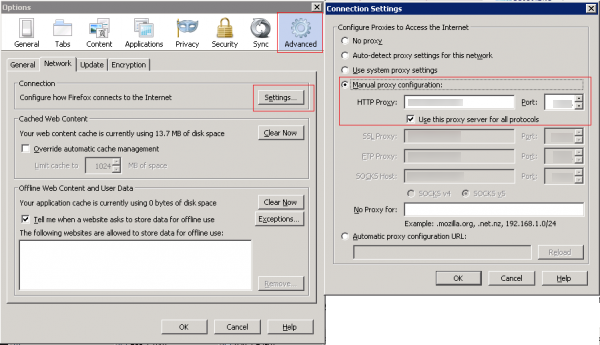 GWMProxy used in Firefox
- Click OK. Now your browser is set up for the GWM Simple Proxy. To use the proxy, all you need to do is navigate to the site where you want the proxy to inject the Web Engagement instrumentation script and browse through the web pages.

End
Modifying the Script in the GWM Proxy (Optional)
You can edit the map.xml file in the /tools/proxy directory to customize the code injected in the HTTP response retrieved through the proxy.
To do this, add your code under the <content></content> element with CDATA masking.
If you want to browse a secure domain, insert your code under <secure><content>...</content></secure> elements; otherwise, use the <simple><content>...</content></simple> element.
In the root <map> tag, the "replace" attribute uses regular expressions to specify where the code must be injected. For instance, the string "%s </head>" means that the "%s" code must be added before the "</head>" tag.
Here is an example of a modified map.xml file that injects the DSL code in the HTTP response.
<?xml version="1.0"?>
<mapping>
<map replace="%s </head>" domains="genesyslab.com;www.genesyslab.com;www-ssl.genesyslab.com;">
<simple>
<content>
<![CDATA[
<script>
var _gt = _gt || [];
_gt.push(['config', {
dslResource: ( 'https:' == document.location.protocol ? 'https://demosrv:8443' :
'http://demosrv:8081') + '/frontend/resources/dsl/domain-model.xml',
httpEndpoint: 'http://demosrv:8081',
httpsEndpoint: 'https://demosrv:8443'
}]);
var _gwc = {
widgetUrl: ( 'https:' == document.location.protocol ? 'https://demosrv:8443' :
'http://demosrv:8081') + '/frontend/resources/chatWidget.html'
};
(function(gpe, gwc) {
if (document.getElementById(gpe)) return;
var s = document.createElement('script'); s.id = gpe;
s.src = ( 'https:' == document.location.protocol ? 'https://demosrv:8443' :
'http://demosrv:8081') + '/frontend/resources/js/build/GPE.min.js';
s.setAttribute('data-gpe-var', gpe);
s.setAttribute('data-gwc-var', gwc);
(document.getElementsByTagName('head')[0] || document.body).appendChild(s);
})('_gt', '_gwc');
</script>
]]>
</content>
</simple>
</map>
</mapping>
The Advanced GWM Proxy is based on the
OWASP Zed Attack Proxy Project (ZAProxy). In addition to acting as a proxy, the Advanced GWM Proxy also provides a UI and validates vulnerabilities in your website at the same time.
To use the Advanced GWM Proxy, you must first complete a few procedures to configure the tool.
Starting the Proxy
Navigate to your Web Engagement installation directory and launch servers\proxy2\zap.bat (on Windows) or servers\proxy2\zap.sh (on Linux). The proxy starts.

Configuring the Proxy
Once the proxy is running, you can configure it using the GUI.
Start
- Open Tools > Filter....
 Select the Filter menu item.
 - In the list of filters, select Replace HTTP response body using multiple patterns and click ... to edit the filter.
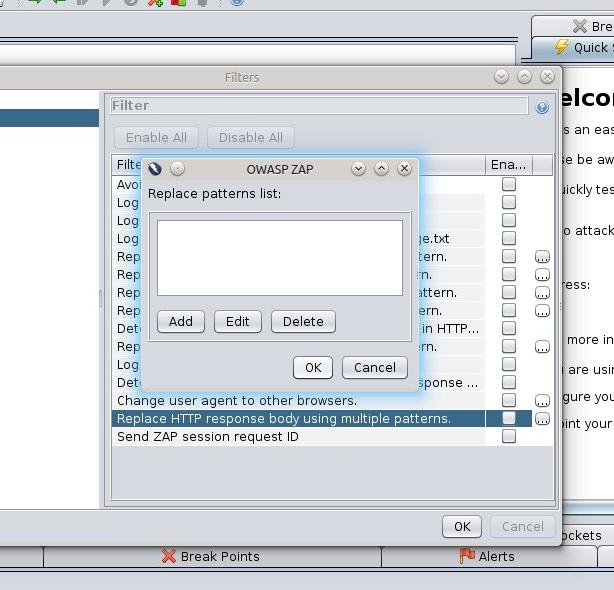 Select the filter.
 - Click Add and enter the following information:
- Pattern - </head>
- Replace with -
<script> var _gt = _gt || []; _gt.push(['config', { dslResource: ( 'https:' == document.location.protocol ? 'https://localhost:8081' : 'http://localhost:8081') + '/frontend/resources/dsl/domain-model.xml', httpEndpoint: 'http://localhost:8081', httpsEndpoint: 'https://localhost:8081' }]); var _gwc = { widgetUrl: ( 'https:' == document.location.protocol ? 'https://localhost:8081 : 'http://localhost:8081') + '/frontend/resources/chatWidget.html' }; (function(gpe, gwc) { if (document.getElementById(gpe)) return; var s = document.createElement('script'); s.id = gpe; s.src = ( 'https:' == document.location.protocol ? 'https://localhost:8081' : 'http://localhost:8081') + '/frontend/resources/js/build/GPE.min.js'; s.setAttribute('data-gpe-var', gpe); s.setAttribute('data-gwc-var', gwc); (document.getElementsByTagName('head')[0] || document.body).appendChild(s); })('_gt', '_gwc'); </script> </head>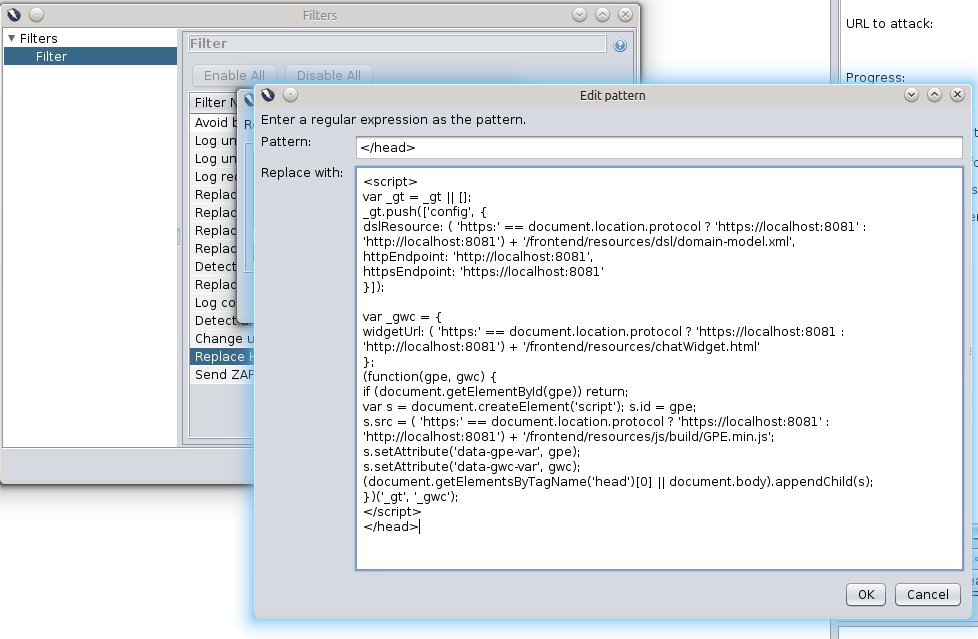 Enter the pattern and text to replace it with
 - Click OK to save the pattern.


End
Configuring the URL Filter
Complete this procedure to use the GUI to configure URLs that the proxy should ignore.
Start
You can exclude a site in one of two ways:
- In the Sites tab, right-click on a site and select Exclude from > Proxy.
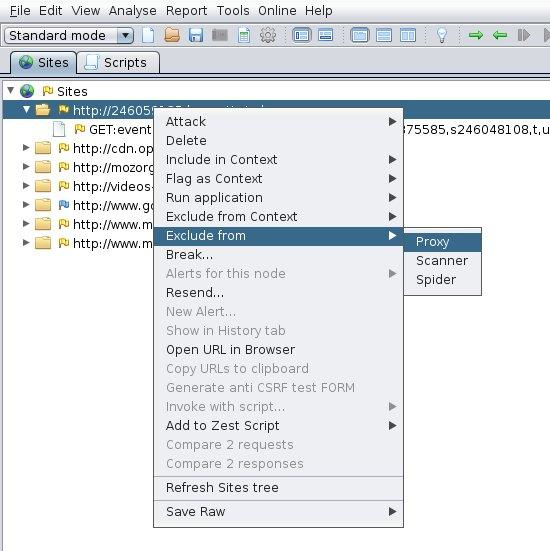 Select a site to exclude
 - Select File > Properties. In the Session Properties window, select Exclude from proxy, add your URL, and click OK.
 Enter a URL to exclude.
- If you want the proxy to remember the excluded URLs beyond the current session, select File > Persist session... and select a file to save your session.


End
Working with the Proxy
After you have configured the proxy, keep it open and open up a web browser. Now you can browse through your web pages that are instrumented with Genesys Web Engagement and they will be displayed in the Sites tab of the proxy GUI:

For more information about working with ZAProxy, see https://www.owasp.org/index.php/OWASP_Zed_Attack_Proxy_Project
Genesys performs security testing with
OWASP Zed Attack Proxy (ZAProxy) to make sure the Genesys Web Engagement solution is invincible to known attacks.
ZAP Overview
The ZAProxy is an easy-to-use, integrated penetration testing tool for finding vulnerabilities in websites and web applications.
Among others, ZAProxy supports the follow methods for penetration security testing:
Genesys uses both methods.
Passive Scan Overview
ZAP is an Intercepting Proxy. It allows you to see all of the requests made to a website/web app and all of the responses received from it. For example, you can see AJAX calls that might not otherwise be obvious.
Once set up, ZAP automatically passively scans all of the requests to and responses from the web application being tested.
While mandatory use cases for the application that is being tested are followed (either manually or automatically), ZAProxy analyzes the requests to verify the usual operations are safe.
Active Scan Overview
Active scanning attempts to find potential vulnerabilities by using known web attacks against the selected targets. Active scanning is an attack on those targets. ZAProxy emulates known attacks when active mode is used.
Through active scanning, Genesys Web Engagement is verified against the following types of attacks:
- Spider attack — Automatically discovers all URL links found on a web resource, sends requests, and analyzes results (including src attributes, comments, low-level information disclosure, and so on).
- Brute browsing (based on the Brute Force technique) — Systematically makes requests to find secure resources based on known (commonly used) rules. For example, backup, configuration files, temporary directories, and so on.
- Active scan — Attempts to perform a predefined set of attacks on all resources available for the web resource. You can find the default set of rules here.
- Ajax spider — Automatically discovers web resources based on presumed rules of AJAX control (JS scripts investigation, page events, common rules, dynamic DOM, and so on).
References
If you want to examine your website against vulnerabilities in a similar way, refer to the OWASP Zed Attack Proxy Project or other documentation to learn about how to perform security testing with ZAP.