Contents
Importing and Managing Datasets
Datasets can include a broad range of data, including interaction details, outcome data, and any other data you consider relevant for predictive routing. You can upload multiple Datasets, but each Predictor is built on data from a single Dataset. Data for upload must be compiled into a CSV file with a consistent schema. Genesys Info Mart is a key source for interaction data, but you might also include data from third-party applications such as CRM system or a survey provider.
You can upload data from a CSV file using either the GPR web application, as described in this topic, or using the GPR API. The file can be zipped for uploading.
- If you plan to use the API, see the Predictive Routing API Reference. (Requires a password for access. Please contact your Genesys representative if you need to view this document.)
For a detailed discussion of the types of data you might use and how it is processed in Predictive Routing, see The Data Pipeline in the Genesys Predictive Routing Deployment and Operations Guide.
View Data on This Window
- To open the configuration menu, click the Settings gear icon, located on the right side of the top menu bar:
 .
. - The right-hand toggle navigation menu enables you to view a tree view of all Datasets associated with your Account, with the Predictors and Models configured for each. To open or close this navigation menu, click the
 icon.
icon. - You must reload the page to view updates made using the Predictive Routing API, such as appending data to a Dataset, creating, updating, or deleting a Predictor, or creating, updating, or deleting a Model.
Best Practices
- Because a large complex Dataset takes significant time to import and display, Genesys recommends that you start a new deployment by importing a small, starter Dataset, which will load quickly and enable you to troubleshoot any issues efficiently. You can then append the remaining Dataset in a single append action.
- When you are creating the CSV data file for a Dataset, do not include the following in the column name for the field to be used as the ID_FIELD: ID, _id, or any variant of these that changes only the capitalization. Using these strings in the column name results in an error when you try to upload your data.
- To speed up Dataset uploads, increase the number of CPUs allocated for Dataset processing from two (the default) to four or six CPUs. For example, with six CPUs, the time required to append a Dataset of three million rows could be less than two hours.
- Release 9.0.013.01 and higher uses the Minio container to increase Dataset upload speeds. If you are running an earlier release and experience unacceptably slow upload and append times, consider upgrading to a more recent release of the AI Core Services component.
- See Supported Encodings and Unsupported Characters for information on how to configure your data.
- If you use a Microsoft editor to create your CSV file, remove the carriage return (^M) character before uploading. Microsoft editors such as Excel, WordPad, and NotePad automatically insert this character. For tips on removing the character from Excel files, refer to How to remove carriage returns (line breaks) from cells in Excel 2016, 2013, 2010.
Procedure: Create your Dataset schema
Purpose: To establish a schema where all data falls into a set structure; for example, all data within a certain column must have the same data type. GPR analyzes your data, recognizes the structure, and ensures that all data you upload later complies with the established schema.Prerequisites
- A small starter Dataset consisting of the desired columns and several rows containing placeholder values for each column that can establish the correct data type for that column.
Steps
Click the Datasets tab, then follow the steps to create a Dataset schema:
- Click Create Dataset. The Create Dataset dialog box opens.
- Click Select file. Navigate to your small starter CSV file and select it.
- Your CSV file can be zipped. You do not need to unzip it for uploading.
- Select the separator type for your CSV file. You can choose either TAB or COMMA.
- Select the encoding type. By default, this is utf-8.
- Click Create. The new Dataset appears on the Dataset window.
Procedure: Set the Timestamp field and synchronize the schema
Steps
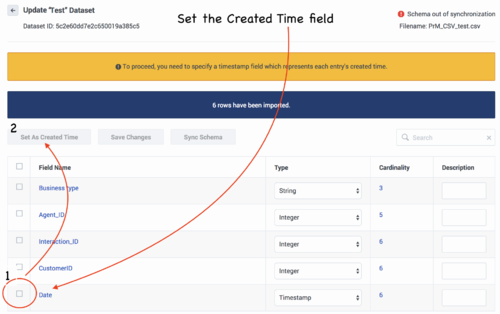
- Set the Timestamp. This field must identify the interaction start time.
- The data type must be Timestamp. If the data type is not set correctly when the data is uploaded, change the data type by clicking in the Type column and selecting Timestamp from the drop-down list.
- Scroll to the top of the list of fields and click Set as Create Time, and then click Save Changes. An Updated schema successfully status message appears in the upper right side of the Datasets window.
- Click Sync Schema. A message appears once the schema has been synced. If there are issues, open the error message to troubleshoot the problem.
- Click Accept Schema. A Schema accepted successfully status message appears.
This procedure has:
- Established the schema structure for the required columns.
- Established the column containing the Timestamp parameter.
Next Step: Upload the remainder of your data.
Procedure: Upload your Dataset data
Purpose: Upload your Dataset data to the established schema.Prerequisites
- You have created a schema, as described in the procedure above.
- You have created a CSV file containing all your Dataset data in the accepted schema structure.
Steps
From the Settings > Datasets window, click the name of your Dataset in the list. The window displays a list of the fields in your Dataset.
- Click Append Data. The Append Data dialog box opens.
- Click Select File. Navigate to your complete CSV file and select it.
- Your CSV file can be zipped. You do not need to unzip it for uploading.
- Select the separator type for your CSV file. You can choose either TAB or COMMA.
- Select the encoding type. By default, this is utf-8.
- Click Create. The uploaded data appears on the Dataset file list window.
- Adjust any data types in the Type column that were interpreted incorrectly.
- Adjust the Visibility toggle, if desired, to hide fields you do not need to see on thisDataset fields window or the Dataset Details window.
- The Visibility toggle simply enables you to configure the display to make it easier to see the fields you are most interested in. Hidden fields continue to be processed.
- Click the Show visible fields only check box to reduce the number of fields displayed.
- Use the Search box to locate a specific field.
- Click Save Schema. A Success. Schema updated successfully status message appears.
This procedure has:
- Completed the Dataset upload to GPR.
The List of Datasets
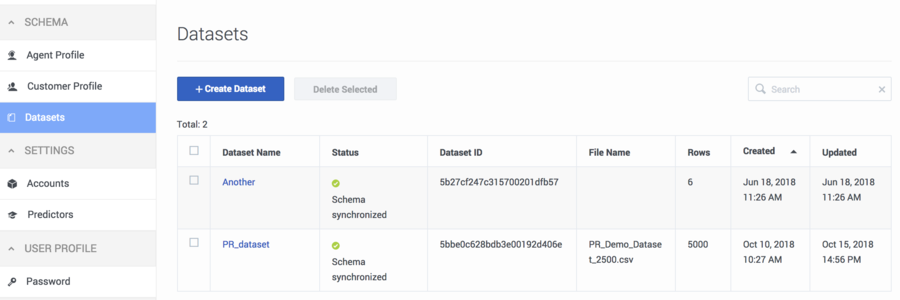
When you navigate to the Settings > Datasets page, all Datasets associated with your account are displayed in a table. Each row presents a Dataset.
- The columns in the Dataset list are the following:
- Dataset Name - The name entered when creating the Dataset.
- Status - Whether the Dataset is synchronized.
- Dataset ID - An identifying number used to access the Dataset in API requests.
- Filename - The name of the CSV file most recently used to create or append data to the Dataset.
- Rows - The number of rows in the Dataset.
- Created - The date and time the Dataset was initially created.
- Updated - The most recent date and time the Dataset was updated.
The List of Dataset Fields
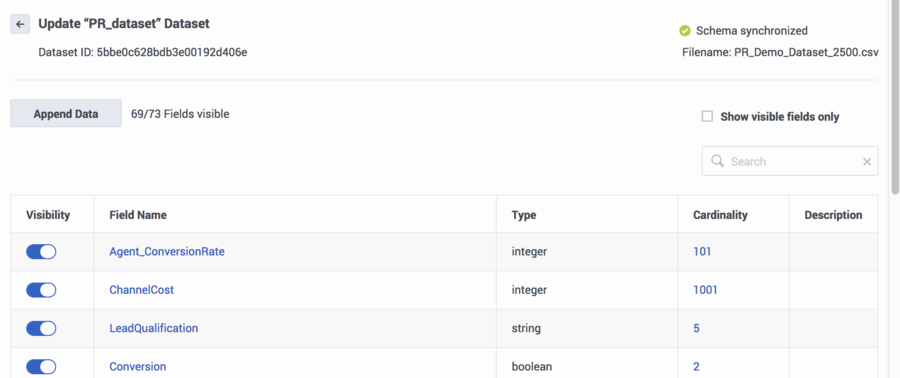
When you navigate to the Settings > Datasets page, and click a Dataset name, your data is displayed in a table. Each row presents a Dataset field.
- The columns in the Dataset fields list are the following:
- Visibility - Shows which fields are set as visible in this list and in the Datasets Details window. This setting affects the display only. Hidden fields are included when running analysis reports, such as the Feature Analysis report, and during scoring.
- Field Name - The name of the field.
- Type - The data type for the field.
- Cardinality - The number of unique values that appear in this field. If there are more than 1000, the number appears as 1001. Click this number to see the actual values that appear in this field.
- Description - Any explanatory note you might have added about this field.
- Click Append Data to append more data to your Dataset.
- ImportantYour appended data must have the same schema structure as the existing data. You can add fields and values, but you cannot change the existing schema. If you need to change the structure of your schema, delete the incorrect Dataset from the table containing all the Datasets associated with your account and then upload a new Dataset.
- To locate a specific field in the list, type the field name into the Search field on the upper right side of the window.
- The ID for the Dataset is located at the top of the list f Dataset fields, just below the Dataset name. This ID is used to make API requests.
- To return to the list of all Datasets, click the left-pointing arrow next to the name of your Dataset at the top of the iist of fields.
- To delete a Dataset, from the table listing all Datasets, select the check box at the beginning of the row for that Dataset and then click Delete Selected.
Understanding Cardinality
- When you upload additional data, cardinalities are automatically updated after every 1,000 new rows are uploaded.
- To view updated Customer Profile data, including cardinalities, re-load your browser page.
Supported Encodings
By default, GPR handles data using UTF-8 encoding. However, starting with release 9.0.014.00, GPR supports importing of data that uses certain legacy encodings. Appendix: Supported Encodings lists those encodings currently supported. This list is updated as new encodings are verified. If you use an encoding type that is not listed, contact your Genesys representative for assistance.
Unsupported Characters in Agent and Customer Profiles and Datasets
The following characters are not supported for column names in Datasets or Agent and Customer Profile schemas. If GPR encounters these characters in a CSV file, it reads them as column delimiters and parses the data accordingly.
- | (the pipe character)
- \t (the TAB character)
- , (the comma)
Workaround: To use these characters in column names, add double quotation marks (" ") around the entire affected column name, except in the following situations:
- If you have a comma-delimited CSV file, add double quotations marks around commas within column names; you do not need quotations for the \t (TAB) character.
- If you have a TAB-delimited CSV file, add double quotations marks around TAB characters within column names; you do not need quotations for the , (comma) character.
- You must always use double quotations for the | (pipe) character.
Unsupported characters in releases prior to 9.0.014.00
In releases prior to 9.0.014.00, certain characters in column names are ignored, are unsupported, or cause an upload to fail, as explained in the following points:
- Columns with the following symbols in their column names are not added to Agent Profiles or Customer Profiles:
- *, !, %, ^, (, ), ', &, /, â, è, ü, ó, â, ï
- The following symbols in column names are ignored, and the column is added with the symbol dropped out as though it had not been entered:
- [Space], -, <
- Non-ASCII characters are not supported. How they are handled differs depending on what data you are uploading:
- In Agent Profiles and Customer Profiles, columns with non-ASCII characters in the column name are not added.
- In Datasets, when a column name contains a mix of ASCII and non-ASCII characters, GPR removes the non-ASCII characters from the column name as though they had not been entered and correctly uploads all column values.
- In Datasets, when a column name contains only non-ASCII characters, the column name is entirely omitted. All the column values are preserved, but you cannot modify or save the schema. In this scenario, GPR generates the following error message: An unhandled exception has occurred: KeyError('name').
Logs for Unsupported Characters
The following Agent State Connector log messages record issues with unsupported characters:
- <datetime> [47] ERROR <BOTTLE> schema_based.py:63 Invalid expression while parsing: <fieldname> = None
- <datetime> [47] ERROR <BOTTLE> agents.py:172 Fields set([u'<fieldname>']) were ignored because names were invalid.


