Contents
Settings: Configure Accounts
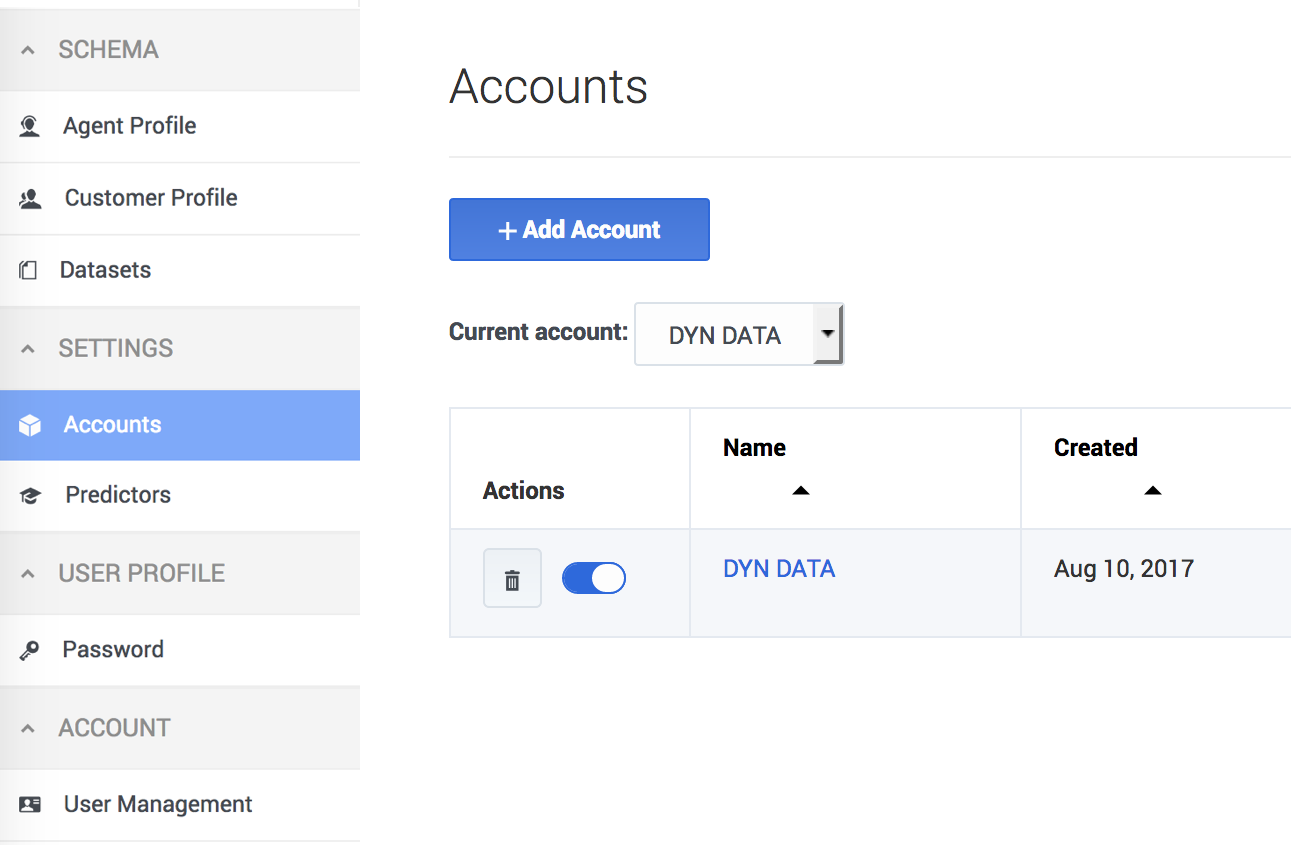
Accounts are managed on the Settings > Accounts tab. To open the configuration menu, click the Settings gear icon, located on the right side of the top menu bar: ![]() .
.
- Accounts are equivalent to tenants. A user with STAFF or ADMIN rights can manage how the accounts existing in your environment interact with Predictive Routing (GPR).
- GPR supports the following capabilities:
Adding a new account
When you initially deploy the AI Core Services (AICS), the set-up process creates a default account with the name "Predictive Routing". The Predictive Routing application is automatically added to this account.
If you need to create additional new accounts, perform the following steps:
- Click the Settings > Accounts tab.
- Click Add Account.
- Specify a name for the account (normally the name of the organization represented by the account).
- If you are using LDAP authentication, select the LDAP Authentication check box. See LDAP-enabled accounts, below, for configuration instructions.
- Click Create.
Configuring or updating an account
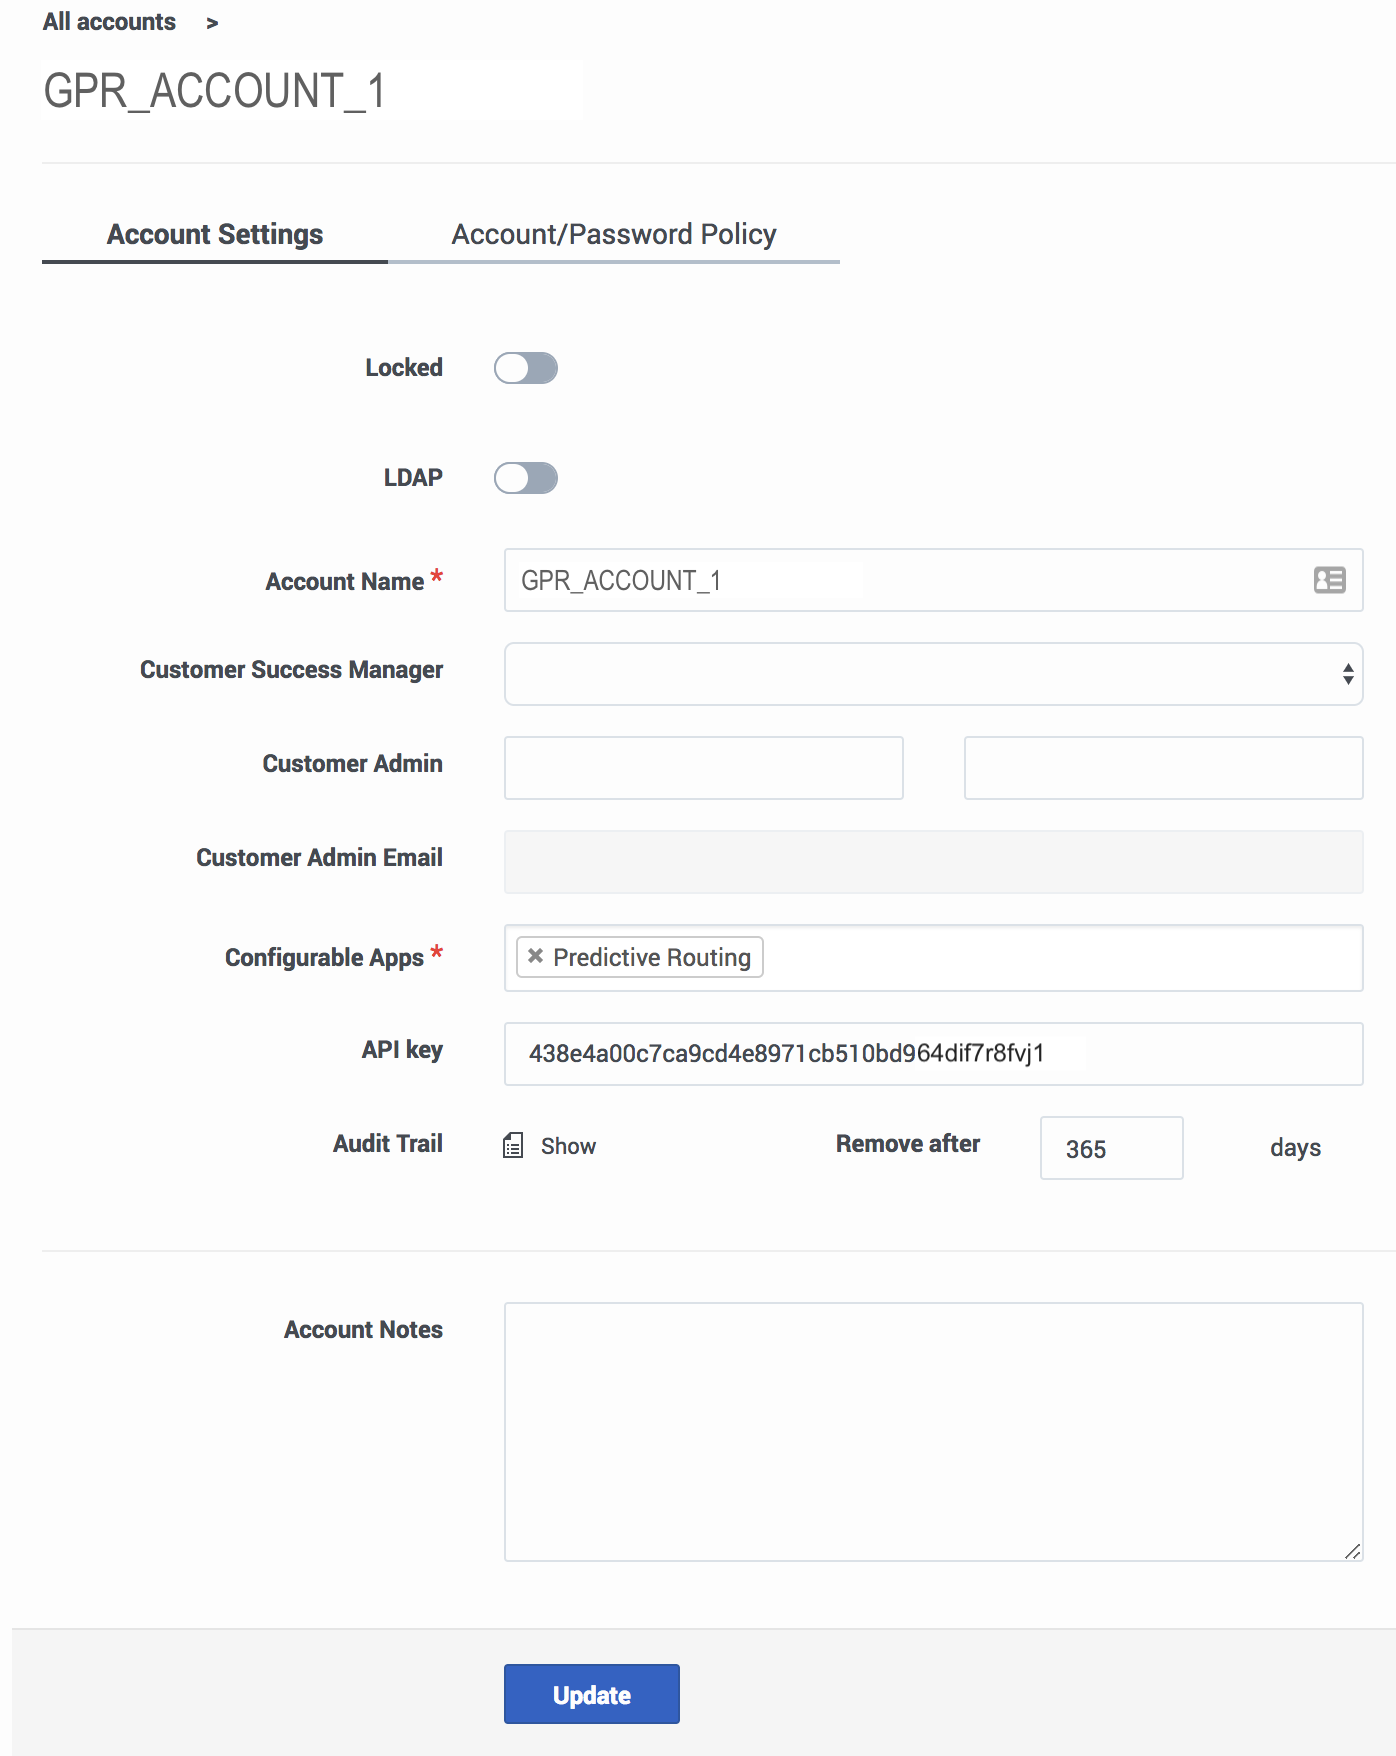
Click an account name to configure the account. The following parameters are located on the Accounts Settings tab. For help with the Account/Password Policy tab, see Password policy configuration.
- Locked—Only ADMIN users of an account can lock it. Once locked, the account cannot be edited.
- LDAP—Toggle this control ON to enable LDAP authentication. See LDAP-enabled accounts, below, for configuration instructions.
- If you convert an account to LDAP authentication, you must also convert the user accounts for those who should use LDAP authentication. User configuration is done in the Settings > User Management window.
- Account Name—The name you assigned to the account.
- Customer Success Manager—The person who created the account in Predictive Routing, and who can function as a contact person in case of issues with account configuration.
- Customer Admin and Customer Admin Email—The name and email for the employee who is responsible for making account updates.
- API key—The API key required to access the Predictive Routing API.
- Audit Trail—The information logged that documents actions performed in the current account.
- To view the audit trail, click Show.
- Enter a number from 1-365 to specify how many days the audit log records should be kept.
- For details on what is recorded in the audit trail, refer to Audit trails.
- Account Notes—Any information important to keep about this account.
This window also enables you to create a new account instead of editing the currently-selected one.
The accounts list
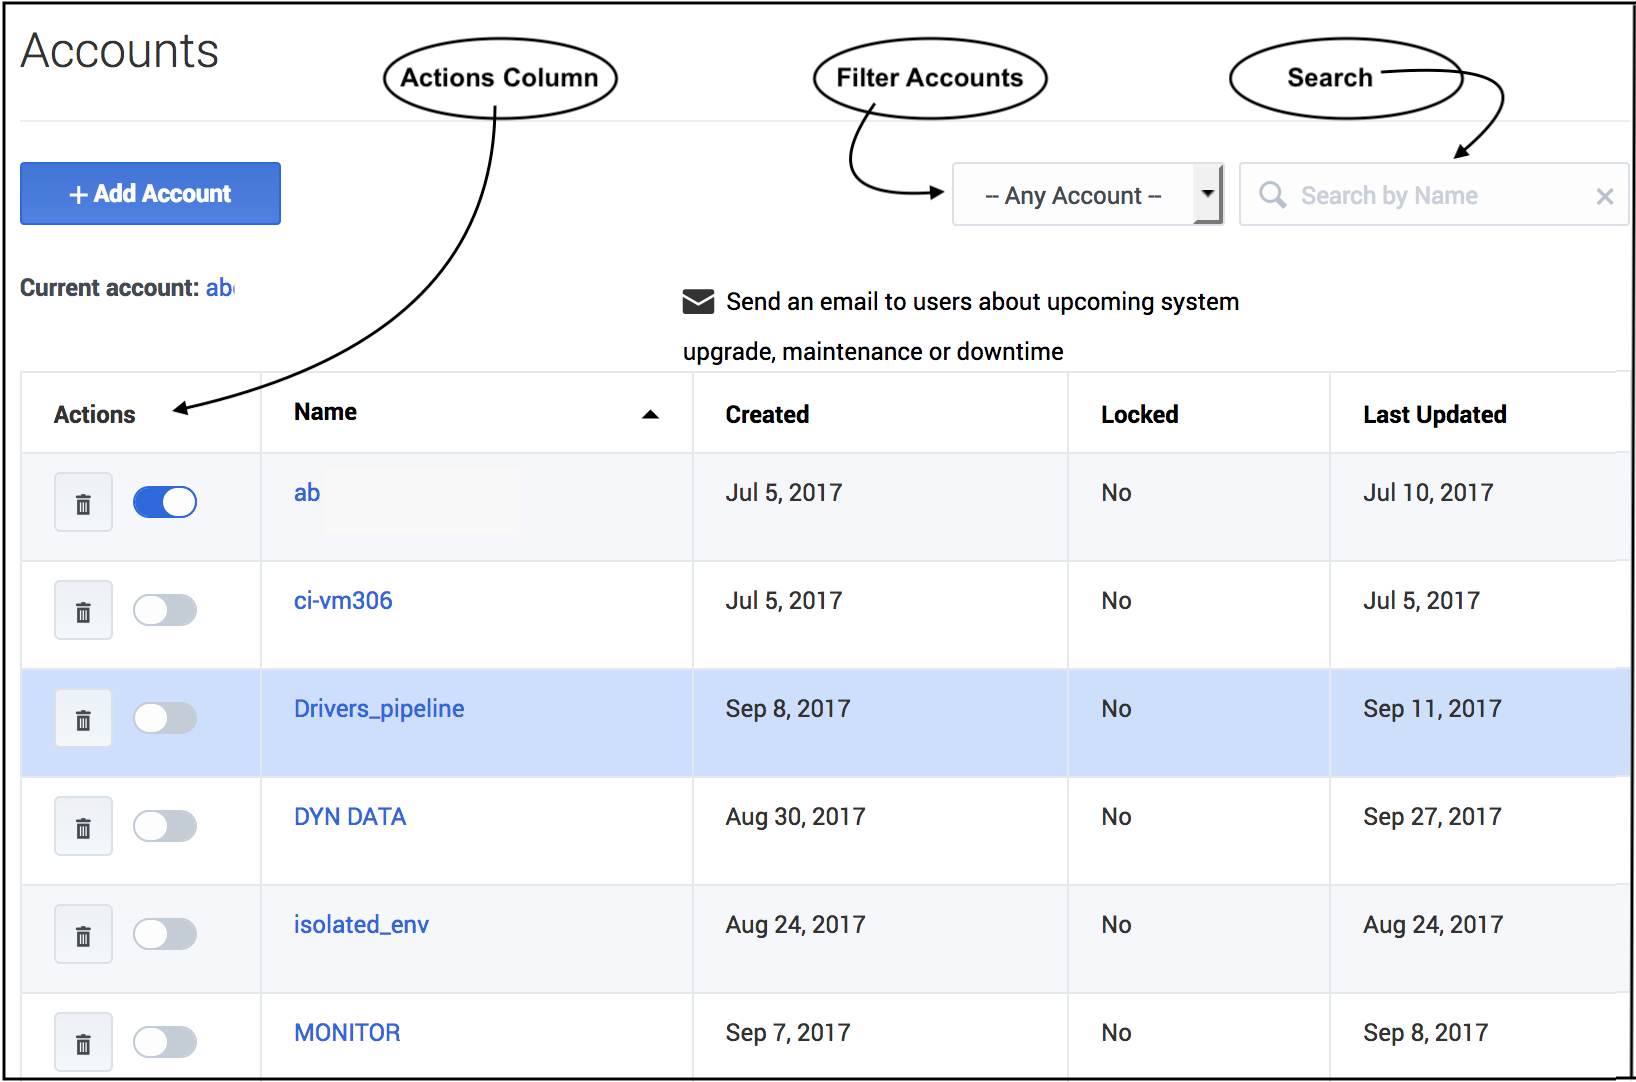
If your environment includes multiple accounts, they appear in a table when you click Settings > Accounts. You can perform the following actions from this table view:
- Activate/Deactivate - The radio button in the Actions column enables you to activate or deactivate an account.
- Delete - Click the trash can icon in the Actions column to delete an account.
- Sort - Click any column header (except the Actions column) to sort the table based on the values in that column.
- Filter - Choose whether to view all accounts, test accounts only, or production accounts only, using the drop-down selector above and to the right of the table.
- Search - Type an account name into the Search field to locate a specific account.
Configuring LDAP-Enabled Accounts
Accounts configured to use LDAP authentication require you to specify the login credentials that Users should enter to gain access to Predictive Routing. The credentials must comply with the LDAP User DN pattern that you establish in the Account settings window. This pattern creates a distinguished name (DN) for each user, and has a format similar to the following:
cn=*,ou=people,dc=example,dc=com
When a user logs in, they enter the actual user ID in place of the asterisk (*) shown in the pattern example above. You can use the following distinguished names in the User DN pattern:
| String | Attribute type |
|---|---|
| DC | Domain Component |
| CN | Common Name |
| OU | Organizational Unit Name |
| O | Organization Name |
| UID | User ID |
The same distinguished name pattern must be configured on the client’s LDAP server. Authorized Predictive Routing users should be described at that path.
- A single user cannot log in with both LDAP authentication and a standard Predictive Routing username/password combination.
- Only a user with the STAFF role can change a user from one form of authentication to the other.
- If necessary, you can associate STAFF users with multiple LDAP-enabled Predictive Routing accounts. Such users will encounter a two-step login process, during which they select the account they want to log into.
Create an LDAP-enabled account
Use the following steps to create the account:
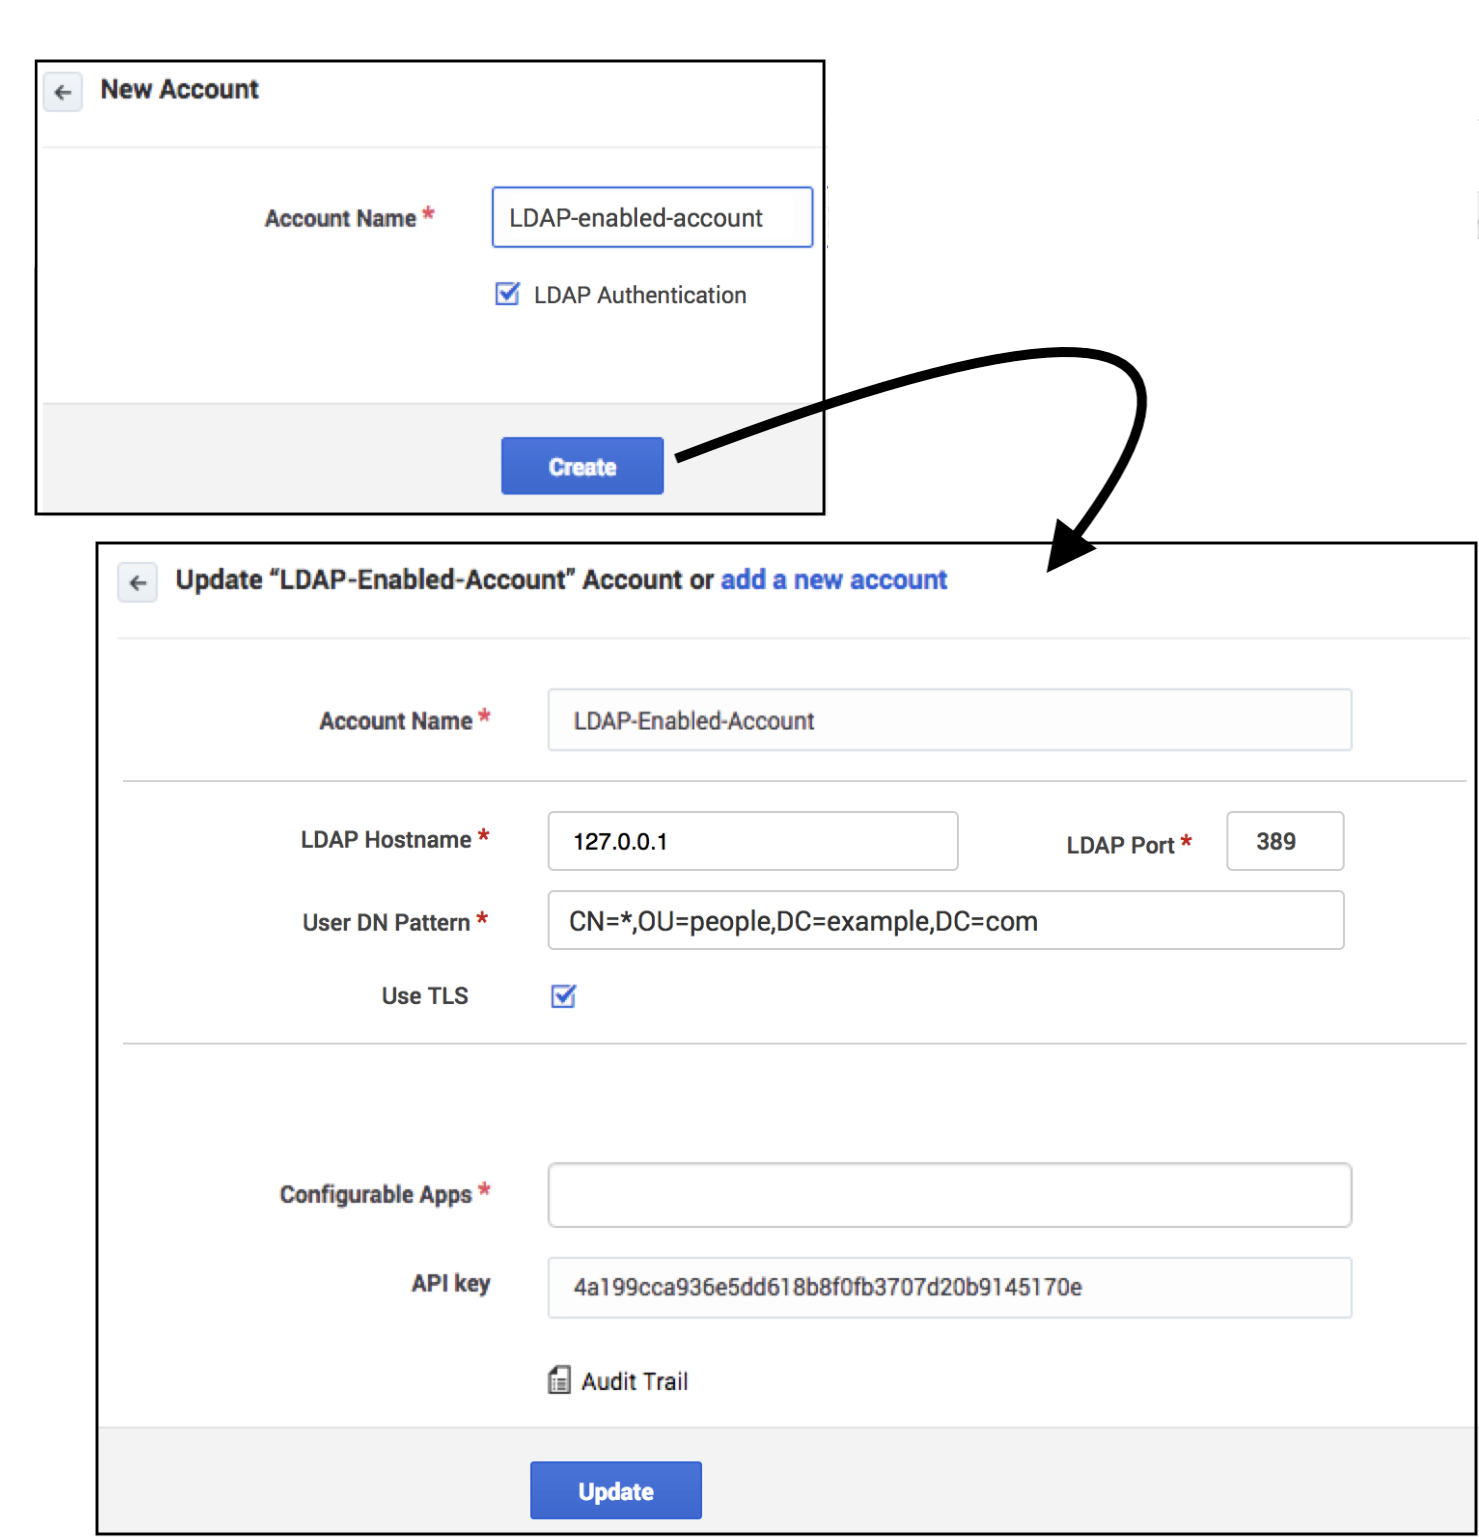
- Click the Settings > Accounts tab.
- Click Add Account.
- Provide an account name.
- Select the LDAP Authentication check box.
- Provide the fully qualified hostname or IP address for your LDAP server.
- Provide the port for your LDAP server. The default value, 389, is used if you do not specify a port number.
- Provide the User DN Pattern, as explained above.
- To enable Secure LDAP (LDAPS), select the Use TLS check box.
- Click Update.
The new account appears in the Accounts list.
The Password Policies Tab
STAFF users can use this tab to specify how GPR handles user passwords and login attempts. It contains the following fields:
| Field name | Default Value | Valid Values |
|---|---|---|
| Password expires after [x] days | 90 | 1 - 90 days |
| Password cannot be changed until after [x] hours | 24 | 1 - 72 hours |
| Show password expiration reminder [x] days before password expiry | 7 | 1 - 14 days |
| Password cannot be the same as the [x] previous passwords | 5 | 5 - 15 previous passwords |
| Account is locked after [x] invalid login attempts | 6 | 3 - 6 invalid login attempts |
| Unlock user account after [x] minutes | 60 | 30 - 300 minutes |
| Block inactive user after [x] days | 45 | 1 - 90 days |
| Message to show blocked users: | This user account was blocked due to too many failed login attempts. Please try again later. | Leave the default, edit the message to be displayed to blocked users, or leave the text box empty to omit a notification message. |
Using Audit Trails
To view audit trail specifics, click the Show icon on the Accounts Settings tab. GPR provides an audit record for the following activities:
- Actions (see the list below) carried out by any user who has access to the current account.
- Any time someone accesses the audit trail.
- Login attempts.
- Reset of audit login.
- Creation or deletion of objects in the system.
For each activity the following information is stored:
- The user ID of the person who performed the action.
- The date and time of the action.
- The result of the operation (failure, success).
- What interface was used to initiate the action (the GPR application or the API).
- The GPR components affected by the action.
GPR stores the specified data for the following objects:
- Datasets
- create
- sync
- accept/decline sync
- append
- delete
- Agent Profiles and Customer Profiles
- create (but only if created using the Predictive Routing application; profiles created using the API are not added to the audit trail)
- sync
- accept/decline sync
- append
- Users/Accounts
- create/update
- delete
- Predictors
- create
- update
- generate training data
- purge training data
- copy
- Models
- create
- delete
- train
- activate
- suspend
- import


