Contents
Configuring Agent Profiles
The Agent Profile schema contains all the relevant information about agents and their performance. Predictive Routing (GPR) uses this schema to assess agent performance when handling each virtual queue and ranking the agents based on regularly updated skills and performance results, which are drawn from Stat Server and Configuration Server/Configuration Server Proxy.
Use the Agent Profile tab on the Settings navigation bar to import and configure agent-related data that you can then use to create predictors. To open the Settings navigation bar, click the gear icon, located on the right side of the top menu bar: ![]() .
.
This topic includes the following sections:
- Procedures for creating the Agent Profile schema and appending data
- Handling Cardinality
- Mandatory fields
- Supported Encodings and Unsupported Characters{
- Skills in Agent Profile Data
How to Create an Agent Profile Schema
You can create your Agent Profile schema using the GPR application or the GPR API. You also have the following choice of methods:
- Enable the auto-schema-discovery configuration option and then run Agent State Connector (ASC). ASC creates a schema containing only the mandatory fields.
- Upload a fully-prepared schema in CSV format. You must include the mandatory fields listed below, but uploading your own file enables you to include additional data and data from non-Genesys sources. This method also enables you to upload data in the form of dictionaries, when this is appropriate. For example, you might add a dictionary called VQ_Performance, in which you capture the queues the agent has worked on and the performance result (score) for each.
- If you have dictionary-type fields that use comma separators, use tab separators for your CSV file.
- Currently only one-dimensional dictionaries are supported, with up to 200 key-value pairs where the key is a string and the value is int, float, or Boolean.
- When you are creating the CSV data file for the Agent Profile schema, do not include the following in the column name for the field to be used as the Agent ID: ID, _id, or any variant of these that changes only the capitalization. Using these strings in the column name results in an error when you try to upload your data.
- If you are using skill names that include a dot (period) or a space in them, use double quotation mark characters to enclose the skill name. For example, a skill named fluent spanish.8 should be entered as "fluent spanish.8".
With either of these options, you can append data after import, which enables you to make updates.
Procedure: Create your Agent Profile schema
Purpose: To establish a schema where all data falls into a set structure; for example, all data within a certain column must have the same data type. GPR analyzes your data, recognizes the structure, and ensures that all data you upload later complies with the established schema.Prerequisites
- Install Agent State Connector and connect it to Configuration Server/Configuration Server Proxy.
- Create a default agent profile consisting of two columns, employeeId and loginStatus, and several rows containing placeholder values for each column that can establish the correct data type for the column.
Steps
Click the Agent Profile tab, then follow the steps to create an Agent Profile schema:
- Click Create Schema. The Create Profile Schema dialog box opens.
- Click Select file. Navigate to your small default CSV file and select it.
- Your CSV file can be zipped. You do not need to unzip it for uploading.
- Select the separator type for your CSV file. You can choose either TAB or COMMA.
- Select the encoding type. By default, this is utf-8.
- Click Create. The uploaded data appears on the Agent Profile window.
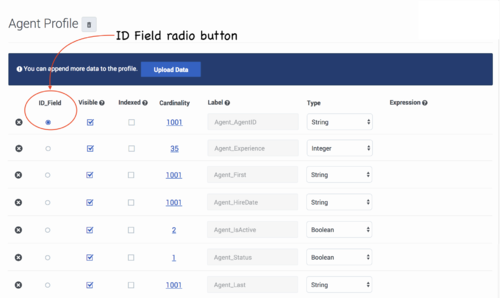
- Set the ID Field. This field must have a unique value in each row that identifies the agent whose data appears in it.
- The data type must be String. If the data type is not set correctly when the data is uploaded, change the data type by clicking in the Type column and selecting String from the drop-down list.
- Scroll to the bottom of the 'window and click Save Schema. A Success. Schema updated successfully status message appears in the upper right side of the Agent Profile window.
- Click Sync Schema.
- Scroll to the top of the list and click Accept Schema. A Success. Schema accepted successfully status message appears.
This procedure has:
- Established the schema structure for the required columns.
- Established the column containing the ID Field parameter.
Next Step: Upload the remainder of your data. You can do this in one of two ways:
Procedure: Upload your Agent Profile data, Method 1 -- Have ASC automatically populate your schema
Purpose: Upload your Agent Profile data to the established schema.Prerequisites
- You are using an on-premises environment.
- ASC is installed and connected to Configuration Server/Configuration Server Proxy.
- You have created a schema, as described in the procedure above.
Steps
- Set the auto-schema-discovery option to true.
- Run ASC.
- The agent data contained in your Configuration Database is uploaded to the Agent Profile schema. When the data upload is complete, the Agent Profile list displays all of the fields discovered in your data, along with their data types and cardinality values.
- Adjust any data types in the Type column that were interpreted incorrectly.
- Adjust the Visibility toggle, if desired, to hide fields you do not need to see on the Agent Details tab. Visibility settings are saved automatically. You do not need to save the schema when updating visibility.
- NOTE: The Visibility toggle enables you to configure which facets, or filters, are available for selection on the Agent Details tab (accessed from the top navigation bar). High-cardinality facets are always hidden, but you can select which low-cardinality facets appear. (Low cardinality means that there are 20 or fewer individual values represented for that field in the schema.)
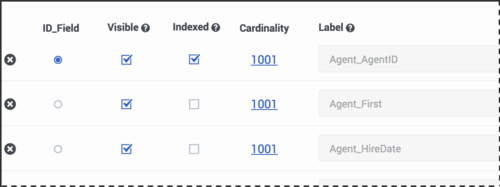
- Adjust the Index toggle to have key fields indexed. Indexing makes lookups faster for that field. The field you specify as the ID_FIELD is indexed by default.
- Important
- An Agent Profile dataset should have no more than 64 indexed fields.
- Indexes must be created on individual skill-name fields, not a skills dictionary field (if you are using one).
- Delete any fields you do not want included by clicking the X to the left of the field name.
- Because the Agent Profile is created by default from the Configuration Database, fields you delete are re-created next time ASC refreshes data.
- Click Save Schema.
This procedure has:
- Completed the data upload to GPR.
Next Steps:
Procedure: Upload your Agent Profile data, Method 2 -- From your own CSV file
Purpose: Upload your Agent Profile data to the established schema.Prerequisites
- You have created a schema, as described in the procedure above.
- You have created a CSV file containing all your Agent Profile data in the accepted schema structure.
Steps
Click the Agent Profile tab, then follow the steps to upload your data:
- Click Upload Data. The Create Profile Schema dialog box opens.
- Click Select File. Navigate to your complete CSV file and select it.
- Your CSV file can be zipped. You do not need to unzip it for uploading.
- Select the separator type for your CSV file. You can choose either TAB or COMMA.
- Click Create. The uploaded data appears on the Agent Profile window.
- Adjust any data types in the Type column that were interpreted incorrectly.
- Adjust the Visibility toggle, if desired, to hide fields you do not need to see on the Agent Details tab. Visibility settings are saved automatically. You do not need to save the schema when updating visibility.
- NOTE: The Visibility toggle simply enables you to configure the display to make it easier to see the fields you are most interested in. Hidden fields continue to be processed.
- Adjust the Index toggle to have key fields indexed. Indexing makes lookups faster for that field. The field you specify as the ID_FIELD is indexed by default.
- Important
- An Agent Profile dataset should have no more than 64 indexed fields.
- Indexes must be created on individual skill-name fields, not a skills dictionary field (if you are using one).
- Delete any fields you do not want included by clicking the X to the left of the field name.
- Scroll to the bottom of the list of fields and click Save Schema. A Success. Schema updated successfully status message appears in the upper right side of the Schema tab.
This procedure has:
- Completed the data upload to GPR.
Next Steps:
Procedure: (Optional) Add new fields to the Agent Profile schema
Steps
- Click Add New Field.
- Add any number of discovered fields to the Agent Profile schema from the drop-down menu.
- (Optional) Type a new field name and press Enter to add a custom field. The custom field value is an expression constructed from arithmetic operations, Python 3 built-in functions, and discovered fields.
- To access the built-in functions, press the SHIFT+@ shortcut.
- Click Save Schema.
Procedure: Synchronize and accept the schema
Purpose: You must synchronize the schema before you can use it.Prerequisites
You must already have created your schema, uploaded your data, and saved the schema.
Steps
- Click Sync Schema.
- Scroll to the top of the Schema tab and click Accept Schema. A Success. Schema accepted successfully status message appears.
- When the schema has been accepted, the Schema out of synchronization message changes to Schema synchronized and the associated icon turns green.
- When data upload is completed, the Agent Profile list displays the fields discovered in your data, along with their data types and cardinality values.
The List of Agent Profile Fields
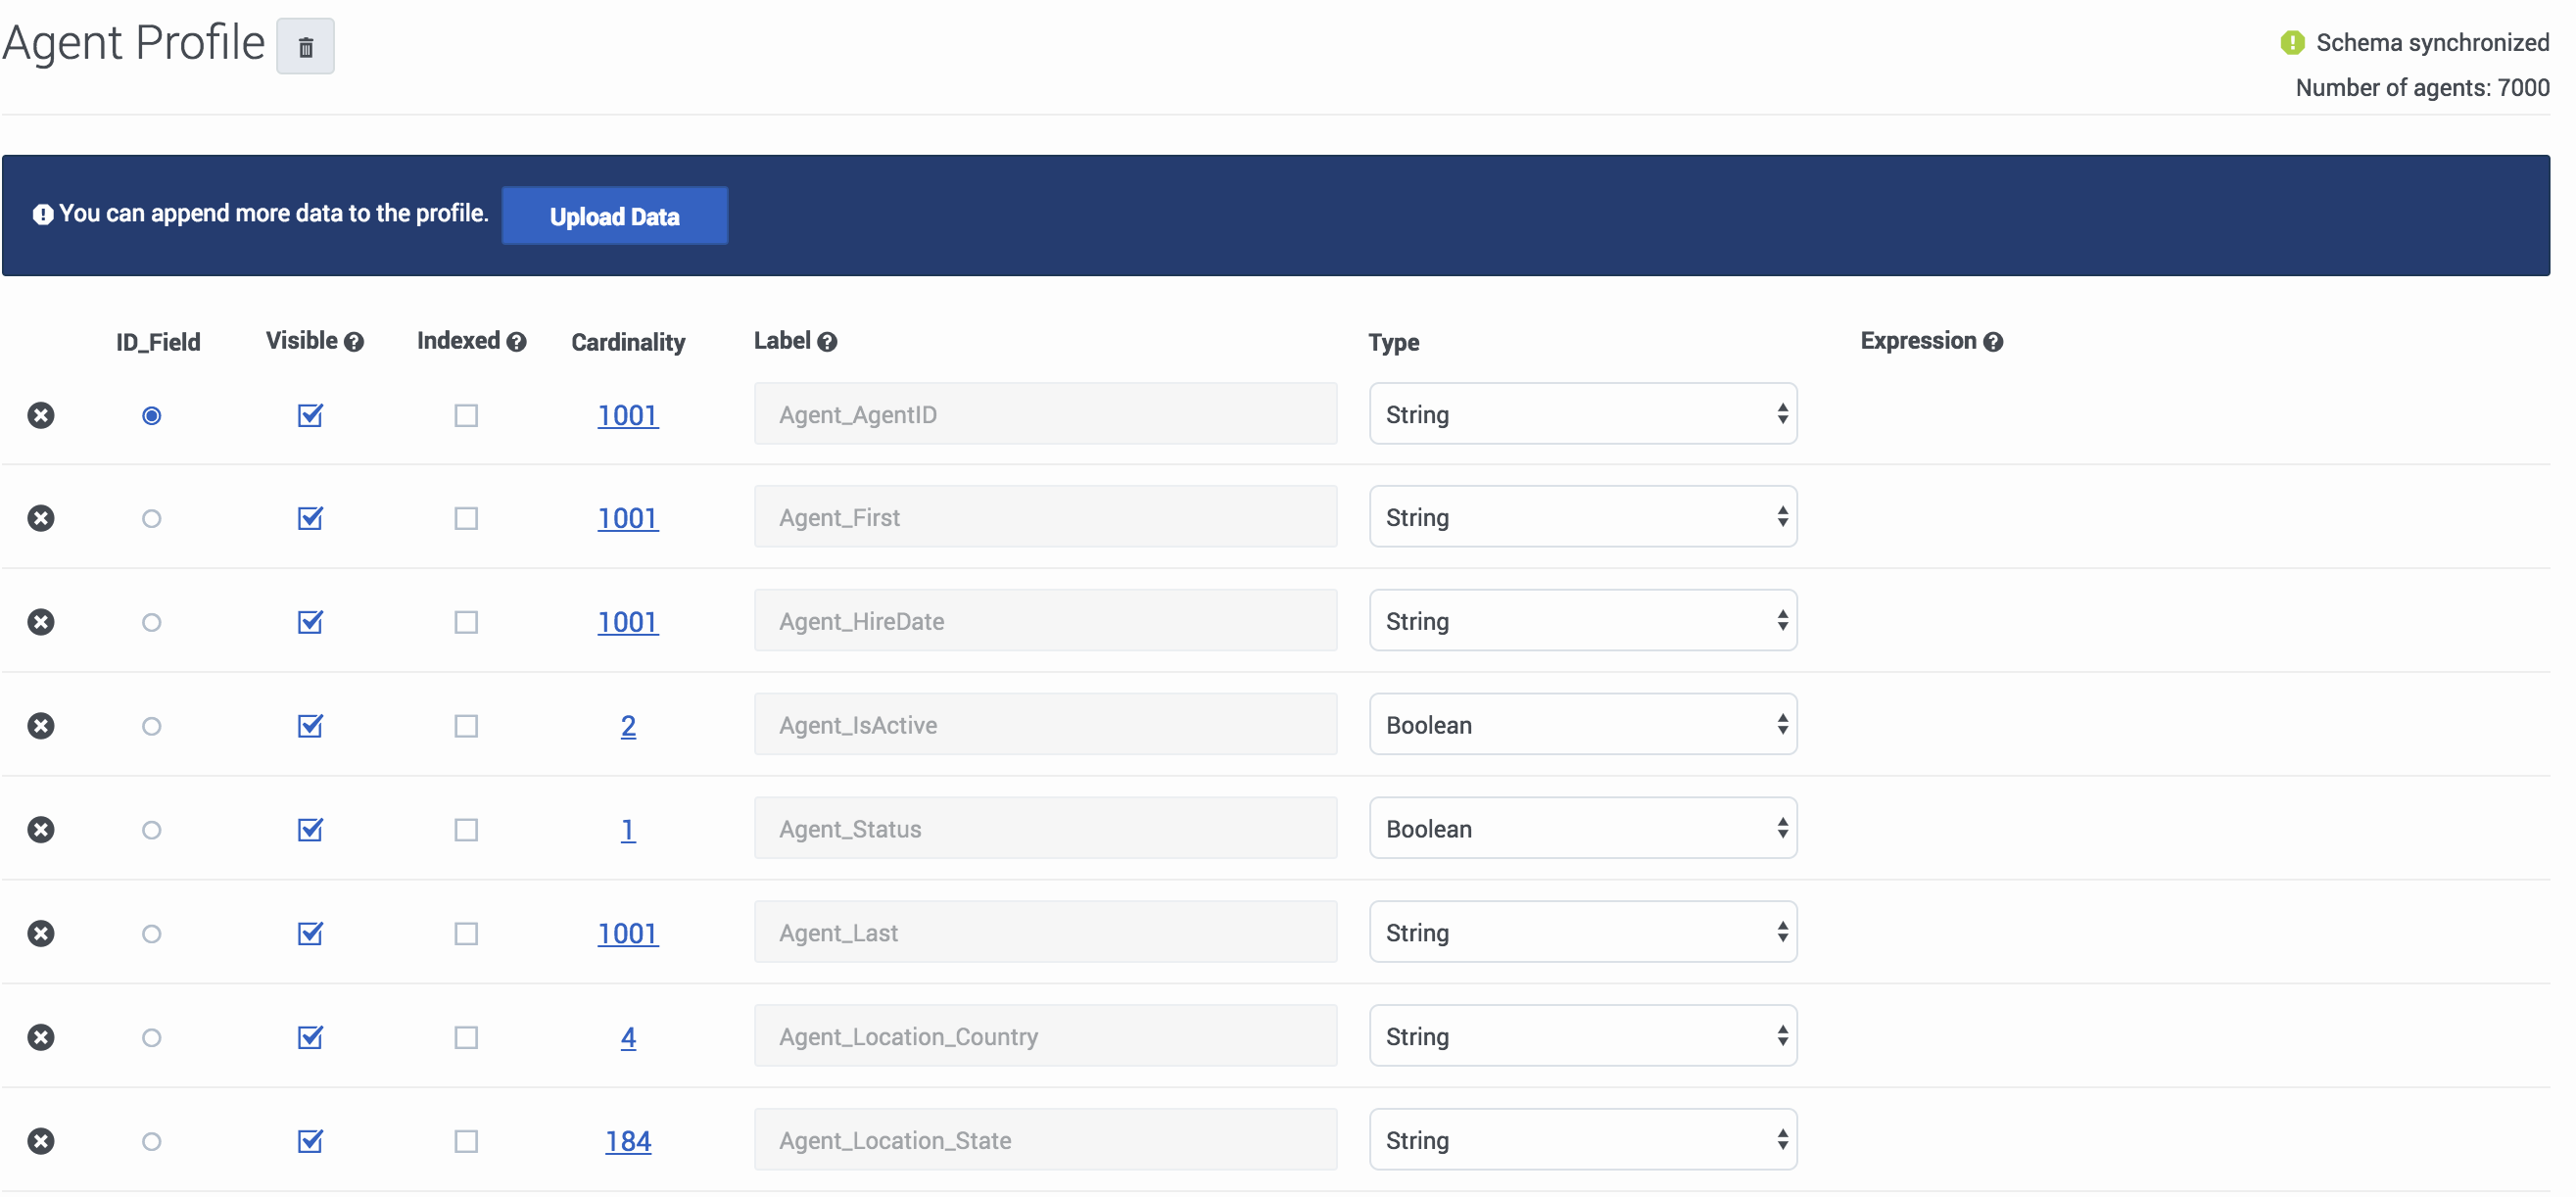
When you navigate to the Settings > Agent Profile page, and you have imported an Agent Profile schema, your data is displayed in a table. Each row presents a schema column.
- The columns in the Agent Profile list are the following:
- ID Field - The field containing the employeeID value.
- Visible - Show which fields are visible on the Agent Details tab.
- Indexed - Shows which fields are indexed, which makes lookups faster for that field. The field you specified as the ID_FIELD is indexed by default.
- Cardinality - The number of unique values that appear in this field. If there are more than 1000, the number appears as 1001. Click this number to see the actual values that appear in this field.
- Label - The name of the field as specified in the Agent Profile schema.
- Type - The data type for the field.
- Expression - If configured, an arithmetical operation to be performed on the value of this field.
- Click Upload to append more data to your Agent Profile schema.
- ImportantYour appended data must have the same schema structure as the existing data. You can add fields and values, but you cannot change the existing schema. If you need to change the structure of your schema, delete the existing schema and upload your corrected data as a new Agent Profile schema.
- To delete your Agent Profile schema, click the trash can icon next to the Agent Profile page title.
API Users: Special Note on Understanding Cardinality
- When you upload additional data using the API, cardinalities are automatically updated after every 1,000 new rows are uploaded.
- To view Agent Profile data you have uploaded using the API, including cardinalities, re-load your browser page.
Fields Populated Automatically By Agent State Connector
| Field Name | Data Type | Source | Indexed | Comments |
|---|---|---|---|---|
| employeeId | string | Configuration Server: Person object, General tab | no | |
| firstName | string | Configuration Server: Person object, General tab | no | |
| lastName | string | Configuration Server: Person object, General tab | no | |
| userName | string | Configuration Server: Person object, General tab | no | |
| tenantName | string | Configuration Server: Person object, General tab | no | |
| loginTimestamp | string | Stat Server: CurrentAgentState statistic | yes | |
| state | string | Configuration Server: Person object, General tab | no | Indicates whether the State Enabled check box is selected. |
| loginId | string | Stat Server: CurrentAgentState statistic | yes | |
| dbID | integer | Configuration Server | yes | The DBID of the Person object. |
| loginStatus | integer | Stat Server: CurrentAgentState statistic | yes | |
| tenantDbID | integer | Configuration Server | no | The DBID of the Tenant specified in the tenantName field. |
| groupNames | list | Configuration Server | yes | All groups are assigned to the agent and available under the groupNames parameter in the Agent Profile schema. |
| loginCodes | list | Configuration Server: Person object, Agent Info tab | yes | |
| attached_data | dict | Configuration Server: Person object, Annex tab | no | |
| skills | dict | Configuration Server: Person object, Agent Info tab | yes | Automatically adds each skill into the schema as separate field with the integer data type. |
| connection_ids | dict | Stat Server: CurrentAgentState statistic | no |
Supported Encodings
By default, GPR handles data using UTF-8 encoding. However, starting with release 9.0.014.00, GPR supports importing of data that uses certain legacy encodings. Appendix: Supported Encodings lists those encodings currently supported. This list is updated as new encodings are verified. If you use an encoding type that is not listed, contact your Genesys representative for assistance.
Unsupported Characters in Agent and Customer Profiles and Datasets
The following characters are not supported for column names in Datasets or Agent and Customer Profile schemas. If GPR encounters these characters in a CSV file, it reads them as column delimiters and parses the data accordingly.
- | (the pipe character)
- \t (the TAB character)
- , (the comma)
Workaround: To use these characters in column names, add double quotation marks (" ") around the entire affected column name, except in the following situations:
- If you have a comma-delimited CSV file, add double quotations marks around commas within column names; you do not need quotations for the \t (TAB) character.
- If you have a TAB-delimited CSV file, add double quotations marks around TAB characters within column names; you do not need quotations for the , (comma) character.
- You must always use double quotations for the | (pipe) character.
Unsupported characters in releases prior to 9.0.014.00
In releases prior to 9.0.014.00, certain characters in column names are ignored, are unsupported, or cause an upload to fail, as explained in the following points:
- Columns with the following symbols in their column names are not added to Agent Profiles or Customer Profiles:
- *, !, %, ^, (, ), ', &, /, â, è, ü, ó, â, ï
- The following symbols in column names are ignored, and the column is added with the symbol dropped out as though it had not been entered:
- [Space], -, <
- Non-ASCII characters are not supported. How they are handled differs depending on what data you are uploading:
- In Agent Profiles and Customer Profiles, columns with non-ASCII characters in the column name are not added.
- In Datasets, when a column name contains a mix of ASCII and non-ASCII characters, GPR removes the non-ASCII characters from the column name as though they had not been entered and correctly uploads all column values.
- In Datasets, when a column name contains only non-ASCII characters, the column name is entirely omitted. All the column values are preserved, but you cannot modify or save the schema. In this scenario, GPR generates the following error message: An unhandled exception has occurred: KeyError('name').
Logs for Unsupported Characters
The following Agent State Connector log messages record issues with unsupported characters:
- <datetime> [47] ERROR <BOTTLE> schema_based.py:63 Invalid expression while parsing: <fieldname> = None
- <datetime> [47] ERROR <BOTTLE> agents.py:172 Fields set([u'<fieldname>']) were ignored because names were invalid.
Skills in Agent Profile Data
The Genesys configuration layer allows Skills and Groups to have the same name. There should be no impact on either Agent State Connector or scoring due to the same group name/skill name.
- Groups are stored in the groupNames list in the Agent Profile.
- Skills are stored in a skills dictionary and copied to the top level in the Agent Profile.
As a result, there is no collision between the names.
For example, an Agent can be assigned to the Group "Complaints" and at the same time be assigned the Skill "Complaints" with a skill level of 2. This does not negatively affect GPR performance.
When creating/updating an Agent Profile in AICS, ASC copies the keys and values listed in the skills dictionary to the top level. This facilitates the selection of agents when AICS processes scoring requests from the routing strategy. The skill expressions used in the strategy and provided in the action_filters field of the scoring requests can be used as-is for agent selection.


