
Customize Invites
| Purpose: To describe how to customize the engagement invites. |
Contents
Modifying the Invite Message
If an actionable event is submitted to the Web Engagement Backend Server, the Genesys Web Engagement application displays a chat or web callback invitation to engage the customer. This invite message in the dialog box is defined in the WebEngagement_EngagementLogic project, located in apps/<application name>/_composer/. Complete the following procedure to modify the invite message:
Prerequisites
- The Genesys Rules Development Tool is installed, configured, and opened in Composer or in Eclipse.
- The following procedure uses Composer.
Start
- In the Genesys Rules Authoring Developer Tool, select
File > Import.... - In the
Importdialog window, navigate toGeneral > Existing Projects into Workspace. ClickNext. - Select
Select Root Directory:, then clickBrowse. Select theWebEngagement_EngagementLogicproject located inapps/<application name>/_composer/.
Mandatory: Do NOT enable theCopy projects into workspaceoption. - Import your project.
- Right-click the project and select
Upgrade Composer Project. Wait until the upgrade is complete. - In the Project explorer, expand
WebEngagement_EngagementLogic/Worflows/engage.workflowand click on the ECMA Script object namedFulfillEngagementProfile. In the properties pane, click on Script properties.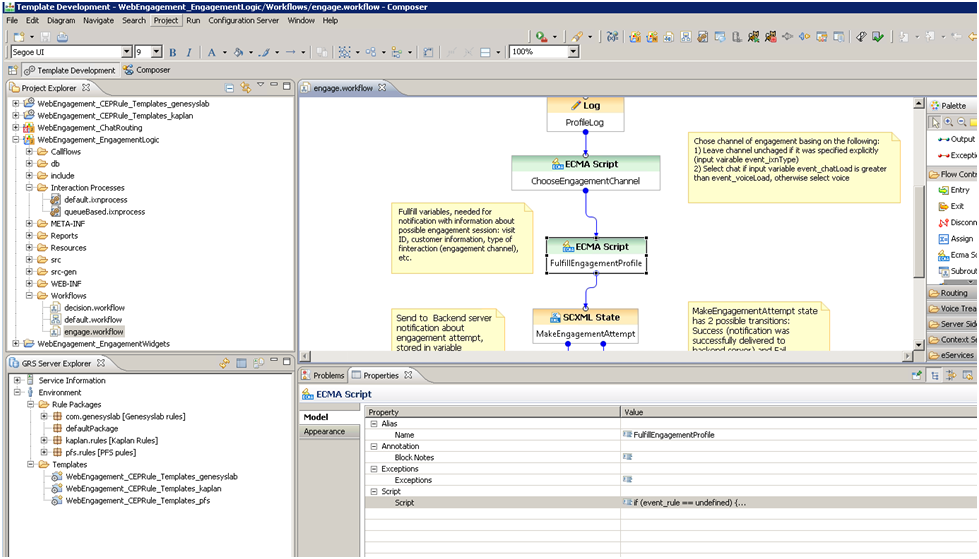
- Edit the ECMA Script and update the content of the message field in the variable
engageProfile:var engageProfile = { 'visit_id': event.visitID, 'nick_name': profile.FirstName, 'first_name': profile.FirstName, 'last_name': profile.LastName, 'email_address': customerAddress, 'subject': channelName,'message':'Hello. Would you like assistance with the topic of current page? Agents are available now to answer your questions.','time_zone_offset': 8, 'wait_for_agent' : false, 'routing_point':sipRoutingPoint, 'ixn_type': channelType, 'pageId': event.pageID, 'inviteTimeout': 30}; - Save your changes and generate the code. Note: This step must be completed to make your changes available in the Genesys Web Engagement servers.
- To make the changes available in the Genesys Web Engagement servers:

- Stop the servers in Genesys Administrator.
- Build and Deploy your Application.
- Start your Web Engagement Servers.
You may have to clean your cache to see the changes.
Modify the Logo used by the Frontend Server
- To modify the logo:
- Rename your logo image to
logo_small.pngand copy the file inapps\<application name>\frontend\src\main\webapp\resources\img.
- Or:
- Edit the
weinvite.cssfile in the\apps\<application name>\frontend\src\main\webapp\resources\css\directory, and modify the name and relative path of your logo here:.wedialog .dialog-content .branding-content{/*...*/ background-image: url(../img/logo_small.png);/*...*/}
- Rename your logo image to
- Save your changes and generate the code. Note: This step must be completed to make your changes available in the Genesys Web Engagement servers.
- To make the changes available in the Web Engagement servers:
- Stop the servers in Genesys Administrator.
- Build and Deploy your Application.
- Start your Web Engagement Servers.
You may have to clean your cache to see the changes.
This page was last edited on March 5, 2014, at 19:03.
Comments or questions about this documentation? Contact us for support!