Contents
Rich Media
If you're using a chat-based persona, you can add rich media elements (an image or a video, for example) to chat interactions so that users can interact and engage with message content.
In Intelligent Automation you can add and configure rich media using the rich media editor for any Message block, Menu block, or Question block, or you can create custom rich media using a Script block. Both options are described below.
Adding rich media using the rich media editor
To add rich media to a Message block, Menu block, or Question block:
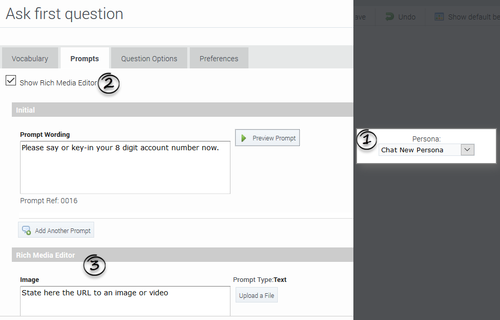
- Go to the Prompts tab for the block and ensure you're using a chat persona.
- Click the Show Rich Media Editor checkbox.
- In the new Rich Media Editor section, fill in the fields described in the table below.
| Option | Description |
|---|---|
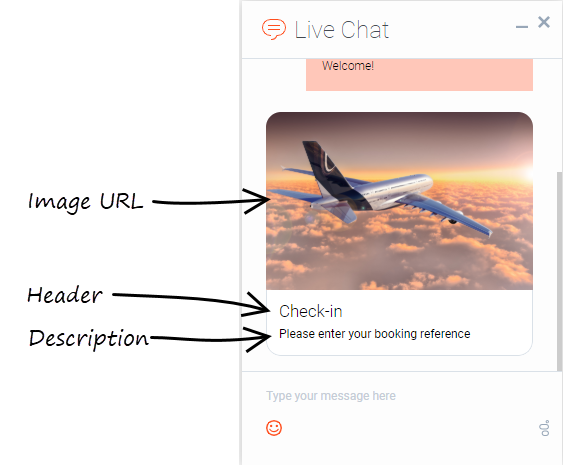
| Image | Enter a URL for an image, or click Upload a File to upload an image from your computer. |
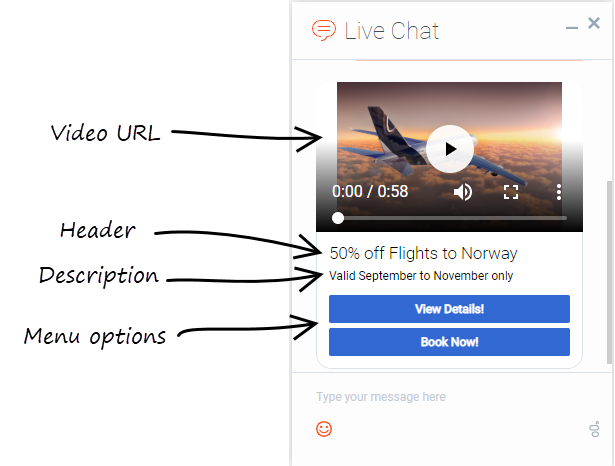
| Video | Enter a URL for an image, or click Upload a File to upload an image from your computer. |
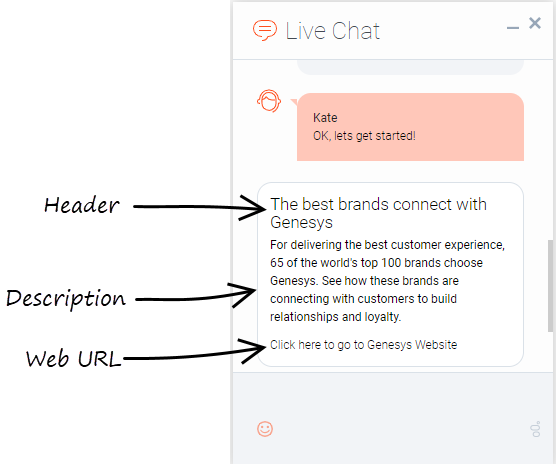
| Header | Enter title text for the rich media message. |
| Description | Enter description text that appears below the Header text. |
| Submit Button | This field is not currently supported. |
| Web URLs | Enter a web URL that the customer can select to get more information. It must be in this format: [link:URL;Description]. For example: [link:https://www.genesys.com;Genesys]. In the preceding example, https://www.genesys.com is the URL that opens if the button is selected, and Genesys is the name of the button or link that the customer must select to open the URL.
Important The appearance of certain elements, such as Web URL, depends on the Rich Media Format callflow preference. For example, the Text Only format displays links as text, but Text and Buttons displays links as buttons. |
Next, set the following rich media callflow preferences described below. Note that these callflow preferences only apply if you're adding rich media using the rich media editor. They do not apply if you add custom rich media.
| Callflow Preference | Desription | Example/Notes | Typical Values |
|---|---|---|---|
| Rich Media Format | Specifies the output format for rich media message options. | Select Text, Buttons and Videos to use a rich media format that incorporates all of these elements. If None is selected, all rich media prompts are ignored.
Important You can also set the following default server settings:
|
|
| Rich Media try fallback if necessary | Specifies whether to try a fallback format if the selected Rich Media Format is incorrectly configured (for example, if Text, Buttons and Videos is selected but a video is not attached). In other words, this setting determines whether Intelligent Automation validates the user's configuration or simply attempts to use what it is given. | Select True if you want Intelligent Automation to validate the user's rich media format. If the format is incorrect, Intelligent Automation tries to select an alternate format. | False |
Adding custom rich media
Creating custom rich media is an alternative to using the rich media editor in a Message, Menu, or Question block.
To add custom rich media:
- In a Script block, create an object based on the definition described on the Rich Messaging page in the Genesys Widgets Deployment Guide.
- Convert that object to a JSON string using the context.toJsonString() method.
- Use that JSON string to create a native data prompt with the context.createNativePrompt() method
- Store the native data prompt in a variable.
- Reference that variable within a chat persona fallback prompt (for example, [var:MyNativePrompt])
You can send also rich media related properties as optional parameters (JSON key-value pairs) as part of the message using the createNativePrompt() method:
optionField = ["type" : "Button"];
optionFieldJSON = context.toJsonString(optionField);
custom = context.createNativePrompt( "QuickReply3", sJson, "Genesys EngageStructuredMessage", "facebook-messenger",optionFieldJSON);
context.setVariable( "MyNativePrompt", custom);
Rich media examples
The following examples show how each element might appear in a typical chat widget. Your chat widget might appear differently, depending on your environment's configuration and style rules.
[+] Example chat with image element
[+] Example chat with video element
[+] Example chat with header and description prompt
Related Topics
- Message Block
- Menu Block
- Question Block
- Script Block
- Setting Callflow Preferences
- Rich Messaging (Genesys Widgets Deployment Guide)


