Contents
Message Block
![]()
You use Message blocks to play a message to the caller. These messages consist of one or more prompts, using either prerecorded audio or Text To Speech (TTS).
Adding this block to the callflow
To add and configure Message blocks to a callflow:
- Drag and drop the Message block onto the appropriate position in the callflow.
- Double-click the Message block to open its properties.
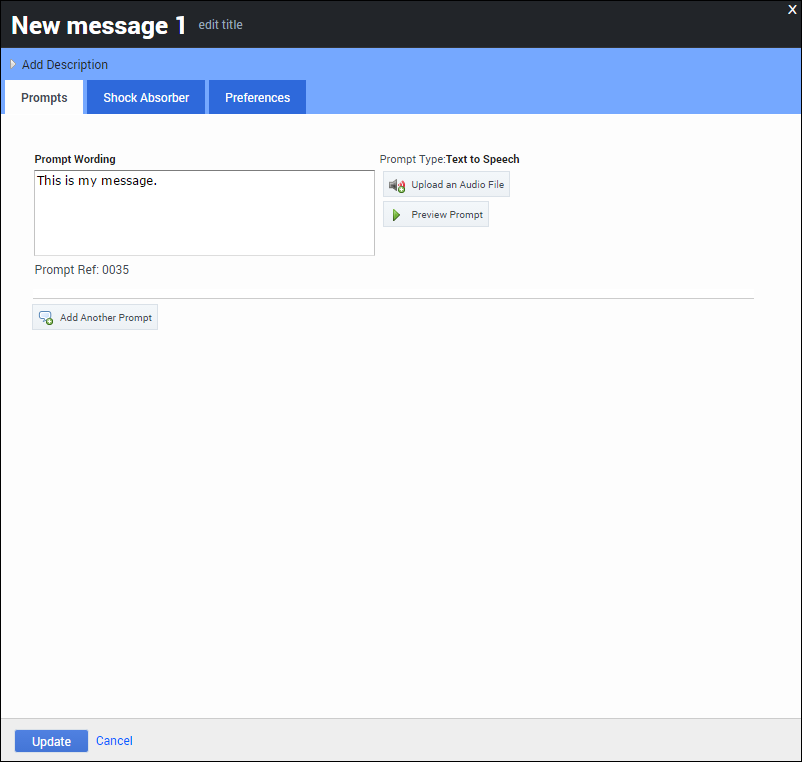
- In the Prompts tab, add a message to be played to callers, either by:
- Entering TTS text in the Prompt Wording text box.
- Clicking Upload an Audio File to select a prerecorded audio file. After the file uploads, you can click Preview Prompt to listen to the audio file.
- Click Update.
When configuring the prompts, enter Standard Responses, defined in UCS, in the following format:
StandardResponse:<text of response as defined in UCS>:Any fallback textThe fallback field for the Standard Response is mandatory. See Standard Responses for configuring Standard Responses.
Using variables
You can configure prompts to reference variables that store dynamic data, such as account summaries or customer names. When you deploy the application, these variables are replaced with call-specific data.
Variables are created automatically by some prebuilt modules. For example, Payment Capture modules create variables such as PaymentAmount to store dynamic data about how much money the customer has chosen to pay.
You might also see variables when data is returned from a web service, or if you choose to set variables manually by using Script blocks.
To add a variable to a prompt, you must enter it using square-bracket notation. For example: Your account number is [digits:AccountNumber].
Using shock absorbers
You can also add a Shock Absorber rule to a Message block, in which you state the message is only played to a particular subset of callers, or only played for a limited period of time. In other words, a Shock Absorber enables you to only play this message if the call meets specific conditions.
For example, if your contact center becomes unexpectedly busy, you can use a Shock Absorber to notify callers that wait times might be longer than usual.
To add a Shock Absorber to a Message block:
- Click a Messsage block to open its properties.
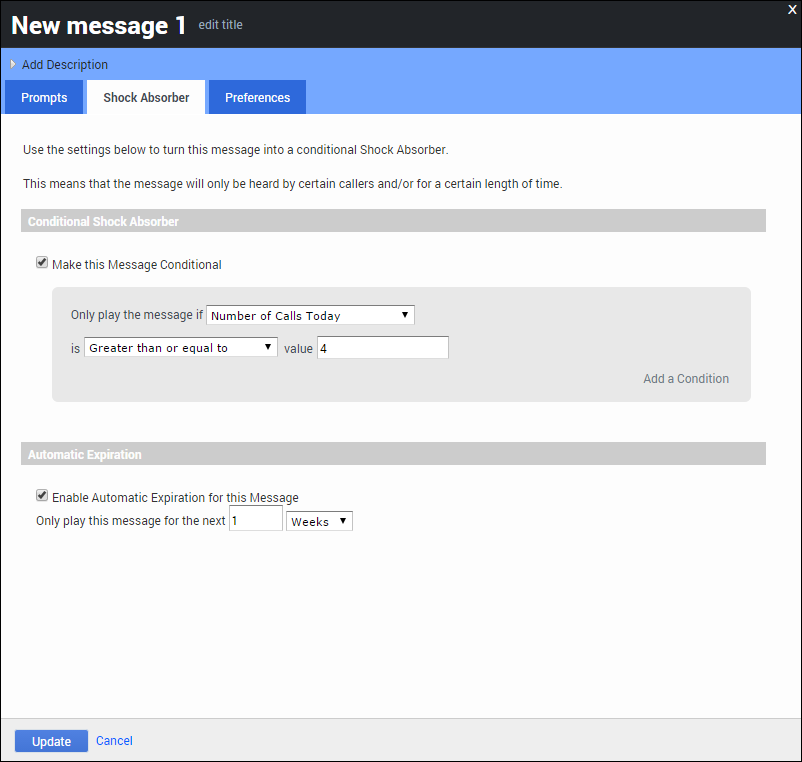
- Click the Shock Absorber tab.
- Enable the Make this Message Conditional check box to enable the Shock Absorber.
- In the Only play the message if menu, select and then configure one of the following conditions:
- Variable – Enable the Shock Absorber based on whether the specified variable (including attached data fields) has a specified value.
- Dialled Number – Enable the Shock Absorber based on the number that the caller dialled (DNIS).
- CLI – Enable the Shock Absorber based on the number from which the caller has dialled.
- Test Call Flag – Enable the Shock Absorber based on whether this is a test call or a production call.
- Recent Failure Flag – Enable the Shock Absorber based on whether there has been a recent failure in the callflow.
- Random Percentage – Enable the Shock Absorber for a specified percentage of callers. For example, you can direct 50 percent of callers down a particular path to help split the call volume between two phone transfer points.
- Last Result – Enable the Shock Absorber based on the result from the block previous to this Message block (for example, success or error).
- Number of Calls ... – Enable the Shock Absorber based on the number of calls made by this CLI today or in the last one, two, or four weeks.
- Date - Enable the Shock Absorber for a specific date.
- Time - Enable the Shock Absorber for a specific time.
- Date and Time - Enable the Shock Absorber for a specific date and time.
- Current Day of the Week - Enable the Shock Absorber for a specified day of the week.
- (Optional) Select the Enable Automatic Expiration for this Message check box to specify the length of time for which you want this message to be played. For example, you might configure the Shock Absorber to play this message only if this is the fourth call today from this CLI and to only play it for the next week. After a week, the message stops playing, regardless of how many calls come from this CLI. See the graphic below for an example.
- Click Update.
Using rich media with this block
If you are using a chat-based Persona, you can add rich media elements to this block by selecting the Show Rich Media Editor checkbox, which displays a new section called Rich Media Editor below the Initial prompt.
Enter the following information:
- Image—Enter a URL for an image, or click Upload a File to upload an image from your computer.
- Video—Enter a URL for a video, or click Upload a File to upload a video from your computer. To display a static image before the user plays the video, you must also enter a URL in the Image field.
- ImportantYou must click Update to preview the image or video that you attached to this rich message.
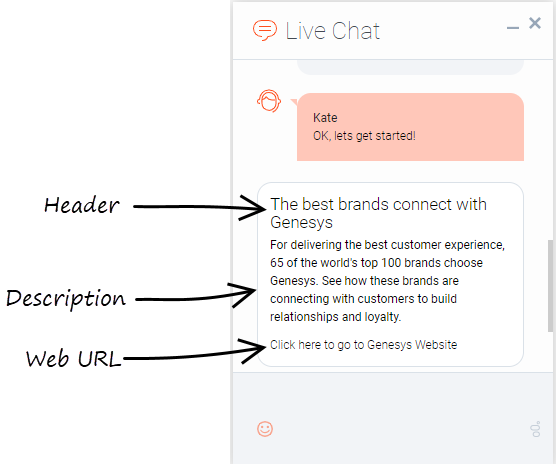
- Header—Enter title text for the rich media message.
- Description—Enter description text that appears below the Header text.
- Web URLs—Enter a web URL that the customer can select to get more information. It must be in this format: [link:URL;Description]. For example: [link:https://www.genesys.com;Genesys]. In the preceding example, https://www.genesys.com is the URL that opens if the button is selected, and Genesys is the name of the button or link that the customer must select to open the URL.
- ImportantThe appearance of certain elements, such as Web URL, depends on the Rich Media Format callflow preference. For example, the Text Only format displays links as text, but Text and Buttons displays links as buttons.
The following graphic shows how each element might appear in a typical chat widget. Your chat widget might appear differently, depending on your environment's configuration and style rules.
For more information about rich media functionality, refer to the Rich Media page in this manual.


