Contents
Apple Business Chat
Apple Business Chat enables organizations to connect with customers using Apple's own iMessage framework. Using Business Chat, customers can get answers to questions, resolve issues and complete transactions on their iPhone, iPad, Mac, and Apple Watch.
In Genesys Intelligent Automation, Apple Business Chat is an extension of existing chatbot functionality and provides the look and feel of an Apple application. It works with a callflow to enable your customer to chat with your enterprise. You can set up Apple Business Chat with new or existing callflows.
This page describes the Apple Business Chat feature and how to set it up in Intelligent Automation.
How it works
The following diagram provides a high-level view of how Apple Business Chat works with Genesys Intelligent Automation.
Generally, a customer enters a question, response, or similar information on their iOS device, which sends the message through the Apple Server and Genesys Hub to the Digital Messaging Server. The Routing Server then routes it through the BOT Gateway to Intelligent Automation, which forwards it on to the enterprise. To send a message back to the customer, the enterprise sends a message in a similar route, where Intelligent Automation sends it back to the customer.
Summary
To set up Apple Business Chat in Intelligent Automation, you must do the following:
- Create or designate a callflow that represents the callflow used by the enterprise to process an Apple Business Chat interaction with the customer. If an existing callflow does not meet your needs, you can create a new one by following the instructions in Using the Callflow Editor
- Set up the chatbot for Apple Business Chat.
- Configure the other Genesys servers.
- Add new prompts and menus, as necessary, to the callflow you are using with Apple Business Chat. For the prompts, add corresponding Standard Responses provided by the Universal Contact Server (UCS).
Set up the chatbot for Apple Business Chat
To create and set up a chatbot for Apple Business Chat, do the following:
- Install and configure Digital Message Server.
- Configure the chatbot in Interaction Routing Designer.
Configure the other Genesys servers
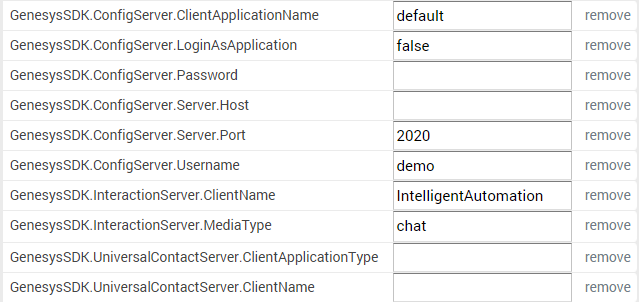
Chatbots are created with help from other Genesys components (Interaction Server, Universal Contact Server). The configuration information for these other components is stored in the Genesys Configuration Database, and is accessible only through the Genesys Configuration Server. Therefore, settings for Configuration Server and the other servers must be configured in Intelligent Automation.
Enter these settings as Default Server Settings under the Administration tab, in the fields highlighted in the following diagram. Some values will be entered as defaults, but you can change them as required.
Customize the callflow you are using for Apple Business Chat by adding and modifying menu blocks and prompts, as appropriate.
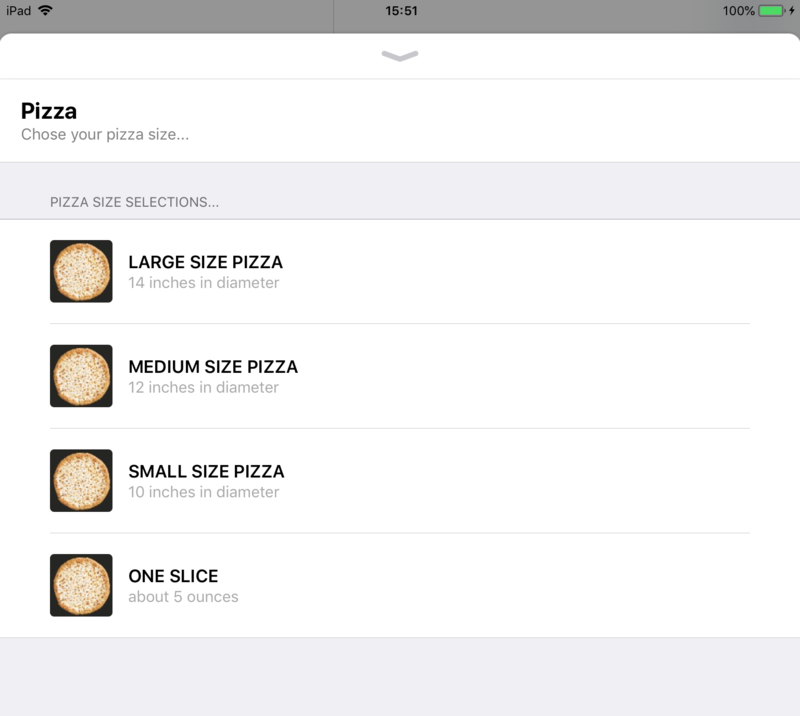
In Menu blocks, add prompts representing the options in the menu. The chatbot renders these blocks as Apple List Picker items, complete with appropriately illustrated buttons. For example, a Menu block in which the customer selects the size of the pizza they are ordering might look like this:
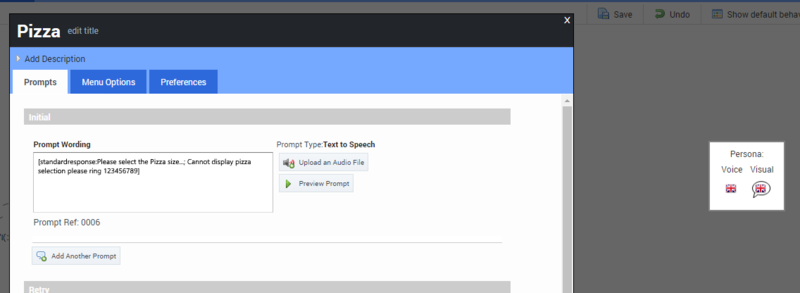
Add prompts as necessary to handle customer responses. When configuring the prompts, enter Standard Responses, defined in UCS, in the following format:
StandardResponse:<text of response as defined in UCS>:Any fallback textThe fallback field for the Standard Response is mandatory. See Standard Responses for configuring Standard Responses.
For the pizza example, the prompt is configured in the Menu block, like this:
The chatbox renders this menu, complete with prompts, as an Apple List Picker, like this:


