Contents
Call Monitor
Use the Call Monitor view to monitor and test your applications. There are two methods you can use to test an application:
- Call Monitoring - Allows you to monitor calls from a specific CLI. As the call progresses, you can visually follow the call as it flows through blocks and monitor call data and variables. This option is useful for situations in which you need to quickly test an application and do not need the robust analysis provided by a virtual call.
- Virtual Call - Allows you to virtually call an application and view a detailed analysis of variables, call settings, and call preferences in use. You can quickly start and restart calls, and select different callflow scenarios to test various aspects of your application. This option is useful in situations in which you need to drill down into more complex scenarios that are difficult to simulate in Call Monitoring, such as callflows that rely on web-service calls.
Call Monitoring
You can use call monitoring to view how an application responds to a caller in real time. Prompts and menu choices are displayed as the caller progresses through the call, allowing you to easily monitor the caller's path through the application, along with information about variables and other call data that are set by the application in response to the caller.
Starting call monitoring
In the Call Monitor view, go to the Register for Call Monitoring section and configure the following:
- Calling Number (CLI) - Enter the CLI to monitor. If you do not know the proper CLI format, you can check the call log in the Reports view and copy the CLI value into this field.
- Monitor Production Calls - By default, call monitoring only monitors calls to your test application. Select Monitor Production Calls if you also want to monitor calls to your production application.
Click Register for Call Monitoring to begin monitoring this CLI.
Viewing a monitored call
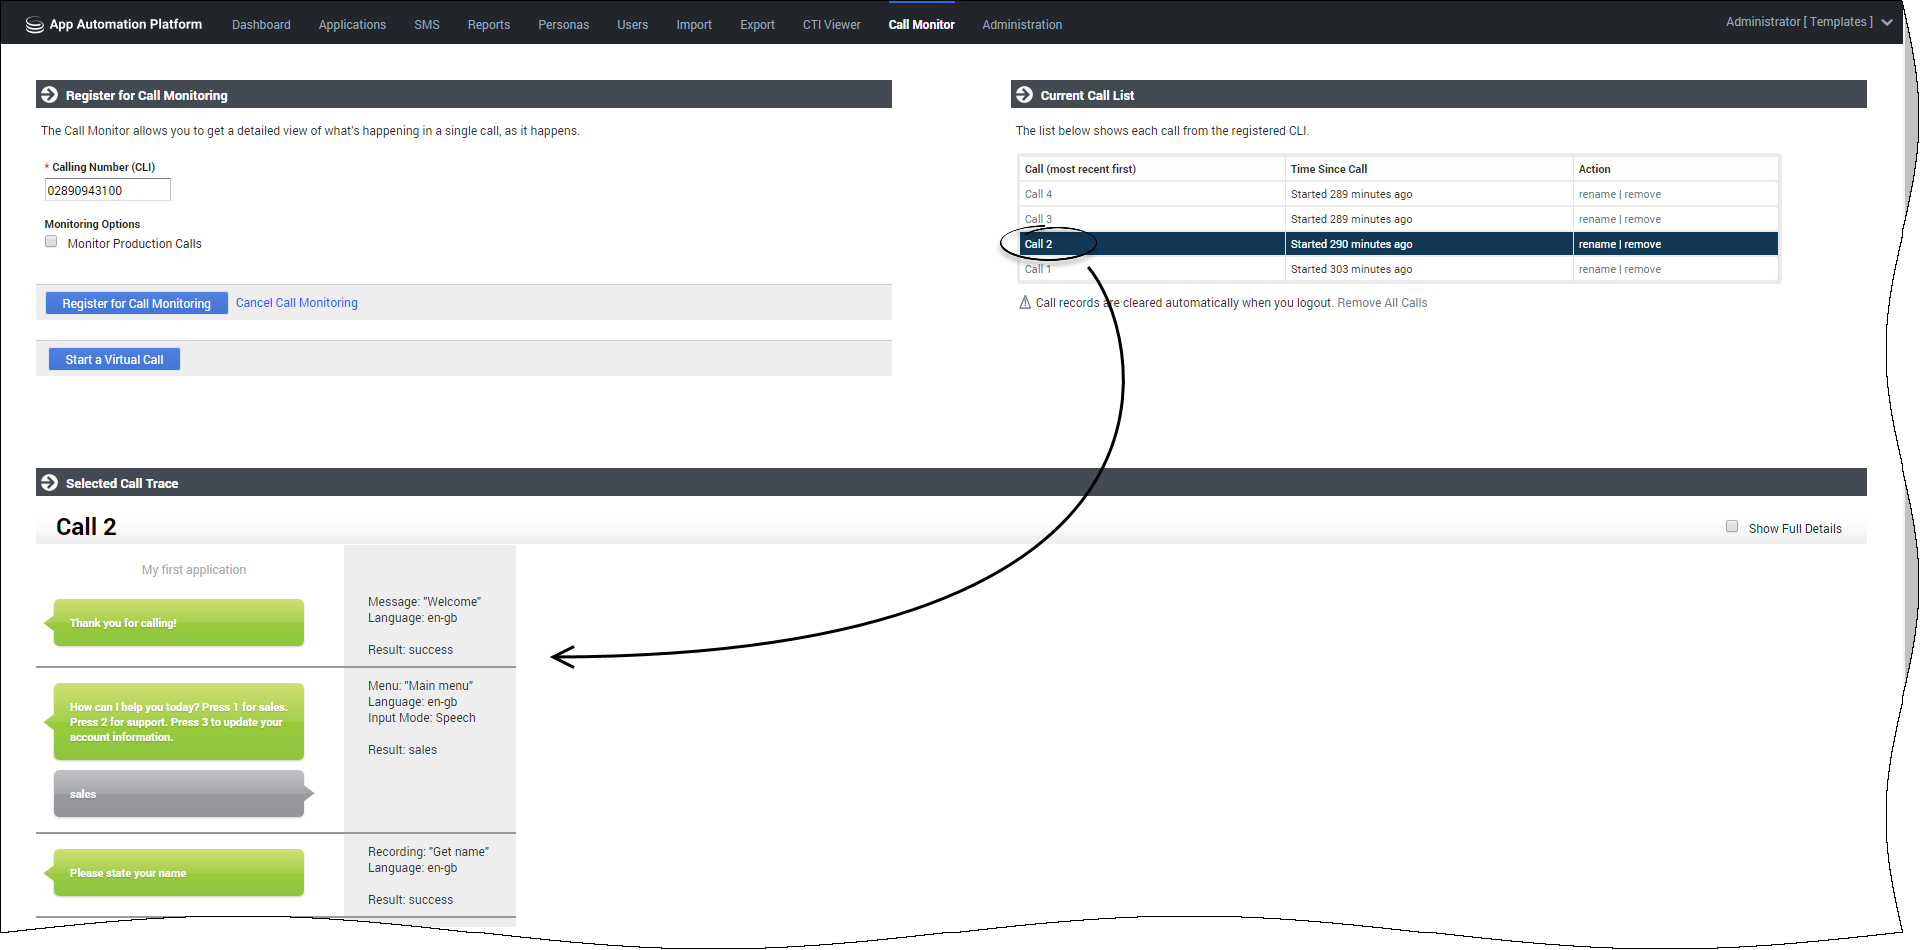
Once a monitored CLI calls, an entry for that call displays in the Current Call List section. Click the name of the call record (for example, Call 2) to view the call in the Selected Call Trace section.
By default, the Selected Call Trace section shows a high-level overview of the call's progression. You can see prompts played to the caller, menu options the caller has selected, responses to questions, and activity within linked modules. You do not see progression through blocks that do not require user input, such as Script blocks.
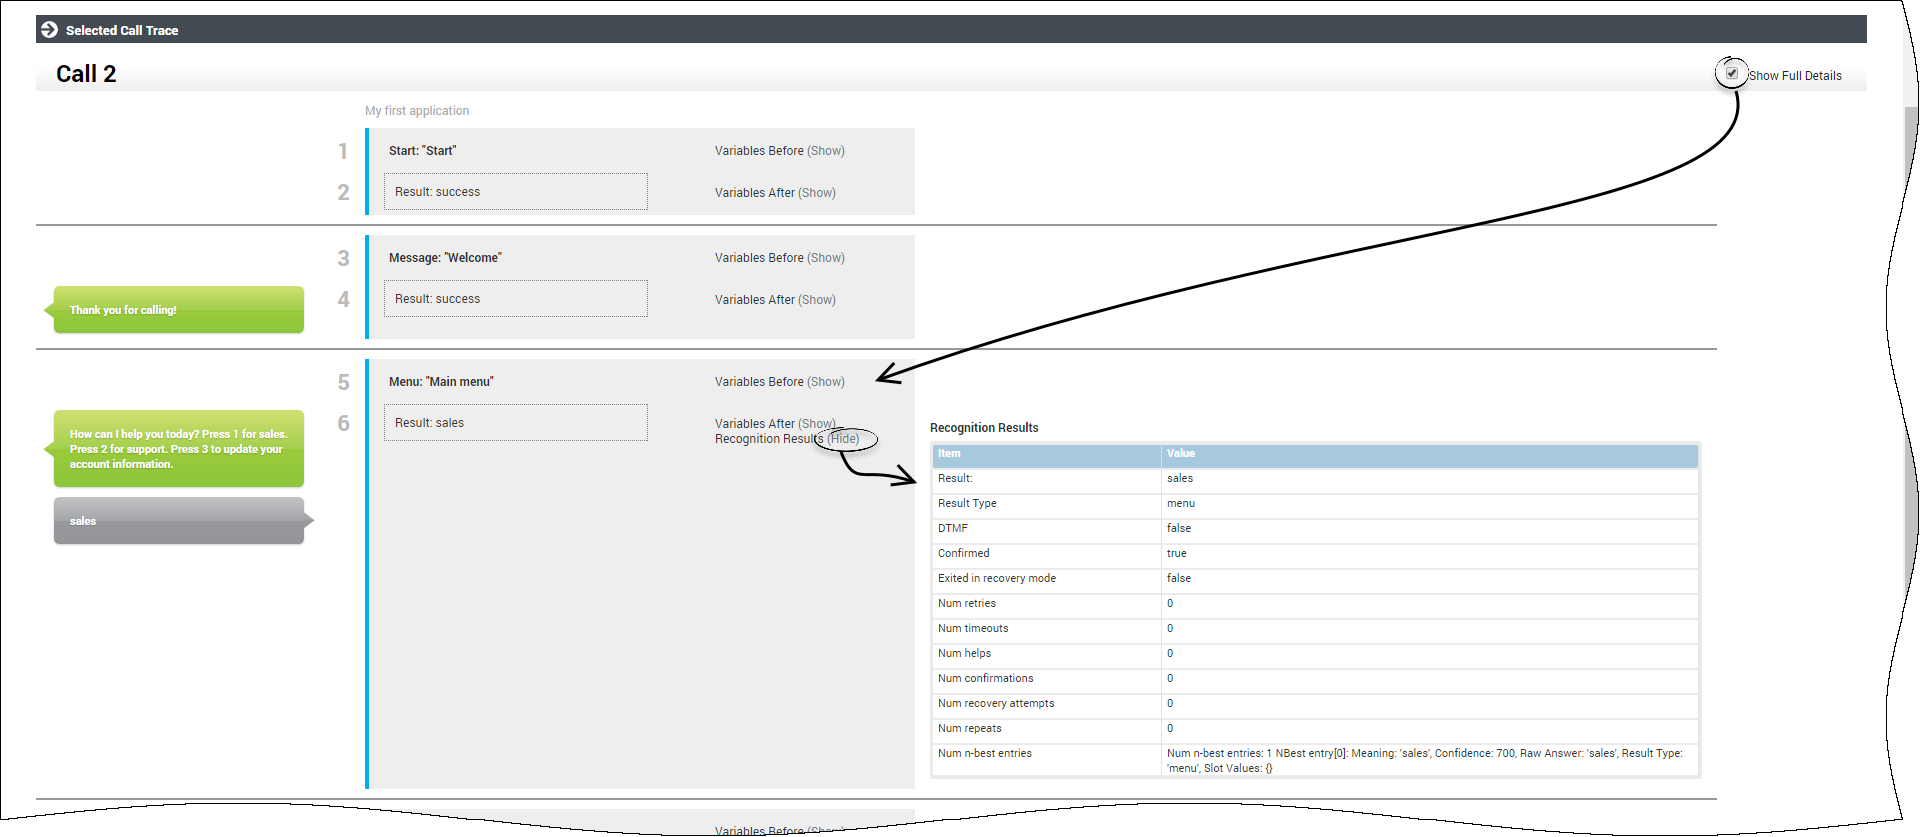
Click Show Full Details to view more information about the call, such as the value of variables at each step, detailed breakdowns of responses to Menu and Question blocks, and much more.
Ending call monitoring
Genesys Intelligent Automationcontinues to monitor a CLI until instructed to stop. Therefore, you might want to cancel call monitoring after you are done testing your application. To do so, go to the Register for Call Monitoring section and enter the CLI to stop monitoring in the Calling Number (CLI) field. Click Cancel Call Monitoring.
Virtual Call
You can use virtual calls to test various aspects of your applications. A virtual call takes you block by block through the application, letting you select various inputs or events to determine how the application responds to a wide range of scenarios. As the call progresses, you can monitor back-end information such as variables, preferences, web-service calls, and even the VXML being generated for voice calls.
- Virtual calls simulate modules only if they are called from the application (for example, by a Link block). Otherwise, you cannot simulate modules as an isolated entity.
- Virtual calls provide information about elements such as call history, variables, attached data, business tasks, VUI preferences, and more. However, you might not see certain elements in a virtual call until data is available. For example, you cannot see information about a variable or business task until it is invoked during the virtual call.
- If your environment supports multiple retry or timeout prompts, you must click Toggle extra prompts in certain blocks to see these additional prompts.
Starting a virtual call
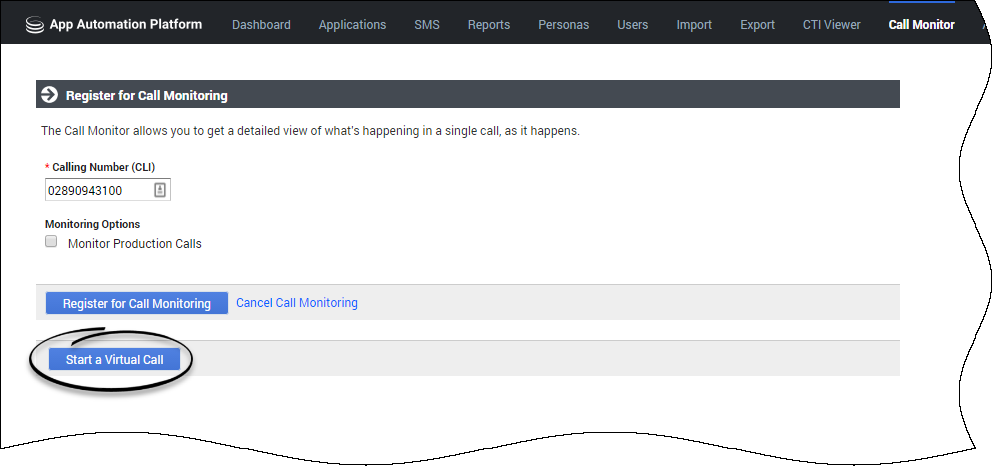
In the Call Monitor view, click Start a Virtual Call.
The Virtual Call opens in a new window.
At the top of the Virtual Call window, you can select the following settings:
- Show Full Details - Select to see the options to be applied to the virtual call. Most options can be left at their default settings. However, you might want to change the following:
- Channel - Select which channel to use for the call. For example, you can select Voice for phone calls or Web for a Web IVR call. This is useful if you want to simulate customer experiences across various channels.
- DNIS - Select the DNIS that the call used to access the application. This setting is useful for testing how your application responds when accessed by one DNIS as compared to another, such as when one customer segment uses one DNIS and another customer segment uses another DNIS.
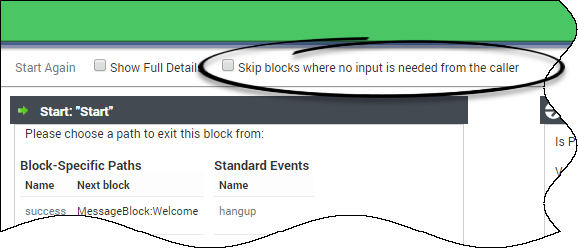
- Skip blocks where no input is needed from the caller - If you do not select this option, the virtual call proceeds through every block, even if user input is not needed. For example, at the Start block, you must click the success event to proceed to the next block. However, if you do select this option, the virtual call stops only when user input is needed, such as at a Menu block.
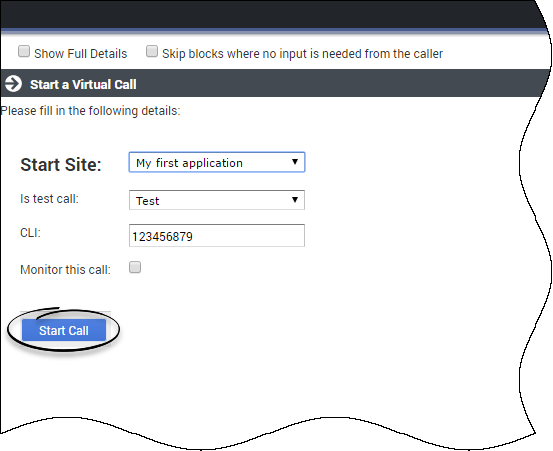
In the Start a Virtual Call section, specify the following:
- Start Site - Select the application to test.
- Is test call - Specify whether the virtual call uses the test version of the application. If this option is not selected, the production version of the application is used.
- CLI - Specify the CLI to use for the virtual call.
- Monitor this call - Select this option to also use Call Monitoring with this virtual call.
Click Start Call to begin the virtual call.
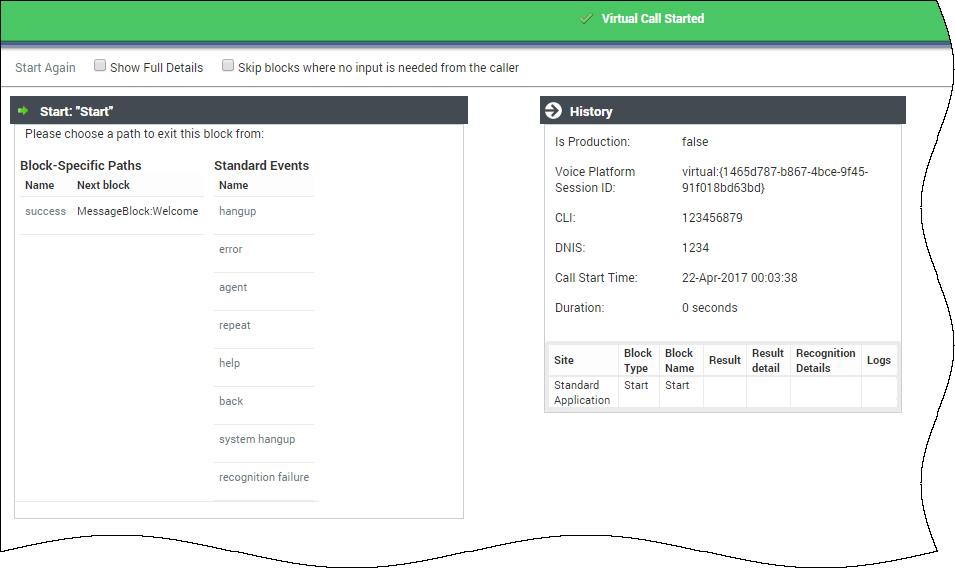
The virtual call begins and simulates how the application responds to a caller. You can monitor the value of variables and the status of callflow preferences to determine how they influence the call experience. If you select the Show Full Details option, you can also view the VXML code as it is generated.
The power of virtual calls is being able to quickly and easily simulate scenarios that might be time-consuming or difficult to simulate with actual calls. For example, at any point in your application, you can trigger standard events such as error to see how the application responds when an error occurs. Or, in a Menu block, you might try specifying various inputs to see how the block processes the input. You can click Start Again in the top-left corner of the screen to restart the call and simulate different events and outcomes.
You can trigger the following standard events at any time during a virtual call:
- hangup - Simulates a caller hangup.
- error - Simulates an unspecified error.
- agent - Simulates the agent default path.
- repeat - Simulates a global default to repeat the last prompt.
- help - Simulates a global default to provide help.
- back - Simulates a global default to go back to the previous block.
- system hangup - Simulates a system-side hangup.
- recognition failure - Simulates an input-recognition failure.
If you run multiple virtual calls to test a certain section of the application, you can skip certain blocks that do not require user input, such as Message blocks. To do this, select the option Skip blocks where no input is needed from the caller to display only blocks that require input from the caller, such as a Menu block or Recording block. You can turn this option on and off throughout the virtual call to skip sections of the application that you do not want to include in your test.
The virtual call ends either when you progress past the last block in the application, or if you simulate an event such as hangup.
Some blocks allow you to set specific options. For example, in a Menu block, you can try various responses to test how the application processes the call. The following sections explain specific options that pertain to each block during a virtual call.
Menu Block
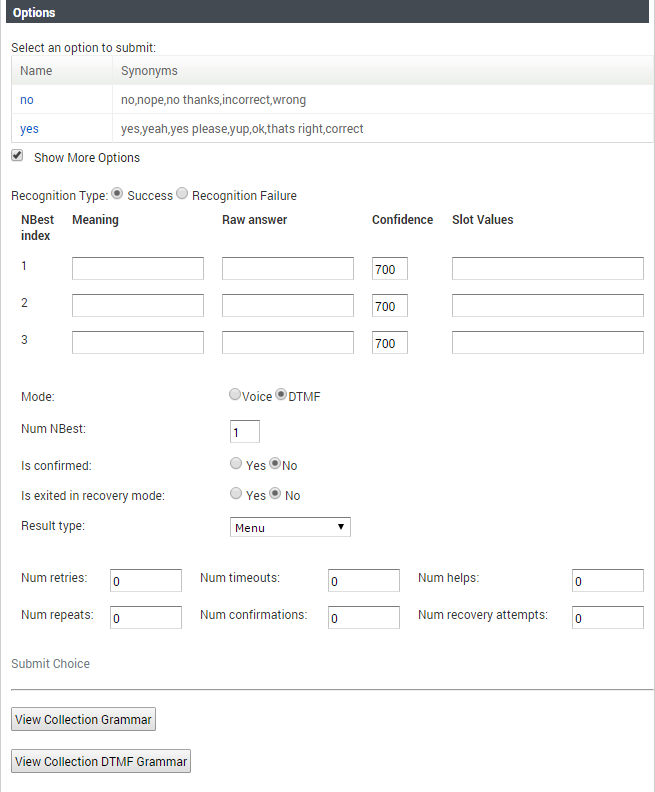
The Options section allows you to specify the caller's input during the virtual call. For example, if the Menu block options are yes and no, you can select either option and proceed with the virtual call.
Click Show More Options to view other input options. For example, you can simulate an input-recognition failure, or you can input one or more words that sound similar to determine if the call proceeds as expected.
The following options are available if you select Show More Options:
- Recognition Type - Select one of the following options:
- Success - Simulates a successful input recognition. In the fields below, you can enter and rank various criteria for successful input, as described below:
- Meaning - The interpreted result from input recognition. For example, 1001.
- Raw answer - The actual input. For example, the caller might say "one double-o one" as a raw answer. In the Meaning field, this is recognized as 1001.
- Confidence - Assign a confidence ranking to this answer, on a scale from 0 (low) to 1000 (high).
- Slot Values - This field is not typically used and can be left blank.
- Mode - Select the input mode to use for input recognition. Select Voice for speech recognition and DTMF for DTMF keypad input.
- Num NBest - Specify the number of NBest options to consider when processing input.
- Is confirmed - Specify whether the input must be confirmed with the caller before proceeding.
- Is exited in recovery mode - Specify whether to exit this block in recovery mode (for example, if the caller provided too many unsuccessful inputs).
- Result type - Specify the result type to use for input. For example, if the caller says "agent" and you have a menu option called agent and a default path called agent, this value specifies which type to use in this virtual call.
- Recognition Failure - Select this option to simulate an unsuccessful input recognition.
- Success - Simulates a successful input recognition. In the fields below, you can enter and rank various criteria for successful input, as described below:
In the Num ... fields, you can specify how many times the caller used each option. For example, enter 2 in the Num retries field to specify the caller had two retries when providing input.
Optionally, select one of the following to download and view the grammar file used for each input type:
- View Collection Grammar.
- View Collection DTMF Grammar.
Click Submit Choice to process the input.
Question Block
The input options for Question blocks are similar to Menu blocks. See the Menu Block section above for more information.
Phone Block
Specify the outcome of the Phone block. The following standard outcomes are available:
- Success - The virtual call simulates a successful transfer and the call ends.
- Busy - The virtual call simulates a busy signal during transfer and plays a standard prompt.
- No Answer - The virtual call simulates an unanswered transfer and plays a standard prompt.
- Transfer Failure - The virtual call simulates a failure during transfer and plays a standard prompt.
Recording Block
You can upload an audio file to simulate the caller providing a voice recording.
Script and Interceptor blocks
These blocks provide the output path returned by the script or defined in the interceptor logic.
Phone Block
You can select the outcome of the transfer.
If an Opening Hours rule applies, the outcome of that rule is shown.
Using the Current Call List
The Current Call List shows a record of your monitored calls and virtual calls. This list clears after you log out and does not persist between user sessions.
Besides viewing information about these calls, you can:
- Rename a call record - Click rename to rename the call record. By default, calls are named Call 1, Call 2 and so on, but you can use more descriptive names, particularly if you choose to generate test cases based on these calls using Cyara.
- Remove a call record - Click remove to remove the call record from the list. Once removed, you cannot retrieve the record again.
Using Cyara to generate test calls
If you have purchased Cyara, you can select items in the Current Call List to generate XML for importing into Cyara. To do so, click the check box in the Generate? column for each call you want to select for test cases.
In the Generate Cyara Test Case window, enter a filename and click Save to save the XML to your computer.


