Phone Block
![]()
You can use Phone blocks to transfer a call to an external phone number or SIP address. The following results are possible:
- success
- no answer
- busy
- hangup
- error
Adding this block to the callflow
To add and configure Phone blocks on a callflow:
- Drag and drop the Phone block onto the appropriate position in the callflow.
- Click the Phone block to open its properties.
- In the Transfer Details tab:
- Enter the number to which you want to transfer the caller. You can enter:
- A phone number.
- A SIP address (for example, sip:12345@myserver.com).
- Multiple numbers or SIP addresses, each separated by a comma. The Phone block will try each one until it gets an answer or they all fail.
- A phone number or SIP address in the form of a variable name (for example, [var:MyDestinationNumber]).
- Genesys Intelligent Automation validates entered phone numbers to ensure calls are not transferred to any disallowed numbers (for example, premium-rate numbers). Disallowed numbers can be changed by your system administrator.
- (Optional) Select the Use Whisper Transfer checkbox and configure the prompt you want to play to the agent during a Whisper Transfer. The prompt can include variables, such as [digits:AccountNumber] or [digits:WhisperID]. See the Whisper Transfer section, below, for more information.
- Enter the number to which you want to transfer the caller. You can enter:
- (Optional) Apply an Opening Hours rule to this call to specify at which times and which days calls can be transferred to a specific number. For example, you might not want to transfer to a number during weekends. If a call is made outside of opening hours, a specific prompt plays and the call can transfer to a different phone number or another result as determined by the Opening Hours rule.
ImportantAt least one Opening Hours rule must be set up in the current module for the Opening Hours rule list to be visible.
- Click Update.
Whisper Transfer
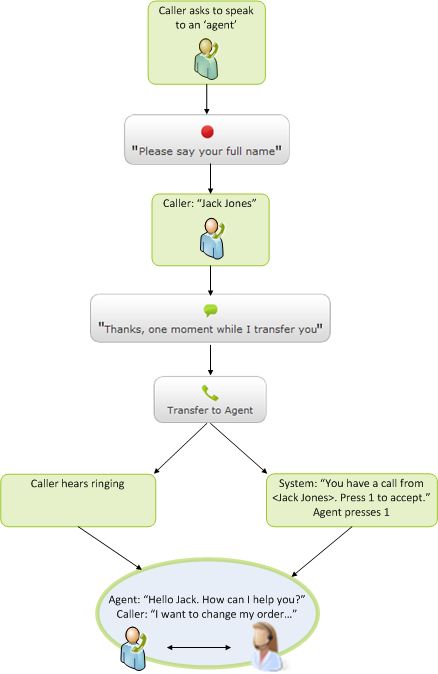
This feature allows you to supply the agent with basic details, such as the caller's full name, before the agent speaks to the caller. You can turn on Whisper Transfers for all transfers or for individual transfers.
The agent must provide a DTMF response when provided with the whisper prompt. For example, you might use: Press 1 to accept the call or 2 to decline it. Or, you can add the account number: You have a call from [digits:AccountNumber]. Press 1 to accept or 2 to decline.
If you have provided the WhisperID variable as part of the prompt, the agent can use the CTI Viewer to view the details of the call. For example, you might use: The code is [digits:WhisperID]. Press 1 to accept or 2 to decline.
The following parameters determine the maximum number of times the Whisper Transfer prompt is played to the agent:
- Maximum no input count – Defines the maximum number of times a prompt is played to an agent before it times out due to lack of input from the agent.
- Maximum retry count – Defines the maximum number of times the retry prompt is played to the agent. The retry prompt may be played to the agent if he or she has selected an invalid option.
If one of these maximums is reached and you still want the call to connect to an agent, you can add the Connect on whisper transfer timeout option in the Preferences tab. Otherwise, the call returns a no answer result.
If the Whisper Transfer is in a queue, you can add the Two-step whisper transfer parameter in the Preferences tab to specify what happens if the Whisper Transfer is in a queue. When enabled, this parameter plays an introductory message to the agent ("Press 9 to hear the message") in a loop until the agent is ready to hear the actual Whisper Transfer. At this point, the agent can press 9 to hear the message or 8 to reject the call.
- The maximum number of times the introductory message can be played to the agent is dictated by the length of time specified in the Transfer timeout parameter — not the number of iterations. Once the agent presses 9 to hear the actual whisper message, the Maximum no input count and Maximum retry count parameters determine how many times the message is played.
- By default, Whisper Transfer uses a built-in WAV file (whispertransfer_intro.wav) for the introductory message, but you can override this by uploading a custom prompt named Standard whisper transfer introduction.wav.

