
Contents
Redundant (HA) Configuration Servers
This section describes how to deploy redundant Configuration Servers.
Redundancy
Redundant Configuration Servers support only the Warm Standby redundancy type.
Both the primary and backup Configuration Servers operate with the same Configuration Database. The backup Configuration Server does not accept client connections or make changes to the data until its role is switched to primary. When the backup Configuration Server starts, it establishes a connection to the primary Configuration Server. During the operation, the primary Configuration Server sends notifications about all changes made in the Configuration Database to the backup Configuration Server.
If there are any Configuration Server Proxies connected to the primary Configuration Server when it fails, those Proxy servers connect to the backup Configuration Server when it assumes the primary role.
Deploying Redundant Configuration Servers
This section describes how to install and set up redundant Configuration Servers.
Installation Recommendations
- To ensure proper redundancy, Genesys recommends running the primary and backup Configuration Servers on separate computers.
- When both the primary and backup Configuration Servers are running, do not remove the backup Configuration Server Application object from the configuration.
- You are responsible for ensuring that the configuration options of the primary and backup Configuration Servers are the same, with some exceptions: the log options in the primary Configuration Server can differ from those in the backup Configuration Server configuration.
Prerequisites
- Configuration Layer components are installed and running as described in Deploying Configuration Layer.
- You are logged into Genesys Administrator.
Installation and Configuration
- Configure an Application object for the backup Configuration Server.
- Go to Provisioning > Environment > Applications, and click New.
- In the General section of the Configuration tab:
- Enter a descriptive name (not confserv) in the Name text box.
- Select the appropriate template, as follows:
- Click the search icon in the Application Template field to open a Browse dialog box that lists the available application templates. If a Configuration Server template file is not listed, close the dialog box and import the Configuration_Server_current-version.apd file from the Management Framework 8.5 product CD.
- In the Browse dialog box, select the Configuration Server template file.
- Click OK.
- In the Server Info section:
- Select the Host object on which this Configuration Server runs.
- Specify the Listening Ports that Configuration Server clients must use to connect to this Configuration Server.
- In the Working Directory, Command Line, and Command Line Arguments text boxes, do one of the following:
- Enter the appropriate information in each of the text boxes. For information about command-line parameters, see Starting a Backup Configuration Server.
- Type a period (.) in the Working Directory and Command Line text boxes, and leave the Command Line Arguments text box blank. The information will be filled in automatically when you install the backup Configuration Server, but only if the Installation Package can connect to the primary Configuration Server.
- Enter appropriate values for the other mandatory fields (those indicated by red asterisks).
- Click Save & Close to save the configuration.
- Install the backup Configuration Server.
Prerequisite
- The backup Configuration Server Application object exists.
- On the Management Framework 8.1 product CD, go to configuration_layer/configserver/operating_system/.
- Type install at the command prompt, and press Enter.
- For the installation type, type 2 to select Configuration Server Master Backup, and press Enter.
- For the external authentication option, type the number corresponding to the type of External Authentication that will be used (LDAP, Radius, both, or neither), and press Enter.
.ImportantIf you select LDAP, be prepared with the URL to access the LDAP Server. For more information about LDAP configuration, see the Framework External Authentication Reference Manual
- For the host name of this backup Configuration Server, do one of the following:
- Specify the host name, and press Enter.
- Press Enter to select the host on which this backup Configuration Server is being installed.
- Specify the primary Configuration Server, as follows:
- Specify the primary Configuration Server Hostname, and press Enter.
- Specify a value for the port for the primary Configuration Server, and press Enter.
- Specify the User name of the primary Configuration Server, and press Enter.
- Specify the Password for the primary Configuration Server, and press Enter.
- Type the number corresponding to the Application object for the backup Configuration Server that you created, and press Enter.
- Specify the full path of the destination directory, and press Enter.
- If the target installation directory has files in it, do one of the following:
- Type 1 to back up all the files in the directory, and press Enter. Then specify the path to where you want the files backed up, and press Enter.
- Type 2 to overwrite only the files in this installation package, and press Enter. Then, type y to confirm your selection, and press Enter. Use this option only if the application already installed operates properly.
- Type 3 to erase all files in this directory before continuing with the installation, and press Enter. Then, type y to confirm your selection, and press Enter.
The list of file names will appear on the screen as they are extracted and written to the destination directory.
- For the product version to install, do one of the following:
- Type 32 to select the 32-bit version, and press Enter.
- Type 64 to select the 64-bit version, and press Enter.
- Do one of the following:
- Type y to configure the backup Configuration Server during installation (now), and press Enter. Continue to the next step to specify values for the configuration file. For information about Configuration Server configuration options and their values, refer to the Framework Configuration Options Reference Manual.
- Type n to not configure backup Configuration Server during installation. In this case, you have finished installing Configuration Server; do not continue to the next step in this procedure. Before you can start Configuration Server, however, you must create a configuration file and set the configuration options in it, as described in Configuration Server Configuration File.
- For the confserv section:
- Specify a value for the backup Configuration Server port, and press Enter.
- Specify a value for the backup Configuration Server management port, and press Enter.
- For the dbserver section:
- Type the number corresponding to the database engine that this Configuration Server uses (dbengine), and press Enter.
- Specify the name or alias of the DBMS that handles the Configuration Database (dbserver), and press Enter.
- To specify the name of the Configuration Database (dbname), do one of the following:
- If you are using an Oracle database engine (that is, you typed 3 in Step i), press Enter. This value is not required for Oracle.
- If you are using any other database engine, specify the name of the Configuration Database, and press Enter.
- Specify the Configuration Database username, and press Enter.
- To specify the Configuration Database password, do one of the following:
- Specify the password, and press Enter.
- Press Enter if there is no password; that is, the password field is empty, with no spaces.
When the installation process is finished, a message indicates that installation was successful. The process places the backup Configuration Server in the directory specified during the installation process. The installation script also writes a sample configuration file, confserv.sample, in the directory in which the backup Configuration Server is installed.
Important- If you chose to configure the backup Configuration Server during installation, the sample configuration file, confserv.sample, is renamed confserv.conf, and the parameters specified in Steps l and m are written to this file.
- If you chose to configure the backup Configuration Server after installation, you must manually rename the sample file as confserv.conf and modify the configuration options before you start the backup Configuration Server. See Configuration Server Configuration File.
- On the Management Framework 8.5 product CD, go to configuration_layer/configserver/windows.
- Double-click setup.exe to start the Genesys Installation Wizard.
- Click About on the wizard's Welcome page to review the read_me file. The file also contains a link to the server's Release Notes file.
- Click Next on the Welcome page to proceed with the installation.
- On the Maintenance Setup Type page, select Install new instance of the application and click Next.
- On the Configuration Server Run Mode page, select Configuration Server Master Backup and click Next.
- On the Configuration Server Parameters page, specify the Server Port and Management Port for Configuration Server, and click Next.
- On the Database Engine Option page, select the database engine used by Configuration Server, and click Next.
- On the Database Parameters page:
- Specify the Database Server Name and Database Name.
- Specify the Database User Name and Password.
- Click Next.
- On the Configuration Server External Authentication page, select the type of external authentication Configuration Server uses, or select None if Configuration Server is not using external authentication. Click Next.
- On the Connection Parameters to the Genesys Configuration Server page:
- Specify the Host name and Port of the primary Configuration Server.
- Specify the User name and Password for the primary Configuration Server.
- Click Next.
- In the upper pane of the Select Application page, select the backup Configuration Server Application object that you just configured, and click Next.
- On the Choose Destination Location page, the wizard displays the destination directory (if specified during installation) in the Working Directory property of the server's Application object. If you entered a period (.) in this property, or if the specified path is invalid, the wizard generates a path to the destination directory in the c:\ProgramFiles\GCTI\Product Name format.
If necessary, click:
- Browse to select another destination folder. In this case, the wizard will update the Application object's Working Directory in the Configuration Database.
- Default to reinstate the path specified in the Working Directory property.
- On the Ready to Install information page, click:
- Back to update any installation information.
- Install to proceed with the installation.
- On the Installation Complete page, click Finish.
- Windows Add or Remove Programs window, as a Genesys server.
- Windows Services list, as a Genesys service, with Automatic startup type.
- Modify the primary Configuration Server Application object to work with the backup Configuration Server.
Prerequisite
- The primary and backup Configuration Server Application objects exist.
Procedure
- Go to Provisioning > Environment > Applications, and click the primary Configuration Server Application object (named confserv) to open its properties.
- On the Configuration tab, open the Server Info section.
- Use the Browse button next to the Backup Server property to locate the backup Configuration Server Application object you want to use as the backup server.
- Select Warm Standby as the Redundancy Type.
- Select Auto-Restart.
- Click Save & Close to save the changes.
- If you installed the backup Configuration Server on UNIX and chose to configure it after installation, create and modify the configuration file for the backup Configuration Server.
The configuration file for the backup Configuration Server must be the same as that for the primary Configuration Server with the following exceptions:
- The name of the section in the backup Configuration Server configuration file must match the name of the backup Configuration Server Application object.
- The values for the port and management-port options in the backup Configuration Server configuration file must be those values specified as Communication Port and Management Port values, respectively, during installation of the backup Configuration Server.
- The log options can be different.
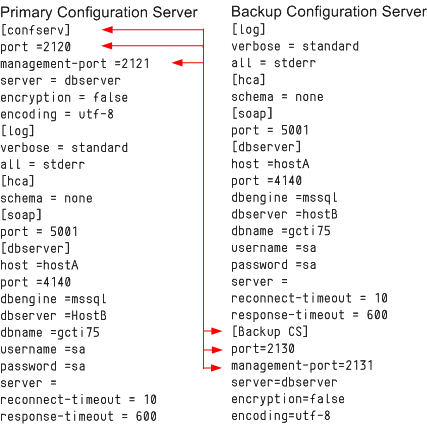 Sample Configuration Files for Primary and Backup Configuration Servers.
If you installed the backup Configuration Server on UNIX, modify the run.sh file to enable the backup server to be started.
Sample Configuration Files for Primary and Backup Configuration Servers.
If you installed the backup Configuration Server on UNIX, modify the run.sh file to enable the backup server to be started.
- In a text editor, open the run.sh file.
- Add the following at the end of the command line in the file:
-s <section name> -c <configuration file name>
- Manually synchronize options and ports between the redundant Configuration Servers.
- Manually synchronize high-availability (HA) ports between the redundant Configuration Servers.
When Configuration Servers operate in a high-availability (HA) environment, the backup Configuration Server must be ready to take on the primary role when required. This requires that both Configuration Servers are running and that they must have the same information. When you configure redundant Configuration Servers to operate with the Warm Standby redundancy type, the primary Configuration Server uses the connection to the backup to deliver synchronization updates. Genesys recommends that you enable Advanced Disconnect Detection Protocol (ADDP) for this connection.
ImportantYou can configure multiple ports for any Application of type Server. When multiple ports are configured for a server in a Warm Standby redundancy pair, the number of ports, their Port IDs, and the Listening Mode settings of the primary and backup servers must match, respectively.
Solution Control Server is required for HA Configuration Servers to switch over. Modify and start the SCS responsible for that pair to work with the Configuration Server running in Primary mode.
As a result of the installation, the wizard adds Application icons to the:
For more information about the Configuration Server configuration file, see Configuration Server Configuration File. For information about Configuration Server configuration options and their values, refer to the relevant chapters in the Framework Configuration Options Reference Manual.

The SCS configuration file has a filename extension of .cfg (for Windows), and .conf (for UNIX). Here is a sample of the contents:
[backup_configserver]
host=<backup CS host name>
port=<backup CS port>
name=<SCS application name>
server=primary_configserver
[primary_configserver]
host=<primary CS host name>
port=<primary CS port>
name=<SCS application name>
server=backup_configserver
When using HA Configuration Servers, you must restart Solution Control Server to enable it to connect it to the Configuration Server running in Primary mode. If a Master Configuration Server is part of an HA pair, the SCS responsible for that pair of servers must be provisioned with a startup option as follows:
scs.exe -f SCS configuration fileStarting the Backup Configuration Server
When starting a backup Configuration Server, specify the following values in the startup command line:
| -s | The name of the Configuration Server section within the configuration file for the backup Configuration Server. |
| -c | The name of the configuration file that contains configuration information for the backup Configuration Server. |
For a description of the command-line parameters specific to Configuration Server, refer to Configuration Server.
- To start from Genesys Administrator, refer to Starting and Stopping with the Management Layer.
- To start manually, go to the directory in which the backup Configuration Server is installed, and do one of the following:
- To use only the required command-line parameters, type the following command line:
sh run.sh - To specify the command line yourself, or to use additional command-line parameters, type the following command line:
confserv -s <section name> -c <configuration file name> [<additional parameters as required>]
- To use only the required command-line parameters, type the following command line:
- To start as a Windows Service, refer to Starting and Stopping with Windows Services Manager.
- To start from Genesys Administrator, refer to Starting and Stopping with the Management Layer.
- To start manually, do one of the following:
- Use the Start > Programs menu.
- To use only the required command-line parameters, go to the directory in which the backup Configuration Server is installed, and double-click the file startServer.bat.
- To specify the command line yourself, or to use additional command-line parameters, open the MS-DOS window, go to the directory in which the backup Configuration Server is installed, and type the following command line:
confserv.exe -s <section name> -c <configuration file name> [<additional parameters as required>]
Operating Configuration Server in HA mode
Configuration Server won't support a manual switchover request and is stopped instead to promote another instance to become primary. If Configuration Server receives a request to switch over from the management layer, then it should be recycled at a later time before it can become primary again. The backupmode-restart option, along with the AutoRestart option, ensures this happens automatically.
Configuring ADDP between Redundant Configuration Servers
Advanced Disconnect Detection Protocol (ADDP) is supported between primary and backup Configuration Servers. Use the new configuration options protocol, addp-timeout, addp-remote-timeout, and addp-trace, setting them in the configuration server section of the configuration files for both Configuration Servers. For the primary Configuration Server, this section is called [confserv]. For the backup Configuration Server, this section has the same name as the backup Configuration Server Application object. For detailed descriptions of these options, refer to the Framework Configuration Options Reference Manual.
For example, in a primary Configuration Server configuration file, the ADDP options would appear as follows:
[confserv]
...
protocol=addp
addp-timeout=16
addp-remote-timeout=32
addp-trace=both
...
For more information about ADDP, see Advanced Disconnect Detection Protocol.