
Contents
Post upgrade steps
Removing artefacts from previous installations
If you are upgrading from a version prior to 9.0, there may be items left behind after the upgrade that can be safely removed. Genesys recommend taking a backup of any database before permanently deleting it.
Microsoft Analysis Server Databases
These will typically have a name of the format DNACube_<Unique Name>_<Number>. These databases were required by the old “DNA Cube” functionality which has been superseded by the Data Warehouse.
The Performance DNA service user account will no longer require access to the Analysis Server. Provided the account is not shared with other systems, the user can be removed from the Analysis Server Administrators role.
DNA Databases
These databases can be identified because they will contain, amongst others, the tables:
- DNA
- DNAComponent
- DNACube
- DNAUserDetails
These databases were created per-tenant, and have been superseded by the Data Warehouse.
Deprecated scheduled tasks for Performance DNA
Some of the scheduled tasks created by previous releases of Performance DNA are no longer required. These will be called
- <SystemName> Process Queues
- <SystemName> DNA Cube Refresh
where <SystemName> is the name of the system, for example “PerformanceDNA” (this may vary depending on the installer used)
Configure Training Manager-Performance DNA Integration
In previous versions, the Training Manager-Performance DNA integration (the setting of the Performance DNA URL and tenant ID) was configured via the SkillsManagerWS web.config file. These settings have been moved to the Settings page in Portal and must be replaced after an upgrade. To update these settings:
- Login to portal as an Administrator
- Click the system settings page link
- Set the Performance DNA URL. Once this has been set the Tenant dropdown will be populated with a list of tenants.
- Select the Tenant that Training Manager should integrate with.
- Click the Save button.
Training Manager client users will then be able to connect to the Performance DNA tenant specified.
3rd Party Authentication
The latest version of Performance DNA and Portal now allow for a 3rd party authentication scheme. This requires a software component provided by a customer to authenticate against a customer’s database of users. This facility is provided as an alternative to the STS configuration.
When configured correctly the login screen will re-direct to a customer provided web site to enter user credentials. The 3rd party application will need to call a Web service provided by Silver Lining with an authentication token when the user is authenticated. The 3rd Party Application will then re-direct back to a landing page which will validate the authentication token and log the user in to the system.
Configuring Performance DNA
The following settings must be provided in the System Settings for Performance DNA to enable 3rd Party Auth:

A Tick box to enable 3rd Party Auth, this makes the other fields appear.
The 3rd Party Auth login page.
The 3rd Party Auth logout page.
The user field in Performance DNA to use for choosing which user to login.
Configuring Portal (via Training Manager)
The following settings must be provided in the Portal Settings page of Training Manager to enable 3rd Party Auth:

- A drop down so you can choose whether to user the user name or employee name for authentication.
- The 3rd Party Auth login page.
- The 3rd Party Auth logout page.
E-mail ADG Setting for IEX WFM
In previous versions the IEX email ADG was specified via the SkillsManagerWS/WebSettings.config file. This setting has been removed from this file. The email ADG is now set in the Training Manager Portal screen of the Training Manager client (labelled “Email ADG Name”). The upgrade process does not retain this value, therefore, it is necessary to replace it in the Training Manager Portal settings screen after upgrading.
OAuth2 Authentication
Configuring OAuth2 authentication for your users involves two steps:
Configuring an OAuth2 Provider
You can configure the OAuth2 providers (for example, Google) for your organization from the OAuth2 Providers widget. Note that, you must be a Landlord to perform this procedure.
- Login to Performance DNA as a Landlord.
- Navigate to System > OAuth2 Providers widget. You will see a list of OAuth2 Providers that are currently supported such as Google, Genesys Cloud, and Genesys Engage.
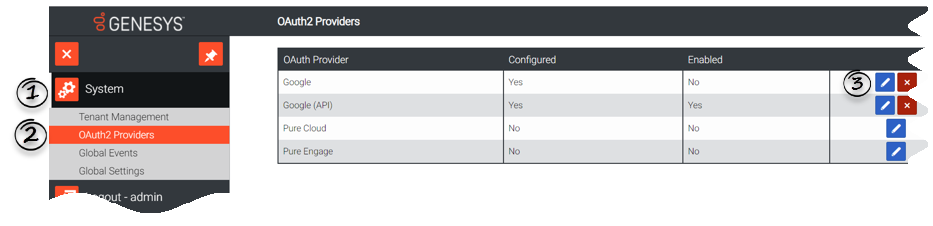
- Now click
 for the OAuth2 provider you want to configure. You can configure only one provider type.
 - In the Edit OAuth Providers screen displayed below, select the check box Enabled to enable this OAuth2 provider for your organization.

- Specify the URL details required for the OAuth2 provider. Ensure that you specify all mandatory fields (highlighted in red) with appropriate values. The mandatory fields are:
- Token Exchange Url
- Redirect Url
- User Info Url
- Client Id
- Client Secret (Encrypted)
- Login Url
- Click Save.
Important
- You cannot modify an OAuth2 Provider configuration if you have assigned Tenants. If you want to remove or modify an OAuth2 provider, you must first remove all the Tenants assigned to it, by navigating to System > Tenant Management widget.
- GSM versions prior to 9.0.101 did not require User Info Url configuration in their OAuth setup. If the OAuth feature was configured prior to 9.0.101, and you are upgrading the software to version 9.0.101 or above, then you must ensure that you configure a new parameter User Info Url before using any OAuth feature.


Configuring Tenants with an OAuth2 Provider
The next step in configuring OAuth2 authentication is to assign the OAuth2 Provider for your Tenants. Once you assign an OAuth2 Provider for a Tenant, the tenant’s users are enforced with OAuth2 authentication method.
Note: You can create an OAuth2 Provider using the OAuth2 Providers widget. Follow the procedure Configuring an OAuth2 provider if you have not created an OAuth2 provider so far.
- Login to Performance DNA as a Landlord.
- Navigate to System > Tenant Management widget.
- From the list of Tenants, click Edit for the Tenant for which you want to assign the OAuth2 Provider. You can see the OAuth2 Provider modal window.
- On the OAuth2 Provider modal window, you can assign the OAuth2 Provider either for an user interface (UI) developed by your organization or an API.
- Note: The OAuth2 Providers listed in the drop-down fields are configured and enabled from the OAuth2 Providers widget. If a provider is not listed here, check if you have enabled the provider by using the OAuth2 Providers widget. Genesys supported authentication providers are Google, Genesys Cloud, and Genesys Engage.
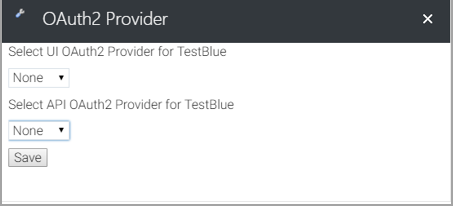
- Click Save.

Configuring SAML authentication
Performance DNA can be configured to use SAML authentication to authenticate users. Follow the steps below to configure the required Performance DNA settings to enable SAML authentication.
- Login to the Performance DNA tenant that you wish to configure for SAML authentication as a tenant administrator.
- Click the System Settings widget under the System section of the menu.
- Click the Authentication tab at the top of the page.
- Click the ‘+ Add’ button.
- Complete the form with the relevant details. The Authenticating field should be set to the user field that contains the login names that are to match the SAML login requests.
- Click the Save button.
The Authentication tab in the System Settings page lists saved SAML authentication providers. These can be edited via the edit button, deleted using the ‘X’ button and re-prioritised using the up and down arrows. Providers can also be enabled/disabled using the Enabled checkbox in the create/edit form.
If more than one provider is present and enabled, Performance DNA will attempt to log users in using the provider with the highest priority first. If this fails, the next provider available enabled provider will be used until the user is logged in successfully or login via all providers has failed.
Configuring Updating Routing Skills
Connectivity Overview
Performance DNA updates routing skills in Genesys through the GIS SOAP webservice interface. Firstly a connection is made to the SessionService service to get a GIS Session token, then various calls are made to the CSProxyService service to retrieve and update information in CME.
Configuring Performance DNA to work with GIS
Enabling GIS
Before the configuration options for GIS will appear in Performance DNA,GIS needs to be enabled. This can be done on the General Settings tab within System Settings. For further instructions on setting up GIS Authentication options, please see the Performance DNA Administrator guide.