
Configuring WFM Fields as Data Source
Follow the steps below to configure WFM as the data source for OrgData.
- Navigate to Admin > Users > OrgData Setup.
- On the Define Data Sources page, in WFM Data Source Configuration section, select the check box Use WFM as a source of Organisational Data (the settings configured in system settings will be used to connect).
- Click + Add to create a new WFM data source.
- Enter the name of the WFM data source field or column that will be used.
- ImportantUserId, EmployeeId, FirstName, LastName and CacheData are default fields in WFM, out of which CacheData is automatically mapped and you do not have to setup explicit mapping.

Note that some fields are specific to a WFM application. Such fields are:
- Genesys-specific fields: Site, Team, Email
- Teleopti-specific fields: Site, Team, Email, ADLogin, AppLogin
- NICE (IEX)-specific fields: MUName
- Repeat steps 3 and 4 until you add all the required WFM data source fields that you wish to import.
- Click Save and Map Fields.
Updating WFM Data Source Fields
The WFM specific data source fields are case sensitive. Hence, Genesys recommends to use the source field names carefully during configuration.
In case you want to update or correct any data source field, follow the below procedure.
- Navigate to the Define Data Sources page and delete the incorrect data source by clicking the X (delete) button.
- Click Save and Map Fields.
- Click Previous.
- Refresh the Define Data Sources page by pressing F5 or Ctrl + R keys.
- Add the data source fields again with the correct spelling and case by following Configuring WFM Data Source Fields procedure.
- Re-map the data source fields to the User Fields.
- Click Save.
Mapping WFM Data Source to User Fields
You can map the WFM data source fields to the Skills Management User Fields by performing the following procedure. Note that, this procedure is a continuation of Configuring Data Source Fields procedure. You can map the data source fields only at the end of configuration procedure, that is, while saving them.
- Click “+ ADD” at the bottom of Map to User Fields page, to create a new data source.
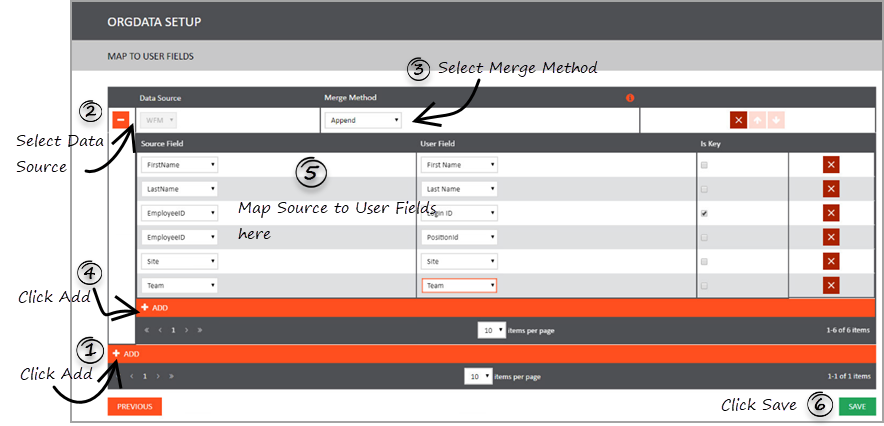
- In the Data Source column, select the source from which you will import the data.
- You can either select WFM or a File Name based on your configuration in the Define Data Sources page.
- In the Merge Method column, select the method which must be applied to merge the Data Source to User Fields. You can select:
- Append – this method adds all new data source fields to the existing User Fields.
- Update and Append – this method updates existing User Fields with the imported changes and creates new User Fields.
- Update Only – this method updates existing User Fields with imported changes and does not create new User Fields.
- New Rows Only – this method only creates new User Fields.
- Click “+ ADD” within the inner table to create a new Source to User Field mapping. You can do the mapping by specifying the following fields:
- Source Field column – select the WFM field from the drop down.
- User Field column – select the corresponding Skills Management field from the drop down.
- Is Key – select this check box if you want to use the current field as the Unique Identifier. For example, Login ID field.
- Repeat the above step until you configure all the User Fields that must be imported from the WFM application.
- Click Save.

This page was last edited on January 16, 2019, at 11:15.
Comments or questions about this documentation? Contact us for support!