Licensing
The following sections describe the licensing options in Performance DNA and Training Manager. If you have upgraded your product and your licences are still valid, there is no need to modify your existing licensing settings.
Licensing Performance DNA
Tenant Administration
The Tenant Administration part of the Performance DNA application is accessible through the web server’s hostname/login/admin, for example http://yourserver/login/admin.
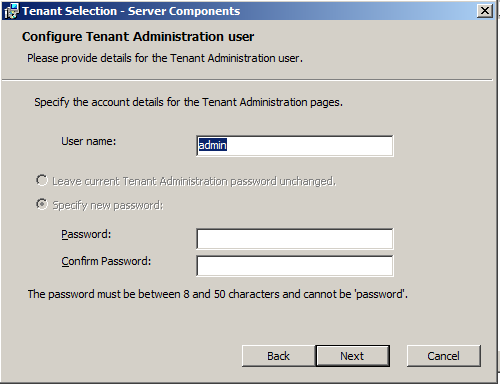
To log in to the tenant administration area, use the tenant administration account details that were specified during the install/upgrade process (See below screenshot of the relevant installer screen. Note that this screen will not be available if using the command-line only installer or Azure install/upgrade script).
Once logged in you should see the Tenant Management screen.
- Click Create New Tenant.
- On the Tenant Details tab, enter the Tenant Name and Primary Contact details for the tenant that will be using the application. You can also specify the billing information from the Billable drop down before you click Next.
- On the Licence Details tab, enter the license details for this tenant such as Company name, Number of licenced users, Licence expiry date, Host name and Licence key and click Next. Note that the number of licensed users are validated against the actual users of the system and you must resolve it when there is a license breach or violation. See License Validation for more information.
- ImportantIf you have access only to Training Manager, specify only the Host name, and a Licence expiry date, for example 01/01/2050 and leave the remaining licence fields blank. This will enable only core Skills Management functionality to be available in the web portal. It will be necessary to enter your Training Manager licence (via the steps in the following section) to use the system.
- On the Authentication tab, select the user field from the Login field drop down that will be used for authentication purpose and click Next. Note that the selected user field must be a field in an email format. Currently, Login Id is defaulted and is recommended for this purpose.
- Select Create as demo tenant if this tenant will be used for demo purposes. If selected, the system populates the tenant with the default demo data. This is an advanced feature recommended only for experienced users who will be showcasing the system. It should not be used for standard customer installations.
- ImportantEnsure to review the choices made on this screen, because the choices once submitted cannot be undone or modified in any way.
- On the Setup Admin User tab, enter the administrator user details to create a new administrator for the tenant.
- Click Finish to close the wizard and create a new standard or demo tenant.
- Note that if the option Create as demo tenant was selected, the process to create a demo tenant will take an extra few minutes; otherwise, you will get the tenant details immediately.
- When the tenant setup is complete, you will see the tenant details in the Tenant Administration screen.
- ImportantIf the tenant that is being created is a demo tenant, you will see the Add Demo Data option. Clicking this button generates demo data for a 6-week window in the past. This process can take several minutes to complete. The button will then update to Refresh Unavailable when you refresh the page. After 6-weeks have elapsed the button will change to Refresh Demo Data. Clicking the button will once again generate new demo data in a new 6 week window from the current date. If the users in a demo tenant need to be refreshed for any reason then edit the tenant and click through from next to finish. This will kick off another user creation run. Note that this process will take several minutes to complete generating the new data before the wizard closes.
If you wish to convert Performance DNA to use Active Directory authentication rather than the default form-based login system, refer to the Installation and Configuration Guide for Active Directory via the SLS Secure Token Service.
Licensing Training Manager
To set up your Training Manager license open a web browser and navigate to the SkillsManagerWS application, for example http://localhost/services/SkillsManagerWS/default.aspx (or right-click the SkillsManagerWS folder within IIS, and then select Browse).
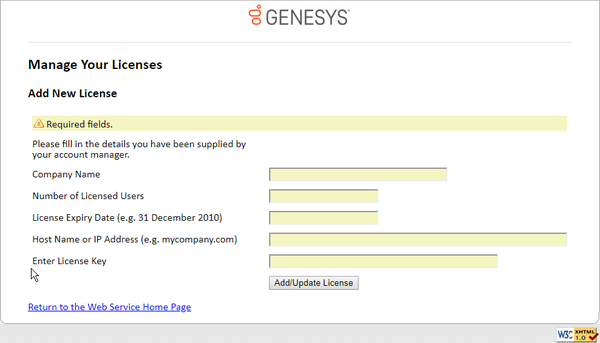
Click the Manage Your Licenses link. A form will appear allowing you to enter your Training Manager product license. Complete the form and click the Add/Update License button to add a new product license. Alternatively, if you have already added licenses, click one of the links at the top of the form to view and/or edit the existing license(s).
The system will be available once you have either a Performance DNA licence, Training Manager licence or both. The widgets that are available in the system will be based on the licence status, i.e. all widgets for both Performance DNA and Portal will only be available if you have a valid licence for both products. If you have one valid product licence, only the widgets that are related to that product will be available. Performance DNA administrators will be able to see all Performance DNA widgets. Similarly, Portal Administrators will be able to see all Portal widgets. If you have both Performance DNA and Training Manager licences, it will be possible to assign users to both Performance DNA and Portal administrator roles so that they will be have full access to the widgets of both products. Other users’ access is restricted based on the widgets available to their assigned roles.


