Contents
Viewing schedules in scenarios
Before entering your bids and deciding on how you will rank them, you might want to take a close look at the available schedules and their details to find those that are most desirable to you.
Click the link in the scenario name to open the scenario and display the Schedules grid. There are many ways to sort and filter the information in the grid so you can see only the details that are important to you.
Using the Schedules grid
The grid displays information about the available schedules. The grid columns are:
- Check box—Displays a check box that you can use to select a row or schedule.
- Name—Displays the schedule name and number of weeks if the schedule is longer than one week.
- Bid—Displays your current bid for this particular schedule. Clicking the Actions icon
 in this column enables you to add this schedule to your desired or unwanted list, or remove it from either list.
 - #—Displays the number of instances of this exact schedule that are available to be bid on across the contact center. For example, if the number in this column is 3, then 3 different agents can be granted this particular schedule.
- Dates—The date range (or beginning and end dates) for each schedule.
- Paid hours—Displays the total paid hours for the week, for each schedule.
Expanding the grid
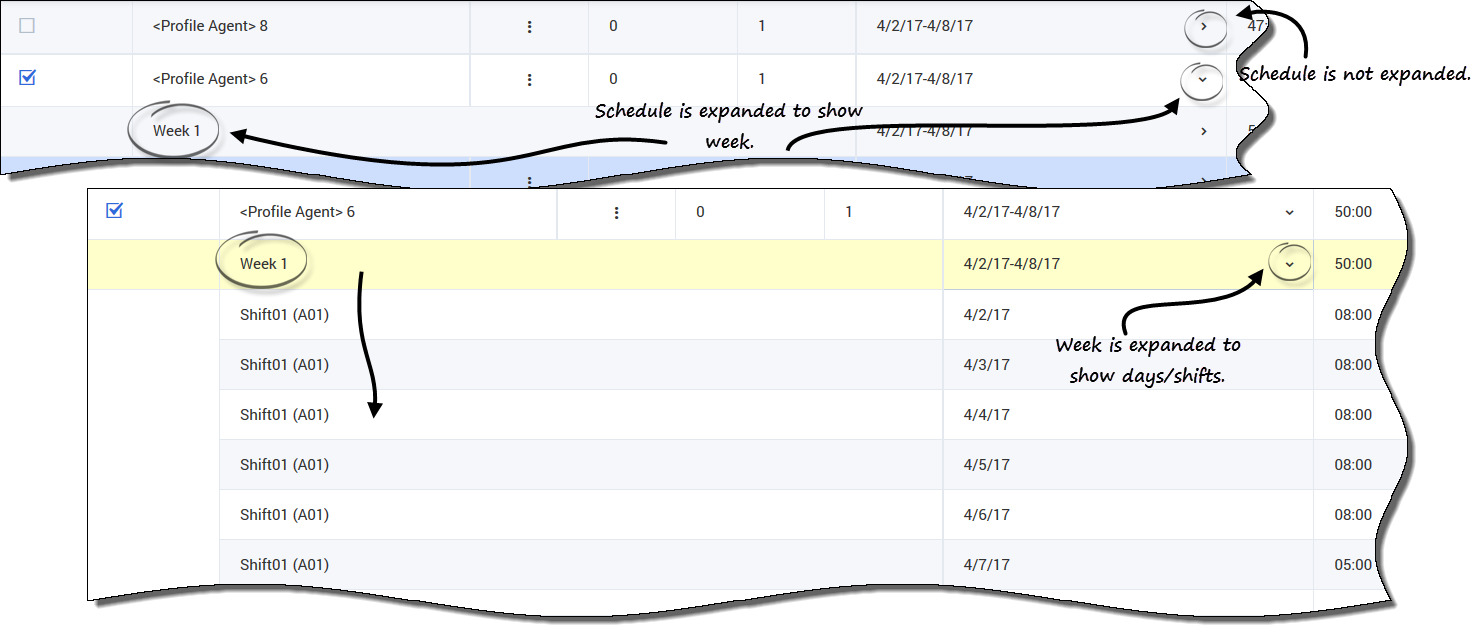
To get a better view of the details for days or weeks within the schedule, can expand the grid.
To view weeks in a schedule:
- In the Dates column, click the arrow to view the number of weeks in a particular schedule. Schedules can cover one week or multiple weeks. The table expands to show a row for each week in the schedule, numbering them consecutively (Week1, Week2, etc). Click the arrow again to hide the week(s) in the schedule.
To view days in a week:
- In the Dates column, click the arrow to view the days in a particular week. The table expands to show more rows; one for each day in the week. Click the arrow again to hide the days in the week.
Viewing schedule details
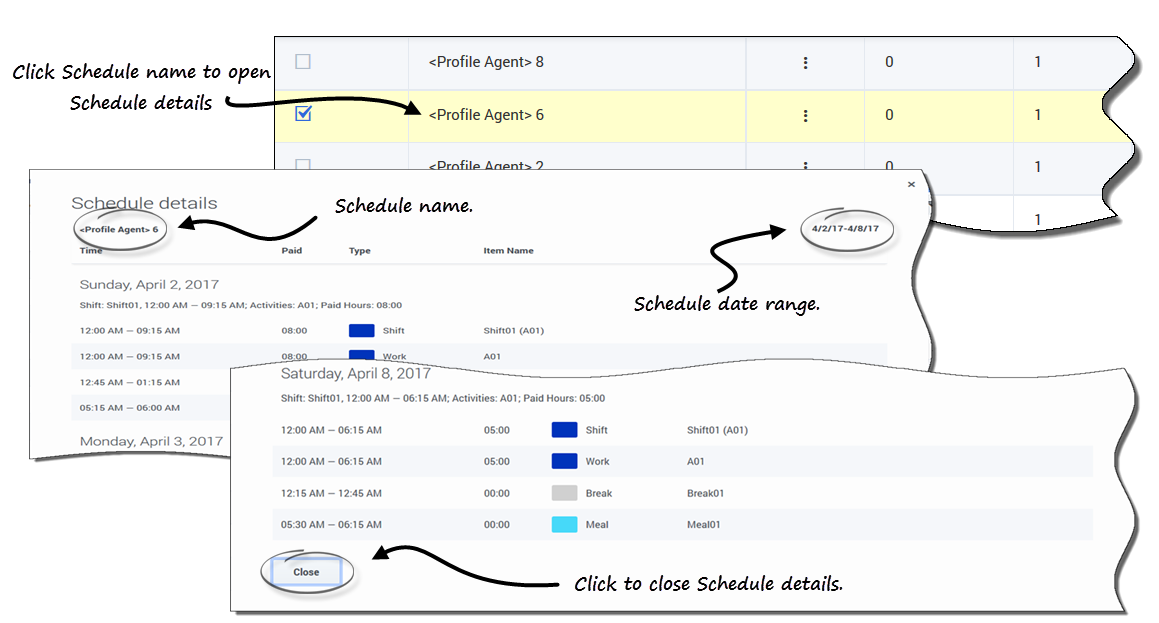
When the grid is expanded to show a row for each week in a schedule, you can hover over the schedule name or a week name to open the schedule details for that period. If you click the name of a schedule that contains multiple weeks, the display will show the details for multiple weeks.
Clicking the Schedule name or Week name link presents a breakdown of all scheduled items, such as start/end times, paid hours, type, and item name, as well as scheduled activities, meals, breaks, and total paid hours.
Sorting shifts in schedules
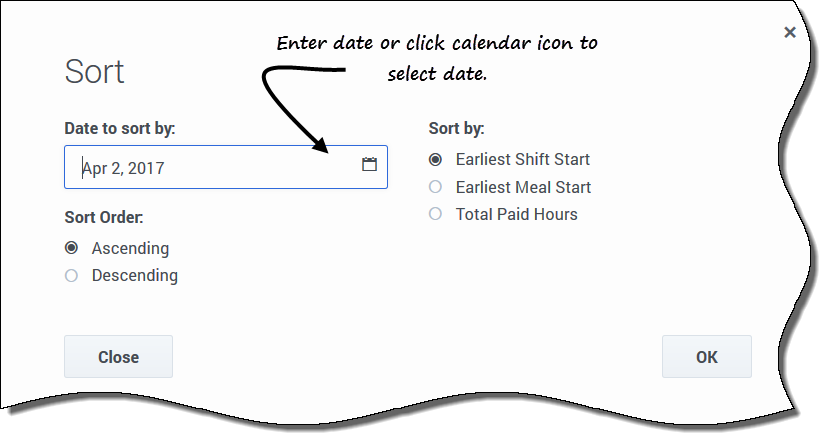
Use the Sort dialog to display the available schedules in the Bidding Assignment view in a particular order:
- Select the schedule that you want to sort by entering a check mark in the first column of the grid.
- Click Sort
 .
.
- The Sort dialog opens.
- In the Date to sort by field, enter a date or select a date from the calendar.
- Select one of these radio buttons:
- Earliest Shift Start—Sort by shift start time (default). Days Off are listed after all schedule days with shifts.
- Earliest Meal Start—Sort by first meal start time. Schedules which contain shifts without meals are listed after all schedules which contain shifts with meals.
- Total Paid Hours—Sort by total weekly paid hours.
- Select a sorting method: either Ascending or Descending.
- Click Ok to save the changes or Close to close the dialog without saving.
See also, Managing your schedule bid assignments.
Filtering shifts in schedules
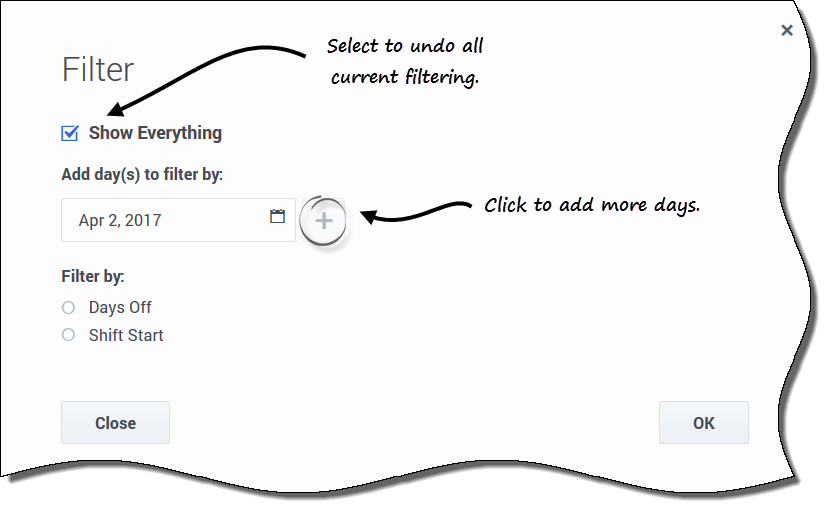
Use the Filter dialog to limit the display of available schedules in the Bidding Assignment view. Select days in the week and then a second filtering parameter that will apply to schedules that have shifts on those days.
- Select the schedule that you want to filter by entering a check mark in the first column of the grid.
- Click Filter
 .
. - In the Filter dialog, do one of the following:
- Select Show Everything to display all schedules and undo all current filtering.
- This is the default setting when the dialog opens.
- Enter dates in the Add days(s) to filter by field or select them from the calendar.
- Select Show Everything to display all schedules and undo all current filtering.
- Click
 after each selection to add more days.
- Your next selection(s) will apply only to schedules that have shifts on the selected days.
- Choose one of two radio buttons:
- Select Days Off to display only schedules that match the full days off that you select.
- Select Shift Start to display only schedules with shifts that start no earlier than your Earliest Start Time setting and no later than your Latest Start Time setting, on your selected days.
- Click Ok to save the changes or Close to close the dialog without saving.
Filter by Desired or Unwanted list
Another filter enables you to view only the lists you want to see. The drop-down list beside the Filter icon shows All (all lists), by default. However, you can view the Desired list only, or the Unwanted list only, by selecting them from the list.


