
Contents
- 1 Working with Documents
- 1.1 Displaying documents
- 1.2 Filtering list of documents
- 1.3 Creating a document
- 1.4 Characters Allowed in Names
- 1.5 Document categories
- 1.6 Translating a document
- 1.7 Translate (no source)
- 1.8 Translate (with source)
- 1.9 Machine translate
- 1.10 Translating a document in compare mode
- 1.11 Document errors
- 1.12 Document types
- 1.13 Viewing a document
- 1.14 Document history
- 1.15 Document version rollback
- 1.16 Comparing document versions
- 1.17 Deleting a Document
Working with Documents
Displaying documents
Select a knowledge base to display a list of its contents. If you select the default language, you can create documents and categories:

If you select any other language, you can translate an existing document or category into the selected language:

Filtering list of documents
From the list of documents you can:
- filter out the list of documents by content:
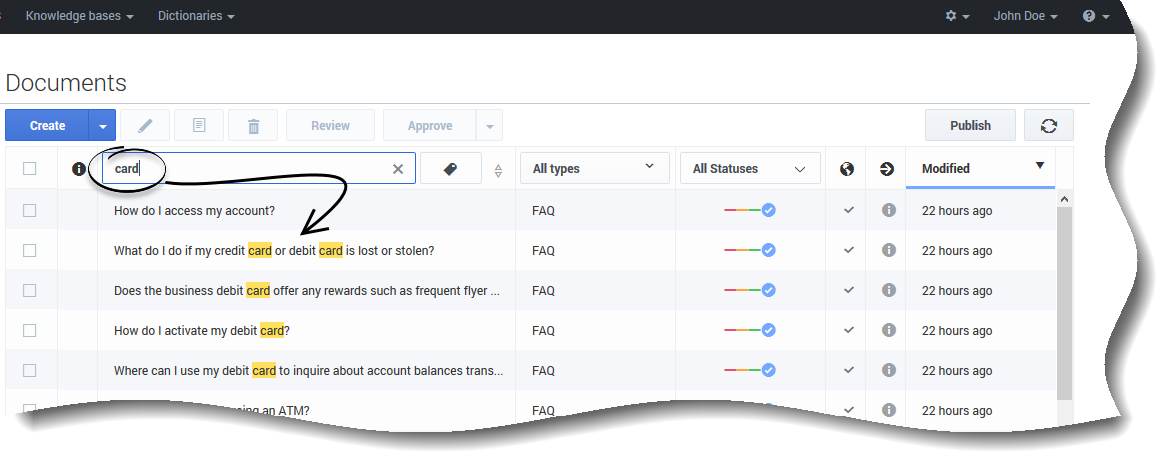
- filter out the list of documents by category:
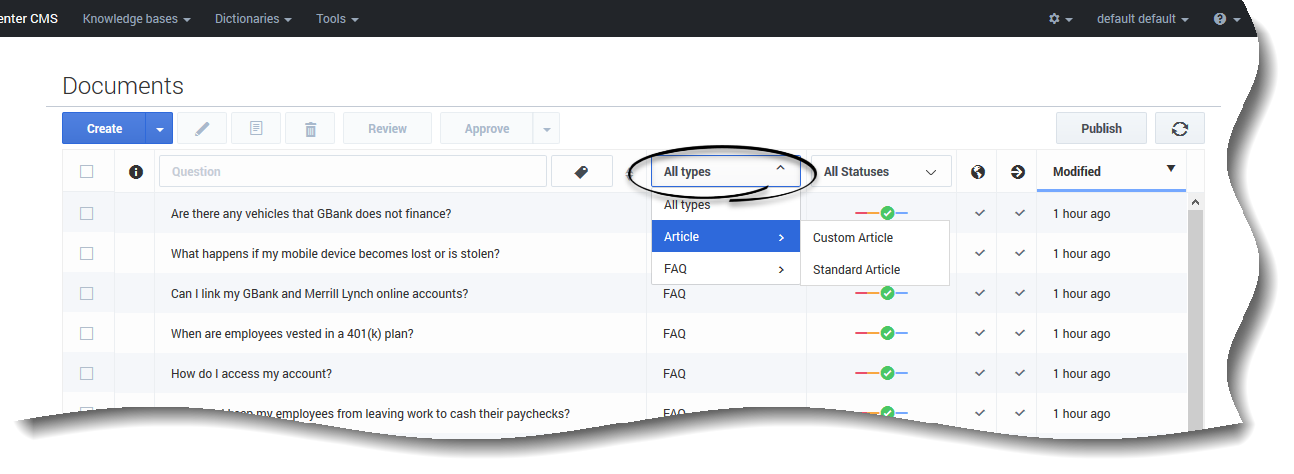
- filter out the list of documents by type and used template (from 9.004.xx version):
- filter out the list of documents by current status:

- sort the template list by:
- document name
- modification date


The final 2 columns display:
- A notification about whether or not the document includes translation on current language
- A notification about errors in the document (for example, the document has not attached a category)
Creating a document
| Click Create. Note: You can only create documents in the default language. Use other languages to translate existing documents. | |
| If your knowledge base allows documents of different types, you will be asked to select the document type. You can bypass this step by selecting the desired document type from the Create button's drop-down menu: | |
| Enter values for the mandatory fields (marked by the red star), as well as any other fields you have data for. | |
| *Optional Enter values in Alternative Question and Tags fields by typing in a value and then pressing "Enter" to create the new entity. | |
| *Optional Add an Attachment. The following is a full list of the types of attachments that can be added - .txt, .doc, .docx, .pdf, .rtf, .asc, .csv, .xhtml, .html, .xml, .readme, .ppt, .pptx, .jpg, .png, .jpeg, .pjpeg, .bmp, .gif, .svg, .tiff, .vnd, .ico, .wbmp, .webp, .mpeg, .webm, .ogg, .wmv, .flv, .3gp, .3gp2, .mp4, .aac, .mov, .avi, .raw, .xls, .xlsx. | |
| *Optional Set Start and Expiration dates.
| |
| *Optional Add a list of media channels if this document provides data to a conversation via specific media (like chat, for example). | |
| Click Save & Close or select one of the other options in the Save & Close button's drop-down menu. | |
| *Optional Add a link to any document in any knowledge base:
| |
| *Optional Add a table of contents (TOC) to any document in any knowledge base:
| |
| *Optional Add a link from one section of a document to a different section in the same document. Adding links to different sections in the same document enables agents to effortlessly navigate within the document to find answers to customer questions.
Note: Repeat these steps for every link you want to create within the document. |


Characters Allowed in Names
The names of most Knowledge Center CMS objects can consist only of the alphanumeric characters supported in UTF-8, plus the characters listed below in the "Additional Characters Allowed in Object Names" table.
The length of a category name cannot be longer than 64 characters.
The Display Name for the Language Business Attribute can only consist of Latin characters and numbers (A-7, a-z, 0-9).
| Name | Character | Name | Character | Name | Character |
|---|---|---|---|---|---|
| Hyphen | - | Exclamation point | ! | Backslash | \ |
| Number sign, pound | # | Dollar sign | $ | Parentheses | ( ) |
| Caret | ^ | Asterisk | * | Question mark | ? |
| Underscore | _ | Curly brackets | { } | Space | |
| Angle brackets | < > | Period, full stop | . | At sign | @ |
Document categories
| Document editor view | |
| Categories attached to the document (selected categories) are rendered by default in the Categories tree. | |
To view Recent categories:
To attach Recent category(s) to the document, 2 options are available:
| |
To view Suggested categories:
To attach Suggested category(s) to the document, 2 options are available:
To refresh the list of Suggested categories:
| |
To view Selected categories:
To remove document from Selected category(s):
| |


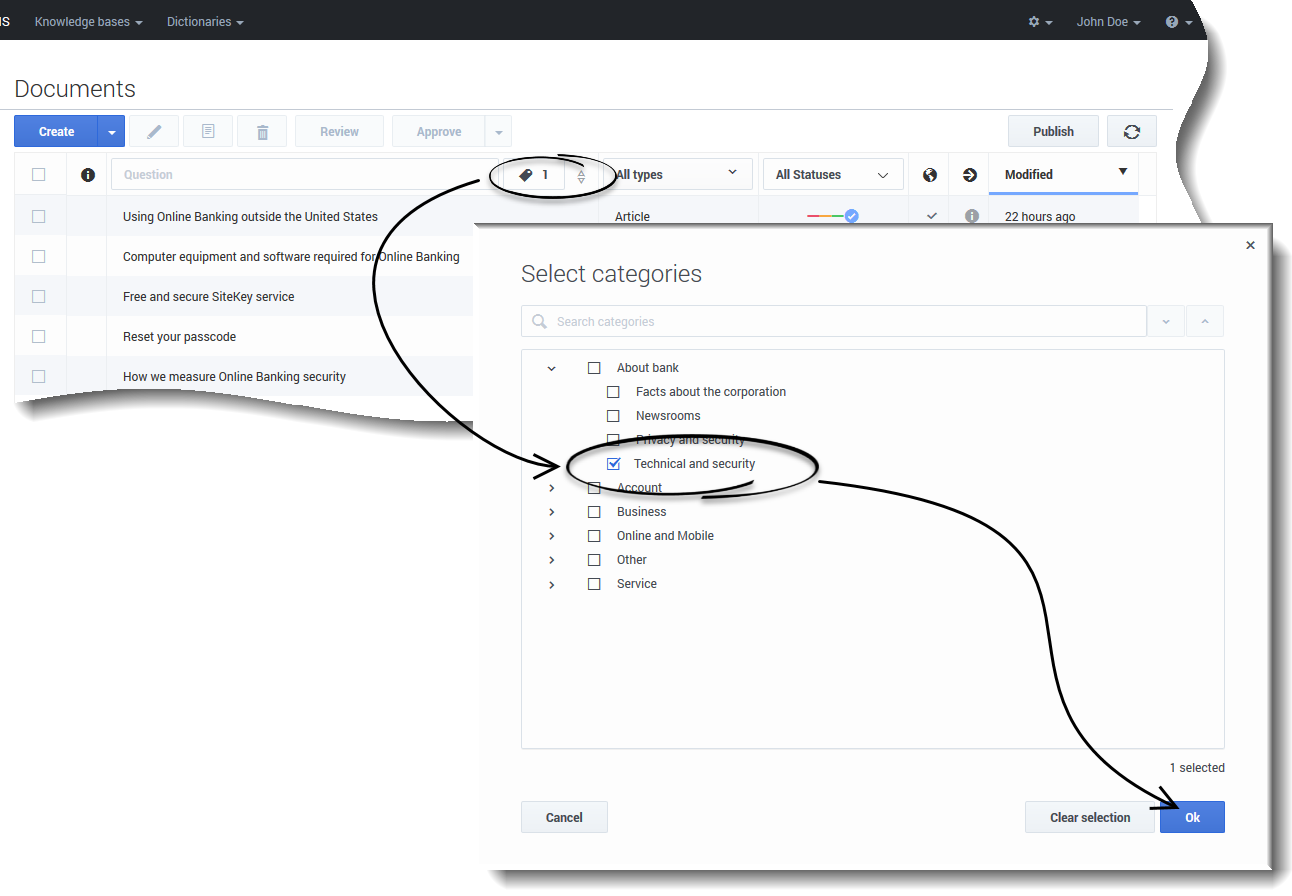
| Category selection | |
| To attach categories to the document or edit categories which are already attached, click | |
| The Categories tree window is opened with Selected, Suggested, and Recent categories' sub-trees expanded to the terminal highlighted category by default. Note: Suggested and Recent buttons are disabled when there are no suggested or recent categories available. | |
To view Recent categories:
| |
To view Suggested categories:
| |
To view Selected categories:
| |
To view All categories in the current Knowledge base:
| |
To attach Suggested or Recent category(s) to the document 2 options are available:
| |


Translating a document
For a quick reference on how to:
- Translate (no source)
- Translate (with source)
- Machine translate
- Translating a document in compare mode
please see the following video—
| Select a document to translate to the current language. | |
Click the arrow next to the Translate menu and choose one of the three types of translations from the list:
|


Translate (no source)
| Click the arrow next to the Translate button in the toolbar and choose Translate (no source) from the menu. | |
| Enter values for the mandatory fields (marked by the red star), as well as any other fields you have data for. | |
| Click Save & Close or select one of the other options in the Save & Close menu. |


Translate (with source)
| Click the arrow next to the Translate button in the toolbar and choose Translate (with source) from the menu. | |
| Translate the document fields using the source document content. | |
| Click Save & Close or select one of the other options in the Save & Close menu. |


Machine translate
| Click the arrow next to the Translate button in the toolbar and choose Machine translate from the menu. | |
| Make edits to the translated version of the document, if necessary. | |
| Click Save & Close or select one of the other options in the Save & Close menu. |


Translating a document in compare mode
| Select a document to translate to the current language. | |
| Click the arrow next to the Translate button in the toolbar and choose Translate (no source) from the menu. | |
| Click the Compare button from the Document translation view. | |
| Click Machine translate or Translate (with source) from the menu. | |
| Make edits to the translated fields, if necessary. If you clicked Translate (with source), you must translate the content in the fields manually. | |
| Click Save & Close or select one of the other options in the Save & Close menu. |


Document errors
When you save a document, the Knowledge Center CMS validates the values you have entered into its fields. It highlights any fields that contain errors by:
- Marking their borders in red
- Adding an error message below them

Document types
The Knowledge Center CMS supports two types of document:
- Frequently asked questions (FAQ)—A list of questions and answers, all of which can be commonly asked in a specific context and which pertain to a particular topic. This format is often used on mailing lists and in other online forums, where common questions tend to be asked repeatedly.
- Article—An independent piece of writing that provides information or evidence, or that serves as an official record.
Both types of document share the same structure, except for these fields:
| FAQ | Article | |
|---|---|---|
| Document name | Question | Title |
| Short Summary (plain text) | Summary | |
| Document content (formatted text) | Answer | Description |
| Alternative names | Alternative Questions | Alternative Titles |
Viewing a document
To view the contents of a document, double-click the document in the list view or select the document and click View:

The document will look something like this:

Information about document word count and estimated reading time are found under the question title. The left side (with the agent icon) displays all information (both public + private) and shows the document word count and estimated reading time. The right side (with the customer icon) shows only the public document word count and estimated reading time.
Document history
While you are viewing a document content, you can click the History button:

Select a version to see its contents. A history drop-down menu shows which version you are looking at:

Each line in the history drop-down shows the following information about the version:

- (1) – Approval status (Draft, In Review, Approved, Published) '
- (2) – How many days since the version was created
Document version rollback
| From the document view mode click the History button. | |
| The Rollback button is now displayed immediately to the right of the history drop-down menu. | |
| Select a historical version from the history drop-down menu. | |
| The Rollback button is enabled after a historical version of the document is selected. Click the Rollback button. | |
| The new historical version of the document is created, which is a copy of the source version. A notification is displayed which states that the current version of the document is a rollback version and provides a link to the source version of the current document's revision. |


Comparing document versions
While editing a document you can compare the current version with any other version by clicking Compare:
Select the desired language and version from the drop-down lists that appear.
This mode is helpful when you want to:
- Compare the current version with a previous version
- Copy content from a previous version
- Localize a document from one language to another
Compare mode displays the older version and the current version side by side:

Click the Copy button (1) near a field to copy its value from the older version to the current one.
Deleting a Document
Prerequisites
- The knowledge base has been defined in the CMS.
- The Document has already been created.
- A connection to Genesys Knowledge Center is available.
- Knowledge.CMS.Document.Author privileges have been assigned to the user.
- Move your mouse over the appropriate knowledge base icon on the main page.
- Click Documents.
- Select one or more Documents from the list.
- Click the Delete button.
- Confirm your action in the pop-up:

