
Contents
Configuration Server
If you want Configuration Server to operate with the Configuration Database, you must install Configuration Server in Master mode. This Configuration Server must be configured through a local configuration file.
- The procedures given in this section are for deploying a primary Configuration Server. To deploy a Configuration Server Proxy, refer to Configuration Server Proxy for relevant installation instructions. To install a backup Configuration Server, refer to Redundant Configuration Servers.
- Refer to the Framework External Authentication Reference Manual for information about Configuration Server's External Authentication feature and for relevant deployment instructions.
Deploying Configuration Server
For more information about the Configuration Server configuration file, see Configuration Server Configuration File. For information about Configuration Server configuration options and their values, refer to the Framework Configuration Options Reference Manual.
To deploy Configuration Server, do the following:
- Install Configuration Server.
To install Configuration Server on UNIX, do the following:
- On the Management Framework 8.5 product CD, locate and open the installation directory configuration_layer/configserver/<operating_system>.
- Type install.sh at the command prompt, and press Enter.
- For the installation type, type 1 to select Configuration Server Master Primary, and press Enter.
- For the external authentication option, type the number corresponding to the type of external authentication that will be used (LDAP, Radius, both, or neither), and press Enter.
TipIf you select LDAP, be prepared with the URL to access the LDAP Server. For more information about LDAP configuration, see the Framework External Authentication Reference Manual.
- Specify the full path of the destination directory, and press Enter.
- If the target installation directory has files in it, do one of the following:
- Type 1 to back up all the files in the directory, and press Enter. Specify the path to where you want the files backed up, and press Enter.
- Type 2 to overwrite only the files in this installation package, and press Enter. Then type y to confirm your selection, and press Enter. Use this option only if the application that is already installed operates properly.
- Type 3 to erase all files in this directory before continuing with the installation, and press Enter. Then type y to confirm your selection, and press Enter.
- For the product version to install, do one of the following:
- Type 32 to select the 32-bit version, and press Enter.
- Type 64 to select the 64-bit version, and press Enter.
- To configure the Configuration Server during, or after, installation, do one of the following:
- Type y to configure Configuration Server during installation (now), and press Enter. Go to Step 9 to specify values for the configuration file. For information about the Configuration Server configuration options and their values, refer to the Framework Configuration Options Reference Manual.
- Type n to not configure Configuration Server during installation. In this case, you have finished installing Configuration Server-do not continue to the next step in this procedure. Before you can start Configuration Server, however, you must create a configuration file and set the configuration options in it.
- For the [confserv] section:
- Specify a value for the Configuration Server port, and press Enter.
- Specify a value for the Configuration Server management port, and press Enter.
- For the [dbserver] section:
- Type the number corresponding to the database engine that this Configuration Server uses (dbengine), and press Enter.
- Specify the name or alias of the DBMS that handles the Configuration Database (dbserver), and press Enter.
- To specify the name of the Configuration Database (dbname), do one of the following:
- If you are using an Oracle database engine (that is, you typed 3 in Step i), press Enter. This value is not required for Oracle.
- If you are using any other database engine, specify the name of the Configuration Database, and press Enter.
ImportantIf you are using DB Server to access the Configuration Database, you must also specify values for the host and port fields. Refer to Framework 8.1 documentation in this case. - Specify the Configuration Database username, and press Enter.
- To specify the Configuration Database password, do one of the following:
- Specify the password, and press Enter.
- Press Enter if there is no password; that is, the password is empty, with no spaces.
When the installation process is finished, a message indicates that installation was successful. The process places Configuration Server in the directory specified during the installation process. The installation script also writes a sample configuration file, confserv.sample, in the directory in which Configuration Server is installed.
If you chose to configure the Configuration Server during installation, the sample configuration file, confserv.sample, is renamed confserv.conf, and the parameters specified in Steps 9 through 11 are written to this file.
If you chose to configure the Configuration Server after installation, you must manually rename the sample file confserv.conf and modify the configuration options before you start Configuration Server.
WarningGenesys does not recommend installation of its components via a Microsoft Remote Desktop connection. The installation should be performed locally.To install Configuration Server on Windows, do the following:
- On the Management Framework 8.5 product CD, locate and open the installation directory configuration_layer/configserver/windows.
- Locate and double-click setup.exe to start the Genesys Installation Wizard.
- Click About on the wizard's Welcome page to review the read_me file. The file also contains a link to the server's Release Notes file.
- On the Welcome page, click Next.
- On the Configuration Server Run Mode page, select Configuration Server Master Primary.
- On the Configuration Server Parameters page:
- Specify the Server Port and Management Port for Configuration Server.
- Click Next.
- On the Database Engine Option page, select the database engine that the Configuration Server uses, and click Next.
- On the DB Server Parameters page:
- Specify the Database Server Name and Database Name.
- Specify the Database User Name and Password.
- On the Configuration Server External Authentication page, select the type of external authentication that the Configuration Server uses, or select None if Configuration Server is not using external authentication.
- On the Choose Destination Location page, the wizard displays the destination directory specified in the Working Directory property of the server's Application object. If the path configured as Working Directory is invalid, the wizard generates a path to c:\Program Files\GCTI\Configuration Server.
If necessary, do one of the following:
- Click Browse to select another destination folder. In this case, the wizard will update the Application object's Working Directory in the Configuration Database.
- Click Default to reinstate the path specified in Working Directory. Click Next to proceed.
- On the Ready to Install information page, do one of the following:
- Click Back to update any installation information.
- Click Install to proceed with the installation.
- On the Installation Complete page, click Finish.
As a result of the installation, the wizard adds Application icons to the:
- Windows Start menu, under Programs > Genesys Solutions > Framework.
- Windows Add or Remove Programs window, as a Genesys server.
- Windows Services list, as a Genesys service, with Automatic startup type.
- Configure Configuration Server. If you manually installed Configuration Server on Windows, it was configured automatically during the installation process; you can skip this step. If you manually installed Configuration Server on UNIX and chose not to configure it during the installation process, you must configure it now.
Prerequisites:- You manually installed Configuration Server on UNIX.
- You chose not to configure Configuration Server during the installation process.
- The Configuration Database has been initialized.
- From the directory in which Configuration Server is installed, open the sample configuration file (confserv.sample) in a text editor.
- Set the configuration options to work with the Configuration Database and DB Server. Consult the relevant chapters in the Framework Configuration Options Reference Manual for option descriptions and values. Refer also to Configuration Server Configuration File for a description of the configuration file.
- Save the configuration file as confserv.conf.
- If required, configure Configuration Server for multi-language environment support. Add the following options to the [confserv] (for Configuration Server) or [csproxy] (for Configuration Server Proxy) section of the configuration file:
- Set the locale option to the value corresponding to English (US). The database against which a UTF-8 enabled Configuration Server or Configuration Server Proxy is launched must be initialized using English locale scripts.
- Set the encoding option to utf-8.
- Set the multi-languages option to true. You must set this option after initializing the database and before you start Configuration Server against the UTF-8 enabled database.
- If required, configure Windows Authentication with an MS SQL Server by doing the following:
- Ensure that a Configuration Server process is enabled for Windows Authentication.
- Configure access to the MS SQL Configuration Database for Configuration Server.
- Start Configuration Server.
For descriptions of command-line parameters specific to Configuration Server, refer to Configuration Server.
Tip
- Use the -c command line option to point Configuration Server to a configuration file with the name other than the default name (confserv.conf on UNIX or confserv.cfg on Windows). For example, confserv -c <configuration file name>.
- If you are starting Configuration Server for the first time, and want to start logging during startup and initialization (referred to as bootstrap logging), include the -log-<log option name> <log-type> parameter in the startup command. At this point, you can also store these logs in a file separate from the operational logs—also include the -log-<log-type> <filename> parameters in the startup command.
Prerequisites:
- Configuration Database is initialized.
- DB Server is installed and running.
- Configuration Server is installed.
- The Configuration Server configuration file is configured. Configuration Server uses this file for startup.
Go to the directory in which Configuration Server is installed and do one of the following:
- To use only the required command-line parameters, type the following command line:
sh run.sh
- To specify the command line yourself, or to use additional command-line parameters, type the following command line:
confserv [<additional parameters and arguments as required>]
Do one of the following:
- Use the Start > Programs menu.
- To use only the required command-line parameters, go to the directory in which Configuration Server is installed, and double-click the startServer.bat file.
- To specify the command line yourself, or to use additional command-line parameters, open the MS-DOS window, go to the directory in which Configuration Server is installed, and type the following command line:
confserv.exe [<additional parameters and arguments as required>]
- Use Windows Services Manager. Refer to Starting and Stopping with Windows Services Manager for more information.
Configuration Server Configuration File
At a minimum, the configuration file contains the Configuration Server, Configuration Database, and Log sections.
The Configuration Server section contains the configuration options that define Configuration Server. The name of the section corresponds to the name of the Configuration Server Application object. For the initial installation of Configuration Server, it is called [confserv] by default. You can choose to rename this Configuration Server later. In all other cases, or if you rename the initial Configuration Server, the name of this section will be different. The server configuration option in this section specifies the name of the Configuration Database section.
By default, the Configuration Database section does not have a name. The section name must be the same as the value of the server configuration option that you specified in the Configuration Server section. The Configuration Database section contains information about the Configuration Database.
The name of the Log section is [log]. This section contains configuration information about the logging to be done by Configuration Server.
You can find a sample Configuration Server configuration file in the Framework Configuration Options Reference Manual.
Configuring a Dedicated Port for Client User Interface Applications
Warning- Genesys strongly recommends that you do not restrict the default port to accept only client UI applications. Because the backup Configuration Server communicates with Configuration Server via the default port, and because many other Genesys Server applications cannot operate properly with being connected to the default port, restricting the default port would disable you from using these additional beneficial components.
- Ports that have been dedicated as HA sync (in the Server Info section of the port's Configuration tab in Genesys Administrator) cannot be provisioned to accept only client UI applications.
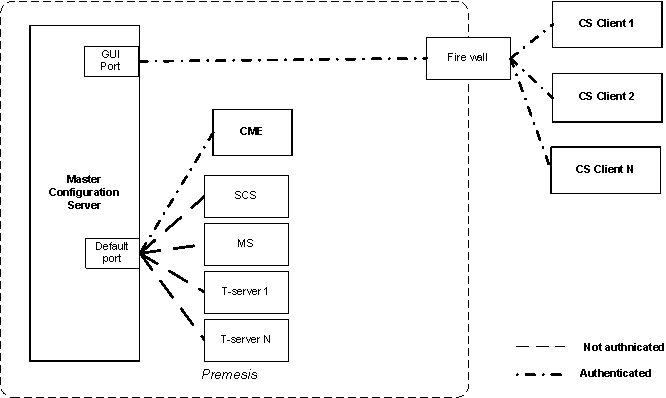
- Set up a firewall between client UI applications deployed in a less secure area of your network, for whom authorization is required, and applications, including Configuration Server, deployed in a more secured (restricted) area. The firewall directs all "outside" client UI applications to the dedicated port of Configuration Server, where they are authorized. Other "inside" applications continue to use their assigned ports.
The following diagram illustrates a dedicated port within the firewall.
- After you have the firewall in place, configure the port to use as a dedicated port. You can use an existing port (not the default port) or create a new one.
- Open the Server Info section of the Configuration tab of the Configuration Server or Configuration Server Proxy application object.
- In the Listening Ports section, select an existing port (not the default port) or create a new port to be used as the dedicated interface port.
- In the Port Info dialog box, select the Advanced Tab.
- Enter user=1 in the Application Parameters field and click OK.
- Save your changes.
Refer to the Framework Configuration Options Reference Manual for more information about the user parameter.
- In Genesys Administrator, select the Provisioning tab, go to Environment > Applications, and double-click the Configuration Server Application object for which you want to change the listening port.
- On the Configuration tab, open the Server Info section.
- In the list of Listening Ports, do one of the following:
- Click the port number that you want to change, enter the new port number, and either click outside of the edit box or press Enter.
- Highlight the port that you want to change and click Edit. On the General tab of the Port Info dialog box, enter the new port number in the Port text box. Then click OK.
- Click Save or Save & Close in the toolbar to save your configuration changes.
- (Optional) Generate encryption keys for encoding and decoding passwords by starting Configuration Server from the command-line with the parameter -keys [<encryption file name> <decryption file name>] (and the -s and -c parameters, if required). The optional subparameters indicate the name and path of the files containing the encryption and decryption keys, respectively. Configuration Server generates the keys and stores them in the file specified by the -keys parameter. If no files are specified, the keys are stored in the default files enc.pem and dec.pem. Configuration Server terminates when this step is complete, generating an error message if key generation was unsuccessful.
- Encrypt the database password by starting Configuration Server from the command-line with the following parameters:
- -p <name of Configuration Database section><password value> (and -s and -c, if required)
- -keys [<encryption file name> <decryption file name>]—Required only if you are using asymmetric encryption.
If the -keys parameter is not specified, the hardcoded key is used to encrypt the password, as in previous releases. If -keys is specified, Configuration Server creates the encryption and decryption keys and the password is encrypted using the key in the specified encryption file, or enc.pem if no file is specified. In both cases, Configuration Server updates its configuration file with the encrypted password in the section specified by the -p parameter, and sets the encryption option to true in the Configuration Server section.
If the -keys parameter is specified, Configuration Server also sets the decryption-key option in the Configuration Server section to point to the specified decryption file, or dec.pem if no file is specified. The presence of this option and encryption=true indicates that the password was encrypted using the asymmetric algorithm.ImportantThe user launching Configuration Server must have Write permission to the configuration file. - Start Configuration Server normally. If encryption=true, it will attempt to decrypt the database password stored in its configuration file using the hard-coded key (if decryption-key is not configured or set to an empty string), or use the decryption key stored in the file specified by decryption-key.
Starting in release 8.5.1, you can configure additional ports to which only client UI applications can connect. To configure this port, do the following:

Configuring Configuration Server Logging
If you plan to use the centralized logging and auditing functionality of the Management Layer, specify appropriate log options in the Configuration Server configuration file before you start using Configuration Server. Most importantly, enable the network log output (for example, create a new option called standard and set its value to network). Refer to the Framework Configuration Options Reference Manual for more information.
Changing Configuration Server Port Assignments
When you install Configuration Server, you specify values for the listening and management ports in the configuration file. You can change these values at any time.
Changing these port assignments depends on the type of port. To change the value of the management port, you must update the configuration file with the revised information, and restart Configuration Server.
Changing the value of the listening port is more complex. As described in Multiple Ports on Configuration Server, Configuration Server reads its listening port assignment from the configuration file once, at initial startup. For subsequent startups, it reads the port value from the Configuration Database. Therefore, you must change the value in the Configuration Database by modifying the Port property of the Configuration Server Application object, as follows:
Encrypting the Configuration Database Password
You can use Configuration Server to encrypt your password for accessing the Configuration Database so that it does not appear in plain text in Configuration Server logs. This improves the security of your configuration data.
You can encrypt the password at any time, either during installation, or later. However, keep in mind that Configuration Server must be stopped during the encryption process.
In release 8.5.0 and earlier, the password was encrypted using an asymmetric encryption algorithm TEA with a hardcoded encryption/decryption key. For instructions on encrypting the Configuration Database password in release 8.5.0 or earlier, refer to the Genesys Security Deployment Guide.
Starting in release 8.5.1, the Configuration Server configuration file optionally supports an asymmetric encryption algorithm using separate encryption and decryption (private) keys that are not hardcoded. In this case, the keys are generated by Configuration Server and stored in separate files. The password is encoded using the key in the encryption file. Upon subsequent restarts of Configuration Server, it uses the key in the decryption file to decrypt and the password.
To encrypt the Configuration Database password in release 8.5.1 or later, do the following:
For Configuration Servers that are part of an HA pair, update each server's configuration file individually. However, they can use the same pair of encryption and decryption keys by specifying the same key file names when configuring encryption for the second server as the first server.
This enhanced encryption capability does not apply to Configuration Server Proxy.
Configuration Server might accept encryption and decryption keys generated by tools or components other than Configuration Server. These keys and their format must be compatible with the cryptography engine used by Configuration, specified in the following table:
| Type | RSA asymmetric |
| Engine | OpenSSL 1.0.1 |
| Key Length | 2048 (when keys are generated internally by Configuration Server)
Note: For Configuration Server 8.5.101.28 and earlier versions, the key length must be 1024. |
| Embedded Key Generation | default open openssl modulus and RSA_F4 exponent parameters |
| File Usage | PEM files, that store the RSA key used for encryption or decryption. Both can be produced by Configuration Server. |