
Contents
- 1 CCAdv/WA Bulk Configuration – Integrated Mode
- 1.1 Database Structures, Scripts, and Procedures
- 1.2 Prerequisites and Preparations
- 1.3 Bulk Configuration of CCAdv/WA in Integrated Configuration Mode
- 1.4 Data Preparation
- 1.5 Loading Data from Spreadsheets into Temporary Database Structures
- 1.6 Bulk Configuration Validation and Logs
- 1.7 Exporting CCAdv/WA Configuration
CCAdv/WA Bulk Configuration – Integrated Mode
If you plan to deploy Pulse Advisors release 9.0.001.06 or later and you will use the bulk configuration tool, then see the Changes to Bulk Configuration section on the Bulk Configuration Overview page in this guide before you proceed.
For information about the configuration modes and how to set the mode, see the Contact Center Advisor and Workforce Advisor Administrator User's Guide. You must select the configuration mode before you perform bulk configuration. Starting with release 9.0.001, the default configuration mode is the independent configuration mode. Previously, the integrated configuration mode was the default mode.
Use the CCAdv/WA bulk configuration tool supplied in the \bulkconfig\integrated\ccadv-wa-bulkload folder when you run CCAdv and WA in integrated configuration mode. When you set the integrated configuration mode:
- Agent group-to-application relationships are automatically propagated to the configured contact groups mapped to these applications.
- Applications are available for mapping to a contact group only if they are configured and have a compatible aggregation structure with this contact group.
- Applications mapped to contact groups are included in the WA rollup only if those applications are configured and have a compatible aggregation structure. Any change of application configuration for CCAdv, or a change of contact group configuration for WA that makes the aggregation structures incompatible, removes the application from WA configuration.
- A configured application and a configured contact group mapped to a non-AGCC contact center have compatible aggregation structures if both are mapped to the same contact center, application group, and regions.
- A configured application and a configured contact group mapped to an AGCC contact center have compatible aggregation structures if both are mapped to the same application group and regions and the application is mapped to a contact center that represents a parent of the AGCC to which the contact group is mapped.
- Agent groups cannot be mapped to network contact center (NCC) contact groups directly. The list of available agent groups is always empty for NCC contact groups, while the list of assigned agent groups represents the agent groups derived from the contact group-application-agent group relationships.
- Agent groups mapped to an agent group contact center (AGCC) can be mapped to contact groups associated with the AGCC, but they are not included in WA dashboard views until mapped to an application that belongs to the parent NCC and that has a compatible aggregation structure.
35px|link= In releases prior to release 8.5.2, the bulk configuration tool required the presence of the business hierarchy objects (regions, operating units, application groups, and contact centers) in the Advisors configuration. You had to first add the business hierarchy data to the Genesys Configuration Server's Business Attributes folder, and then manually activate the same objects using the Advisors administration module. Starting with release 8.5.2, none of that is necessary prior to using the bulk configuration tool; the bulk configuration tool now has a business hierarchy bulk configuration feature. All business hierarchy names will be automatically added to the Advisors configuration and activated. All new business attributes can then be added to the Genesys Configuration Server's Business Attributes folder using the migration wizard supplied in the installation package.
Database Structures, Scripts, and Procedures
An object creation script, blkObjectsCre.sql, is supplied in the installation package, in the \bulkconfig\integrated\ccadv-wa-bulkload folder. You must execute blkObjectsCre.sql as a script – not as a statement – if opened and executed from the SQL Developer SQL Worksheet.
You apply the blkObjectsCre.sql object creation script to the Platform schema to create the following tables, which are required for the contact group bulk configuration:
- blkAllNames
- blkAllAgntGr
- blkAllLog
You must create all of the preceding tables, but the content is optional. Any and all tables can remain empty. Empty tables do not impact the configuration in any way.
Objects already present in CCAdv/WA configuration, but absent from these tables, remain in the CCAdv/WA configuration after you perform the bulk configuration procedure.
Stored Procedure for Bulk Configuration
You implement the bulk configuration by running a stored procedure, spblkConfigCCAdvWAIntegrated, which is also created when you run the blkObjectsCre.sql script. You execute the procedure against the Platform Oracle schema, or against the Advisors Platform MS SQL Server database, after all base data is prepared in the tables created by running the blkObjectsCre.sql script or by the bulk export utility.
Script to Remove Objects Used in Bulk Configuration Process
The blkObjectsDrop.sql script removes all objects used in the bulk configuration (such as the tables that the blkObjectsCre.sql script creates). You must execute the blkObjectsDrop.sql script before you switch to the independent configuration mode and use bulk configuration tools for that mode.
Stored Procedure for Removing Configuration
You can quickly and completely remove all CCAdv application, agent group and related AGCCs configuration created inside or outside the bulk configuration tool. To remove the configuration, execute the spblkRemoveConfigCCAdv stored procedure.
In integrated configuration mode, WA configuration depends on the CCAdv configuration. The removal of CCAdv configuration also removes parts of the WA configuration, specifically all relationships of contact groups to applications and agent groups. As a result, the WA dashboard will not contain real-time metrics and agent groups. If you restore the CCAdv configuration, all WA relationships will be restored, unless the WA configuration removal procedure is applied before the CCAdv configuration is restored.
Execute the spblkRemoveConfigWA stored procedure to remove the WA contact group configuration including relationships to applications, agent groups, and agent group contact centers and to remove the agent group contact centers associated with WA.
Executing the spblkRemoveConfigCCAdv procedure (Oracle):
DECLARE
M VARCHAR2(200);
R NUMBER;
BEGIN
"spblkRemoveConfigCCAdv"
(
M => M,
R => R
);
END;
Executing the spblkRemoveConfigWA procedure (Oracle):
DECLARE
M VARCHAR2(200);
R NUMBER;
BEGIN
"spblkRemoveConfigWA"
(
M => M,
R => R
);
END;
In an MS SQL Server installation, execute the procedure as follows:
USE <name of Advisors platform database>
GO
DECLARE
@m varchar(255),
@r int
EXEC spblkRemoveConfigWA
@m = @m OUTPUT,
@r = @r OUTPUT
SELECT @m as N'@m',
@r as N'@r'
GO

DECLARE
@m varchar(255),
@r int
EXEC spblkRemoveConfigCCAdv
@m = @m OUTPUT,
@r = @r OUTPUT
SELECT @m as N'@m',
@r as N'@r'
GO
Important
The procedure will remove all data left from previous configurations that might have a negative impact on the new configurations. It can be very useful before the configuration mode is changed.
To be able to restore the configuration, you must have a reliable set of bulk configuration files or blk tables that you can use to re-load the configuration. Before you execute the configuration removal procedures, make sure that such data exists.
If you do not have a copy of your bulk configuration files or blk tables, you can use the export utility to generate a "clean" copy of blk tables from the existing application and contact group configuration before you run the configuration removal procedure. See additional details in Exporting CCAdv/WA Configuration.
You also can execute the bulk configuration removal procedures if you are comfortable with the current configuration loss and want to re-configure the applications from the beginning.
The configuration removal procedure does not remove the data from blk files. Those are always preserved unless the tables are dropped by running the blkObjectsDrop.sql script.
Prerequisites and Preparations
Starting with release 8.5.2, the contact centers, regions, operating units, and application groups that you will use in the bulk configuration structures do not need to be present in the Genesys Configuration Server, nor do they need to be visible in the Advisors configuration pages at the time that you run the bulk configuration procedure. The bulk configuration tool automatically adds all hierarchy objects to the Advisors configuration as long as they are entered in the bulk configuration structures, and if they are not currently present in the Advisors configuration. After the bulk configuration procedure is executed, all new business attributes can be added to the Genesys Configuration Server's Business Attributes folder using the migration wizard supplied in the installation package. No existing configuration is removed when using the bulk configuration tool. If any objects are already configured, or any application-to-agent group relationships are added manually (using the administration module), they are not removed by the bulk configuration tool. The tool adds to the configuration or changes the mappings of the existing configured objects based on the data contained in the temporary structures.
Review the following considerations before using the bulk configuration import procedure:
- A contact center will be added to the configuration only if the corresponding Geographic Region name is supplied.
- If a contact center is already present in your configuration, then the bulk configuration import process will make no changes to the existing contact center configuration. 35px|link= Starting with release 9.0, if the geographic region of the existing contact center is "Unknown" while a valid geographic region name is supplied in the bulk configuration structures, the bulk configuration procedure will substitute the "Unknown" geographic region for this contact center accordingly.
- A contact center that is automatically added to the configuration as part of the bulk configuration process will be assigned the default value for opening ("00:00") and the default value for closing time ("23:59"). If you need to change those values, then you must adjust those properties manually using the Contact Center page in the administration module.
- A contact center that is automatically added to the configuration as part of the bulk configuration process will be assigned the local time zone if the contact center name does not match any geographic location in the list of time zones. If the matching location is found in the time zone list, then the time zone associated with that geographic location will be assigned to the contact center. An administrator can adjust the time zone property at any time. It is important to adjust this property in accordance with the actual contact center time zone if the open and close times are different than the default values ("00:00"/"23:59").
- A contact center that is automatically added to the configuration as part of the bulk configuration process will always be of the "Network" type. If you need to create a "Site" contact center, then you must manually configure it on the Contact Center configuration page of the Advisors administration module before you execute the bulk configuration procedure.
- The application server and XML Generator service must be up and successfully running until the required data (see the following two bullet points) displays on the pages of the Advisors administration module. To ensure that the import runs successfully, check the XML Generator log for import-related errors.
- All relevant applications and agent groups have been automatically imported by XML Generator, and are available for configuration.
- If WA configuration is included in the bulk data, all relevant contact groups have been automatically imported by the WA server from the WFM system(s) specified during Advisors installation, and are available for configuration.
If an AGCC does not already exist, one is created by the bulk configuration procedure under every network call center where each application mapped to it (that is, to the NCC) is also mapped to an agent group and that agent group is mapped to an AGCC.
Considerations for SL Threshold Bulk Configuration
The bulk configuration tool accepts the SL Threshold property, which you enter in the CustomSLThreshold field. For more information, see Data Preparations below.
Be sure to follow these rules if you use SL Threshold values that are not the default value (20 seconds):
- The CustomSLThreshold field is measured in seconds; enter values accordingly.
- If you do not supply a value in the CustomSLThreshold field before you run the bulk configuration import procedure, the default value of 20 seconds will be assigned to the corresponding application, even if the current value is different.
- Only the predetermined SL Threshold values shown in the THRESHOLD_VALUE column of the database table are allowed:
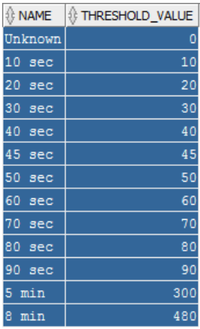
- If you enter an SL Threshold value in the bulk configuration structure that is not listed in the SL_THRESHOLD database tables, the configuration of the related application will be skipped and an error will be registered in the bulk configuration log file.

Bulk Configuration of CCAdv/WA in Integrated Configuration Mode
The following procedure summarizes the steps to perform bulk configuration of CCAdv and WA when you use the applications in integrated configuration mode. The information following this procedure provides additional information to assist you.
Procedure:
Steps
Start Advisors Application Server and XML Generator.
Watch the XML Generator and Geronimo logs. The logs must be free of any import-related errors.
Allow the Advisors application to run for approximately 10 minutes.
Open the Administration module in the browser.
Open each of the following pages and ensure that you can see objects among the available and/or configured object lists, as applicable:
- Application Configuration page
- Agent Group Configuration page
- Contact Group Configuration page
Connect to the Oracle or MS SQL instance as the platform user.
Execute the blkObjectsCre.sql script. You must execute blkObjectsCre.sql as a script, not as a statement, if opened and executed from the SQL Developer SQL Worksheet.
Populate the blk database tables with your application, agent group, and contact group configuration data.
For information about preparing your data, see Data Preparation.
For information about importing data from spreadsheets to the database, see Loading Data from Spreadsheets into Temporary Database Structures.
Execute the spblkConfigCCAdvWAIntegrated procedure; for example, use the following string with an Oracle schema:
DECLARE
M VARCHAR2(200);
R NUMBER;
BEGIN
"spblkConfigCCAdvWAIntegrated"(
M => M,
R => R
);
END;
In an MS SQL Server installation, execute the procedure as follows:
USE <name of Advisors platform database>
GO
DECLARE
               @m varchar(255),
               @r int

EXEC spblkConfigCCAdvWAIntegrated
               @m = @m OUTPUT,
               @r = @r OUTPUT

SELECT  @m as N'@m',
        @r as N'@r'

GO
Verify the log stored in the blkAllLog table.
For information about logs related to the bulk configuration, see Bulk Configuration Validation and Logs.
Correct the data, if necessary, and go back to Step 9.
Examine all relevant configuration pages in the Advisors administration module to verify the configuration.
Examine the dashboards to verify the configuration.
Do one of the following:
If you are satisfied with the resulting configuration, connect to the Oracle instance as the Platform user and execute the blkObjectsDrop.sql script to remove all temporary structures and bulk load procedures.
If you are not satisfied with the resulting configuration, go to Step 11. Alternatively, if you see unpredictable results, and you have a reliable set of bulk configuration data loaded into blk tables, you can remove the whole CCAdv/WA configuration by executing the CCAdv and WA configuration removal procedures. After that you can reload the configuration as described in Step 9.
To remove the entire configuration in Oracle installations, execute the following:
DECLARE
M VARCHAR2(200);
R NUMBER;
BEGIN
"spblkRemoveConfigCCAdv"
(
M => M,
R => R
);
END;

DECLARE
M VARCHAR2(200);
R NUMBER;
BEGIN
"spblkRemoveConfigWA"
(
M => M,
R => R
);
END;
To remove the entire configuration in MS SQL Server installations, the procedure calls are done as follows:
USE <name of Advisors platform database>
GO

DECLARE
               @m varchar(255),
               @r int

EXEC spblkRemoveConfigCCAdv
               @m = @m OUTPUT,
               @r = @r OUTPUT

SELECT @m as N'@m',
               @r as N'@r'


GO

DECLARE
                @m varchar(255),
                @r int

EXEC spblkRemoveConfigWA
               @m = @m OUTPUT,
               @r = @r OUTPUT

SELECT @m as N'@m',
               @r as N'@r'


GO
Data Preparation
You can use spreadsheets or CSV files to collect data in a simple file structure that can be loaded into blk database tables. Data preparation for WA can be done while doing data preparation for CCAdv.
Alternatively, you can omit the file preparation and load the data directly into blk database tables from the sources available through your relational database management system (RDBMS).
If you use spreadsheets or CSV files to collect your data, use the information in this section.
Applications
Your spreadsheet or CSV file contains the list of all application names that need to be configured together with the corresponding application display names, contact center names, application group names, geographic region, reporting region, and operating unit names. 35px|link= Starting with release 9.0, your file must contain 15 columns with headers (headers are mandatory). Bulk configuration application names no longer require the concatenation [tenant name] [base object name or number] / filter name@switch name. Instead the bulk configuration structure contains separate fields for the former parts of object names. The Application Name column should only contain the base object name or number as it appears in the Configuration Server. The tenant name, filter name and switch name can be provided in separate columns where applicable or if necessary. Provide the following information in the file:
- Application Name (35px|link= Starting with release 9.0 provide only the base object name, exclude tenant, filter and switch name)
- Application Display Name
- Contact Center Name
- Geographic Region Name (to allow Contact Center bulk configuration)
- Application Group Name
- Reporting Region Name
- Operating Unit Name
- Contact Group Name
- Contact Group Display Name
- Custom SL Threshold Value (provide this only if you use a value other than the default value of 20 seconds)
- Application Include in Rollup Property
- Contact Group Include in Rollup Property
- 35px|link=Application Switch Name (if applicable, see the Guidelines below)
- 35px|link=Application Tenant Name (if applicable, see the Guidelines below)
- 35px|link=Application Filter Name (if necessary ans applicable, see the Guidelines below)
Add relevant data to the spreadsheet or file under the corresponding column headers. You then import this data into the blkAllNames database table. To expedite the import of the data from the file into the database table, use the column names exactly as they are used in the associated blkAllNames database table.
Guidelines
Use the following guidelines when preparing your data for bulk configuration:
- If a display name, geographic region, reporting region, or operating unit is not defined, you must leave the related cell empty (that is, do not populate the cell with N/A or any other identifier). The reporting region, or the operating unit must have a valid name – both cells cannot be empty. If the geographic region is not provided, and the associated contact center is not yet present in the Advisors configuration, the contact center will not be created and the application or contact group configuration will not be added. A corresponding message will be written in the blkAllLog table. If the geographic region is not supplied, but the contact center is already present, no error will be logged and the application or contact group configuration will be added to the Advisors rollup configuration, unless other issues are detected. If a contact center is already present in the Advisors configuration, but the geographic region that is supplied in the bulk configuration data does not match the existing geographic region property, no changes will be made to the existing contact center geographic region property. The whole content of the data row is rejected if any incomplete configuration is detected or there are names that cannot be resolved.
- Each application name (that is, the application name shown on the Application rollup page in the Administration module along with the tenant, switch and filter name) must match the name contained in the tmpImportCallType.PeripheralName, tmpImportInteractionQueue.PeripheralName, or tmpImportApp.PeripheralName column of the Platform database. 35px|link= Starting with release 9.0 each column with application names should contain only the base object names or numbers as they appear in the name or number property of the corresponding object in the Configuration Server or in the Name field of the Platform database table CFG_IMPORTED_OBJECTS.
- 35px|link= Starting with release 9.0 the tenant name is provided in a separate column if applicable. If you know that the name of the object is unique across all tenants in the Configuration Server, the tenant name can be omitted.
- 35px|link= Starting with release 9.0 the application switch name is provided in a separate column if applicable. If you know that the name of the object is unique across all switches within the mentioned tenant or across all switches in the Configuration Server, the switch name can be omitted.
- 35px|link= Starting with release 9.0 the filter name is provided in a separate column if applicable. In this case the object will be configured with the object segmentation filter which will be applied to all filterable metrics applicable to the object. The filter will not be applied to the metrics that have "Exclude from Base Object Filter" property enabled. The filtered object configured by the bulk configuration tool will be treated as configured with the object segmentation filter even if the filter itself does not have the "ObjectSegmentationFilter" option (35px|link= in release 9.0) set to "true" or "yes". In order to be applied in the statistics requests , the filter must be registered in the Configuration Server as a business attribute under the "Advisors Filters" folder and contain the filter definition under the "Filter" section in the "Filter" option. If you already have filters registered in the "Advisors Filters" folder with the definitions contained in the "Description" property, use the migration wizard to move the existing filter definitions into the "Filter" section.
- If used, each contact group name must match the name contained in the CONTACT_GROUP.NAME column of the Platform database. If the contact group names are unique within each source system, but are not unique across all source systems, append a dot and the source system qualifier to the contact group name in the bulk configuration data, i.e. the name in the bulk configuration will consist of [CONTACT_GROUP.NAME].[CONTACT_GROUP.SOURCE_SYSTEM] .
- Include only contact groups that will be mapped to applications; do not include contact groups that you do not want mapped to applications.
- An empty cell, or any values in the Include in Rollup properties that are different from Y or N are interpreted as Y (for information about the two Include in Rollup columns, see Applications above).
- WA does not support interaction queues. Any contact groups specified and associated with interaction queues are ignored.
- Filters are not applicable to interaction queues and calling lists.
Application-to-Agent Group Relationships
Your spreadsheet or CSV file contains a list of application names, agent group names, and display names. If the related agent groups must be assigned to agent group contact centers (AGCC), you also specify the names of these AGCCs. If the specified agent group contact center does not exist, the tool creates it, but only if the related application is already mapped to a contact center or listed in the blkAllNames table. If no AGCC, contact group, or display name needs to be specified, leave the corresponding field(s) empty.
This structure is not used for application-to-contact group mapping. A contact group is mentioned in this structure only if you want the contact group to be assigned to an AGCC and the associated agent group. 35px|link= Starting with release 9.0, your file must contain 5 additional columns with headers (headers are mandatory). Bulk configuration application and agent group names no longer require the concatenation [tenant name] [base object name or number] / filter name@switch name. Instead the bulk configuration structure contains separate fields for the former parts of object names. The Application Name and the Agent Group Name columns should only contain the base object names or numbers as they appear in the Configuration Server. The tenant name, filter name and switch name can be provided in separate columns where applicable or if necessary.
Your file must contain the following columns with headers and provide the following information:
- Application Name
- Agent Group Name
- Agent Group Contact Center Name
- Contact Group Name
- Contact Group Display Name
- Contact Group Include in Rollup Property
- 35px|link=Application Filter Name (if necessary and applicable, see the Guidelines for Applications above)
- 35px|link=Agent Group Filter Name (if necessary , the guidelines are similar to the ones for Applications)
- 35px|link=Application Tenant Name (if applicable, see the Guidelines for Applications above)
- 35px|link=Agent Group Tenant Name (if necessary, the guidelines are similar to the ones for Applications)
- 35px|link=Application Switch Name (if applicable, see the Guidelines for Applications above)
Add relevant data to the spreadsheet or file under the corresponding column headers. You then import this data into the blkAllAgntGr database table. To expedite the import of the data from the file into the database table, use the column names exactly as they are used in the associated blkAllAgntGr database table.
Guidelines
Use the following guidelines when you create the spreadsheets to import configuration information about application and agent group relationships:
- Each agent group name must match the name contained in the tmpImportSkill.EnterpriseName column of the Platform database. 35px|link= Starting with release 9.0 the name must match the Name field content in the Configuration Server or in the Platform database table CFG_IMPORTED_OBJECTS.
- If used, each contact group name must match the name contained in the CONTACT_GROUP.NAME column of the Platform database. If the contact group names are unique within each source system, but are not unique across all source systems, append a dot and the source system qualifier to the contact group name in the bulk configuration data; that is, the name in the bulk configuration will consist of [CONTACT_GROUP.NAME].[CONTACT_GROUP.SOURCE_SYSTEM] .
- Do not include contact groups that need to be mapped to network contact centers. Such contact groups must be placed into the blkAllNames table instead.
- If an AGCC name is supplied, include only contact groups that you want to be mapped to the specified AGCC and agent group; do not include contact groups if the AGCC name is not specified.
- An empty cell, or any values in the Contact Group Include in Rollup property that are different from Y or N are interpreted as Y. If the contact group is not specified, the Contact Group Include in Rollup property is ignored.
General Data Preparation Guidelines
- If your platform database contains bulk configuration data generated in a previous version, applying the blkObjCre.sql script of the new version in the platform database migrated to the new version will migrate the bulk configuration data to the form required in the new version. If you have bulk configuration data stored outside the database, it can be imported "as is" and then migrated to the form required in the new version by applying the blkObjCre.sql supplied with the new version installation package. It is safe to apply blkObjCre.sql several times. It will migrate the older schema and transform the data as well as preserve the configuration data content.
- If you have a platform database with the existing Advisors configuration but do not have a corresponding copy of the bulk configuration data, you can generate the bulk configuration data in the form required in the new version by applying the bulk export script to the Platform database migrated to the new version. The bulk export script will not remove any existing bulk configuration content. If any, the previous content will be moved to the tables that have identical names with appended timestamps. You can use the content in tables that have "Exp" in their names to review the validity of your current configuration. You then can address the reported warnings or problems by editing the exported bulk configuration data and then by removing and replacing the configuration by using the bulk removal and then the bulk configuration procedure. You also can address the reported issues by applying the changes in the Administration module and verifying the configuration by applying the bulk export script again. The verification process may require several iterations. You can repeat the process until the bulk export procedure does not report any issues in which case the bulk configuration structures will also contain the valid configuration. If the "Exp" content is large, select only the records that have one or more stars '*' in the "Message" field. These would be the messages that require your attention.
See more information in the "Exporting CCAdv/WA Configuration" section of this guide.
Loading Data from Spreadsheets into Temporary Database Structures
Import content from the spreadsheets or files into the relevant columns of the corresponding database tables using the Oracle SQL Developer or the MS SQL import option. Follow the procedure for each table.
Importing Content into Tables (Oracle)
Procedure:
Steps
- Open SQL Developer and register a connection to the Advisors Platform schema.
- Navigate to the Advisors Platform schema, then to each created table.
- Right-click a table and select the Import Data ... option from the menu.
- Navigate to the relevant file and select it.
- Follow the SqlDeveloper Import Data Wizard instructions; the wizard guides you through the import process.
Ensure that you verify the data for each step of the Data Import Wizard, in particular:
- Review the data on the Data Preview screen to ensure accuracy.
- Ensure you exclude any unrelated columns that might be present in the file. It is best if you remove unwanted columns from the file before you start the import, rather than excluding columns each time you run the import wizard.
- Ensure that you correctly map columns in the database table to columns in the file. Verify each and every column.
- Verify the parameters before import.
See the SQL Developer documentation if you have questions related to data import using SQL Developer.
Importing Content into Tables (MS SQL)
You must match each spreadsheet with a destination table. Ensure you choose the table that was created for bulk configuration and not the one suggested by the wizard.
Procedure:
Steps
- Open Microsoft SQL Server Management Studio and register a connection to Advisors Platform database.
- Navigate to the Advisors Platform database and launch the import tool for one of the created tables.
- Follow the import wizard instructions.
- Import the data from each file that contains prepared configuration data.
- Using MS SQL Server, you can load data in one import session if you use Microsoft Excel and the data is consolidated into one spreadsheet with tabs representing the content of each table.
Ensure that you verify the data for each step of the Data Import Wizard, in particular:
- Review the data on the Data Preview screen to ensure accuracy.
- Ensure you exclude any unrelated columns that might be present in the file. It is best if you remove unwanted columns from the file before you start the import, rather than excluding columns each time you run the import wizard.
- Ensure that you correctly map columns in the database table to columns in the file. Verify each and every column.
See the MS SQL Server documentation if you have questions related to data import using Microsoft SQL Server Management Studio.
MS SQL Server Import is very sensitive to special characters which, if present in the files, can trigger an import failure accompanied by a message that might seem completely unrelated and will not explain the actual reason. Make sure that the files are clean. Special characters are often invisible; to avoid import failure, check the files for unnecessary empty trailing spaces, as well as empty rows or formatting, and remove them before you proceed with the import. While preparing the data, do not copy it from web pages or forms that might contain such characters.
Bulk Configuration Validation and Logs
The contact group bulk configuration procedure (spblkConfigCCadvWAIntegrated) validates each record in the database blk structures. The procedure does not add to the configuration if any serious misconfiguration is discovered in the blk tables. Instead, the procedure records a message in the blkAllLog table and exits. Always review the blkAllLog table content; note rows that contain an asterisk (*). The asterisks typically indicate problems with data in the tables. The number of asterisks normally indicates the number of found issues in the configuration for the related object. See Prerequisites and Preparations and Data Preparation for information about correct data preparation.
Examine the log to see if you encountered errors when performing the bulk configuration. If there are errors reported in the log, correct the data in the spreadsheets or files, and reload the content to the related tables and columns. You can also correct the data directly in the tables and then save the change for the future by exporting the new table content into the files. You can correct only some of the records leaving the rest intact. When you execute the bulk configuration procedure, the procedure applies changes to objects present in both the CCA and WA parts of bulk configuration tables.
Re-run the procedure to complete or correct the configuration using the updated data. Repeat the process as many times as necessary. The procedure does not reduce existing configuration. The procedure applies all modifications and additions that occurred in the blk tables after your previous execution of the procedure. Any deletion of data from the blk tables, however, is ignored.
The resulting configuration can be verified from the Advisor Administration module and on the dashboard.
Correct Configuration Validation in Advisors Administration Module
Execution of the spblkConfigCCadvWAIntegrated procedure results in the following configuration, which you can validate in the Advisors Administration module:
- Associates applications contained in the blkAllNames table with contact centers, application groups, geographic regions, reporting regions, and operating units contained in the associated columns. The applications for which all names are resolved (all objects with those names are found in the Platform database and their IDs can be located through associations and assignments) are added to the existing CCAdv configuration and included in the rollup. The Include in Rollup property can be controlled from the utility; that is, the property's value can be supplied in the relevant column in the blkAllNames table. The value can be Y or N. An empty cell, or any values other than Y or N are interpreted as Y for compatibility with previous versions. The procedure also updates display names based on the content in the columns of the table. If the AppDisplayName column in the table is blank for an application, the existing display name for that application, present in the CCAdv configuration, is removed (replaced with the blank name).
- Associates contact groups, where specified, with applications and assigns these contact groups to the contact center, application group, geographic region, reporting region, and operating unit specified in the row with the contact group. The procedure also includes the contact group in the rollup. The Include in Rollup property can be controlled from the utility; that is, the property's value can be supplied in the relevant column in the blkAllNames table. The value can be Y or N. An empty cell, or any values other than Y or N are interpreted as Y for compatibility with the previous versions.
- Associates the contact group with the specified contact group display name. If the CgDisplayName column is blank, the existing display name of the contact group (present in WA configuration) is replaced with the blank name.
- Establishes relationships between applications and agent groups contained in the blkAllAgntGr table.
- Establishes relationships between contact groups and agent groups contained in the blkAllAgntGr table. Each contact group displays in a row with the relevant agent group based on the specified agent group contact center. The contact group inherits the properties of the application contained in the same row of the table as the contact group.
- Records the outcome in the blkAllLog table, which you can examine after the procedure exits.
Exporting CCAdv/WA Configuration
You can export the existing CCAdv/WA configuration into a set of temporary structures compatible with CCAdv/WA bulk configuration. You can then export the structures into delimited files, edit them by adapting to the bulk configuration format, and then use those for CCAdv/WA configuration in another environment. You can also use the exported structures to compare the actual CCAdv/WA configuration to your expected configuration.
Run the blkCfgExp.sql script in your Oracle or MS SQL Server installation to export the data.
The script creates and populates, or updates, the following two tables:
- blkExpAllNames
- blkExpAllAgntGr
All entries for which there is a problem contain an explanation of the issue in the Message column of each table. Make sure you always review the content of this column.
The export utility exports data into four tables:
- blkExpAllNames
- blkExpAllAgntGr
- blkAllAgntGr
- blkAllNames
The first two blkExp tables contain expanded configuration data that is presented in a redundant form for diagnostic purposes. The Message field contains a warning or error information, where applicable.
The other two blk tables contain a "clean", non-redundant copy of your Advisors configuration that can be further used “as is” by the bulk configuration tool. If, at the time of export, the Advisors Platform schema already contains the two blkAll tables, the utility will create a backup copy of each table with the name containing a timestamp.
For example:
- blk12MAY15063407AllAgntGr
- blk12MAY15063407AllNames
The timestamp format is: DD MON YY HH24 MI SS
Once the content of blkAllAgntGr and blkAllNames is saved into the timestamped backup tables, the tables are cleared and the current Advisors configuration is loaded into them.
There is no need to adapt the exported diagnostic blkExp data in order to craft the Advisor configuration blk structures. The content recorded into the blk tables by the export utility can be used as a data source for the bulk configuration tool. The data can be used for migration to another schema or for re-loading the saved configuration into the same schema after you apply the configuration removal procedure. Genesys recommends that you first verify the content of the diagnostic export tables before loading the configuration data from the blk tables created by the export tool.
The export utility can also be used for saving the versions of Advisors configuration while you are in the process of configuring Advisors. The blkExp data will help to capture and correct a problem as soon as you run the export utility. Any copy of the backup data can be loaded into the blk tables and used for reverting the configuration to any earlier, saved version. Genesys recommends that you use the bulk configuration removal procedure before each configuration load.