
Contents
Deploy Digital Messaging Server
The following steps describe how to deploy Digital Messaging Server (DMS).
Prerequisites
- Genesys components
- Message Server 8.5.x
- Chat Server 8.5.309.17 or higher
- Universal Contact Server 8.5.300.39 or higher
- Interaction Server 8.5.300.07 or higher
- Third-party components
- One of the following Java components:
- Oracle Java 8 Developer's Kit (JDK)
- OpenJDK 8
- OpenJDK 11
- OpenJDK 17
- One of the following Java components:
- High loaded DMS
- 16 GB RAM
- For Unix systems: Increase the kernel parameter /proc/sys/vm/max_map_count to 131060 to accommodate a higher number of parallel chat sessions,
Creating a DMS Application object
Create an Application object for DMS if it does not already exist.
- Import the DMS Application Template from the CD.
- Create a new Application object based on the template.
- Open the Properties dialog box of the Application object.
- On the Server Info tab:
- In the Host box, enter the name of the desired host.
- In the Port box, enter the port DMS will use.
- On the Start Info tab, enter some characters in the Working Directory, Command Line, and Command Line Arguments fields. These characters will be overwritten with the correct values during the installation, but they cannot be left blank at this point.
- On the Connections tab, add a connection to all components mentioned.
- If this is for a multi-tenant environment, add the tenant(s) on the Tenants tab.
- Open your Interaction Server Application and add a connection to DMS. Specify the Connection Protocol as either simple or addp.
Installing DMS
See the Supported Operating Environment Reference for prerequisites before you install DMS. For information on compatibility between DMS and various Genesys drivers, see Digital Messaging Server and Driver Compatibility.
Windows
- Locate and run the Setup.exe file for DMS.
- Enter the login information for your Configuration Server:
- Host
- Port
- User
- Password
- Select the checkbox if you want to use the Client Side Port, and then click Next.
- Select the appropriate DMS Application object from the list.
- Choose a destination for the installation.
- Select the Java instance to use with DMS, then click Next.
- Specify a log folder, then click Next.
- Click Install.
Linux
- Locate the install.sh file for DMS.
- Use the command >install.sh to start the installation script.
- On request, enter the absolute path for the directory of the Java executable.
- Press Enter to confirm the host name for the installation.
- Enter the login information for your Configuration Server:
- Host
- Port
- User
- Password
- From the list of applications, select one and enter its number in the list.
- Press Enter to confirm the suggested destination directory, or choose another one.
- Answer other questions, if required.
DMS High Availability configuration
- Starting from the DMS version 9.1.003.10, High Availability is supported for WhatsApp and Apple Business Chat channels.
- Starting from the DMS version 9.1.006.09, DMS by default supports High Availability for WhatsApp, and Apple Business Chat channels, and it necessarily requires High Availability configuration.
- Starting from the DMS version 9.1.008.08 and Genesys Driver for SMS and MMS 9.0.003.03, High Availability is supported for SMS messaging with media type SMS Session. This feature requires installation of Workspace Desktop Edition 8.5.153.05.
Digital Messaging Server supports High Availability in Warm Standby mode. This section describes how to configure DMS to achieve High Availability (HA) on both Windows and Linux operating systems.
Configuring DMS Application objects
- On the Server Info tab of the Primary DMS application, specify the name of the Backup DMS Server.
- On the Server Info tab of the Primary DMS application, specify Warm Standby as the Redundancy Type.
- On the Interaction Server’s Connections tab, configure a connection to the Primary DMS.
Setting JVM properties
Set the following property in the JavaServerStarter.ini file (for Windows) or dmserver.sh file (for Unix):
-Dgenesys.mcr.stdserverex.flexchatprotocol=true
Configuring interactions
SQL Scripts
You must run the provided SQL script to interact with Interaction Server’s database. You can find the following SQL scripts in the ha_sql_scripts folder within the DMS installation folder:
- ha_support_mssql_nvarchar.sql
- ha_support_mssql_varchar.sql
These scripts are prepared for Microsoft SQL DBMS. You can run one of these scripts based on your environment to create nvarchar or varchar string field types.
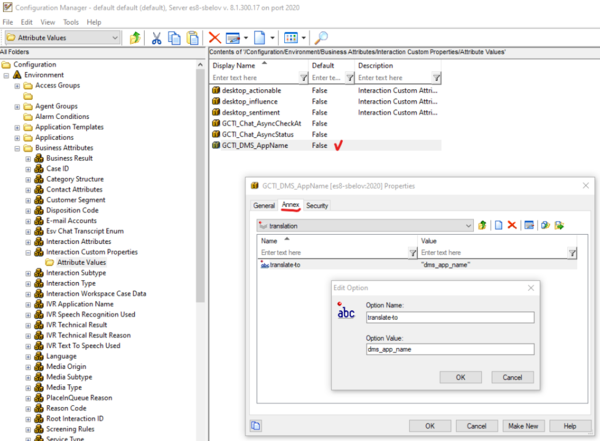
Interaction Custom Properties
Create and configure GCTI_DMS_AppName custom property in the Configuration Server.
- Create a custom property, GCTI_DMS_AppName as shown in the following image:

- For the created custom property in the translation section of Annex, specify the value as dms_app_name for the translate-to option.


Chat Server Connections
You can establish connections to multiple primary Chat Servers using the Connections tab in DMS. The Chat Servers listed in the Connections tab must not use backup support.

DMS Scalability
For information on configurations related to DMS scalability, see DMS scalability.
Next Steps
- Configure the options as necessary. Refer to the Digital Messaging Server page in the eServices Options Reference.
- Continue deployment by:
- Adding a channel, such Facebook, a Twitter, or a Custom Media Channel.
- Adding a messaging channel, such as Apple Business Chat, SMS/MMS, or WhatsApp.
Uninstalling or upgrading DMS
Uninstalling DMS
- If you have also installed Genesys drivers for DMS (for example, Apple Business Chat), you must uninstall these drivers separately. These drivers are not uninstalled automatically if DMS is uninstalled.
- You cannot uninstall DMS and then install a new instance of DMS at the same location and use the old driver instances. You must also reinstall drivers that you want to use with the new DMS instance, even if the driver versions have not changed.
- You must delete the DMS Application object separately.
Windows
To uninstall using the wizard:
- Run the setup.exe file for DMS that is located on the product CD or in the installation package.
- Select Maintenance of existing installation.
- Select the DMS instance that you want to remove.
- Select Next. Wait for several seconds until the Genesys Installation Wizard window appears on your desktop.
- Select Remove.
- Select Next.
- Select Yes to confirm the operation.
- Choose when to restart your computer.
- Select Finish.
To uninstall using the Control Panel:
- Open the Control Panel.
- Select the DMS installation that you want to remove.
- Select Uninstall and then Next. Wait for several seconds until the Genesys Installation Wizard window appears on your desktop
- Select Remove.
- Select Next.
- Select Yes to confirm the operation.
- Choose when to restart your computer.
- Select Finish.
Linux
Delete the DMS files directly by performing the following command: rm -rf <DMS_FOLDER>
Upgrading DMS
- If you have also installed Genesys drivers for DMS (for example, Apple Business Chat), you must update these drivers separately. These drivers are not updated automatically when DMS is updated.
- You cannot upgrade DMS and use the old driver instances. You must also reinstall drivers that you want to use with the upgraded DMS instance, even if the driver versions have not changed.
- You must update the DMS Application separately, if needed.
- If upgrading to the DMS version 9.1.006.09 or later, DMS High Availability configuration is required. For more information, see DMS High Availability configuration.
Windows: Upgrading via the wizard
- Run the setup.exe file for DMS that is located on the product CD or in the installation package.
- Select Install new instance of the application and then select Next.
- Enter your Configuration Server parameters.
- Select Next.
- Select the checkbox if you want to use the Client Side Port, and then select Next.
- Select the DMS application that you want to upgrade and then select Next.
- Select Browse and select the folder in which the existing DMS instance is installed, then select Next.
- Select the Java instance to use with DMS, then select Next.
- Specify a log folder, then select Next.
- Select Install.
Linux: Upgrading via the install.sh script
- Run the ./install.sh file for DMS that is located on the product CD or in the installation package.
- Specify the path to the Java executable folder.
- Specify the hostname.
- Specify the hostname of the Primary Configuration Server.
- Specify the Primary Configuration Server port, username, and password.
- Select the DMS application that you want to upgrade.
- Specify the existing DMS installation path.
- Select how to handle existing data in the DMS folder. For example, 2 only overwrites those files that are part of the installation package.