Contents
Managing templates
In Workforce Management (WFM), you'll use forecast templates to help you create forecasts for sites or business units that have little or no historical data, and other uses. This topic describes the WFM wizards, controls, and settings you'll use to view, create, and manage these templates.
The templates you create using these procedures can be used only for the activities or multi-site activities (MSA) you select in Step 2 of wizards. If you select any other activity or MSA, you won't see the template.
Creating forecast templates
To create forcast templates:
- In the Forecast > Templates view, select:
- A business unit if you are creating the template for multi-site activities.
- A site if you are creating the template for activities.
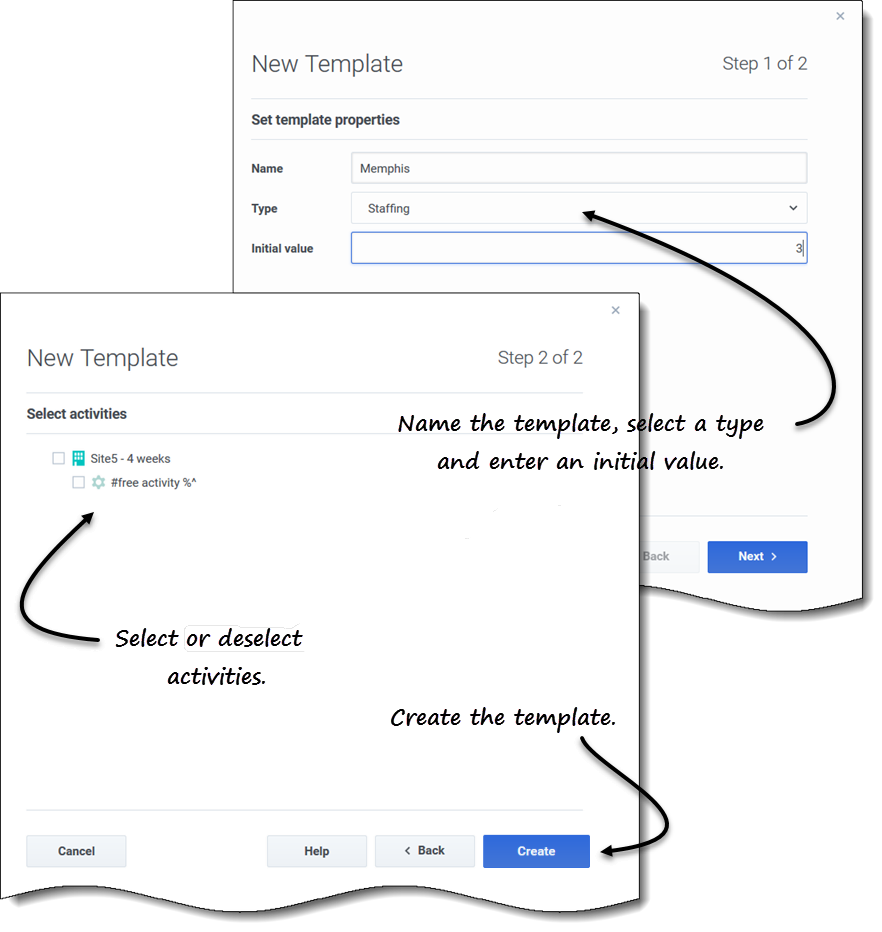
- Click New template.
- Step 1 of the New Template dialog opens.
- Enter a Name for the template (limited to 127 characters)
- Select the template type from the Type drop-down list.
- See a list of template types here.
- Enter a number in the Initial value text box.
- See the Tip below for more information.
- Click Next.
- In Step 2 of the dialog, select the activities or multi-site activities for this template.
- Click Create.
- When the confirmation message appears, click OK.
- Your template displays in the list of templates.
WFM Web interprets the initial value differently, depending on the type of template you choose. For example, templates of type IV (interaction volume) could have an initial value between 0 and 9999999 (calls per timestep). However, templates of type Maximum occupancy could have an initial value between 0.01 and 100.00 percent.
Creating templates based on existing data
Use the Create Based On dialog to create a new forecast template from existing data.
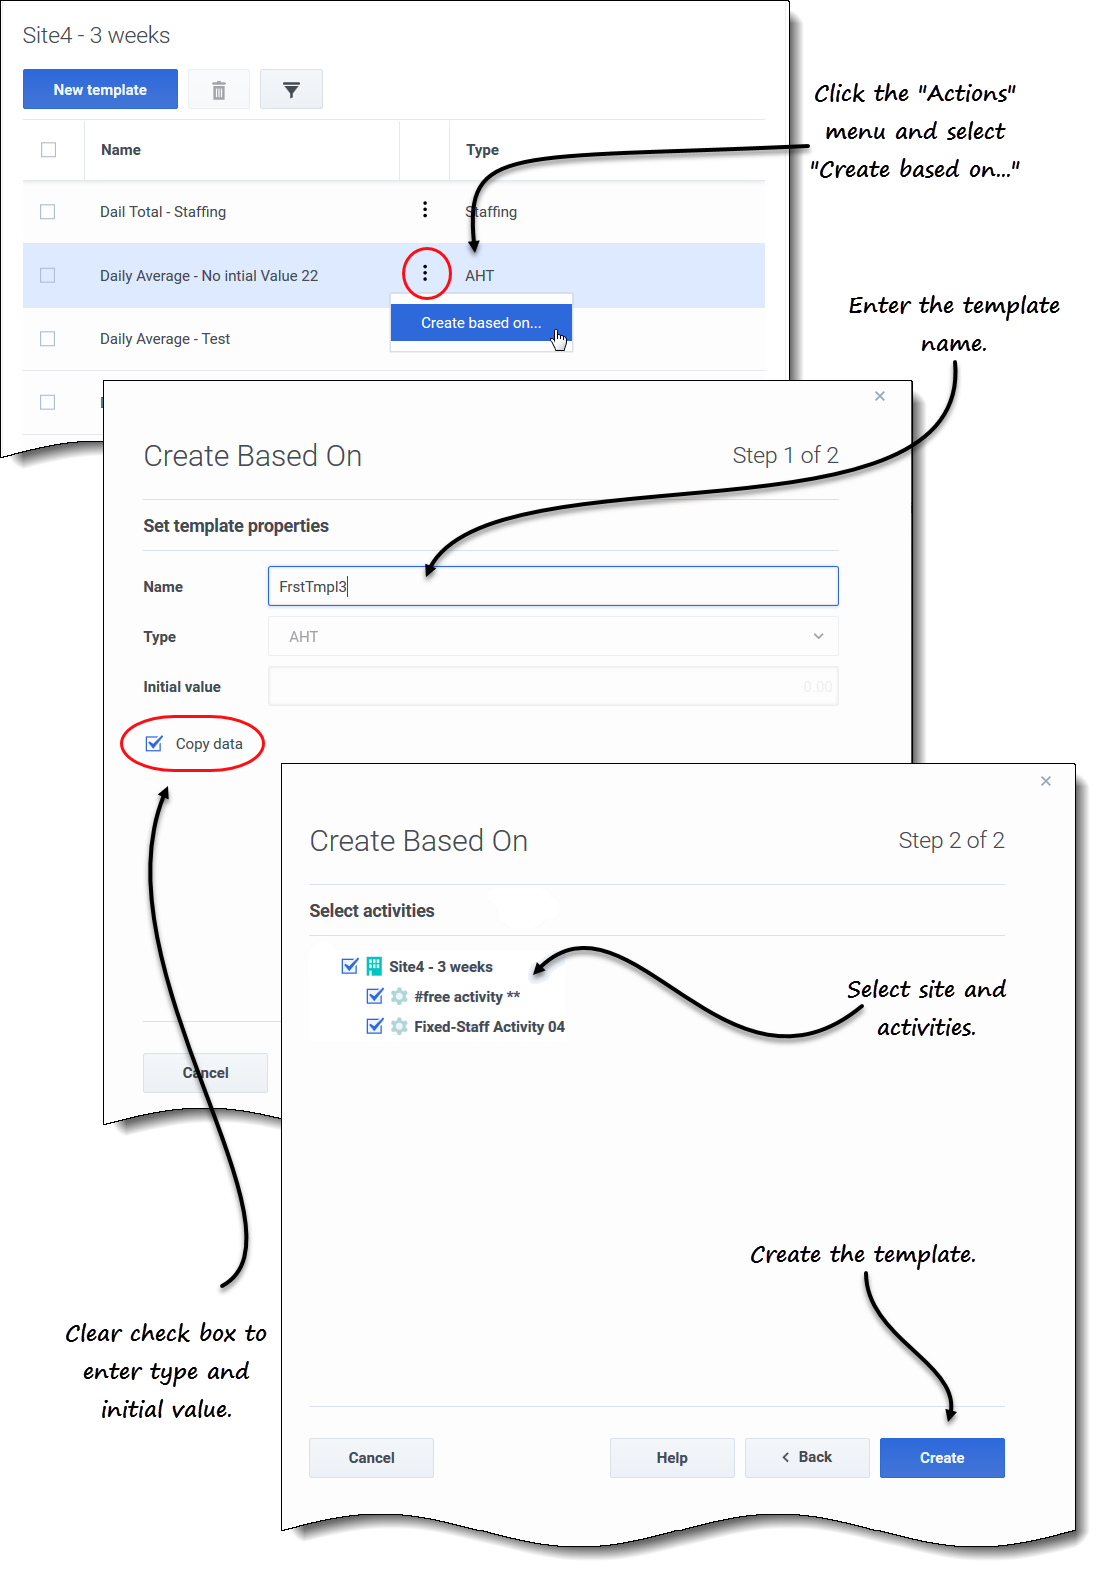
When creating templates using this dialog, you'll notice (in Step 1) that the Type and Initial value fields are disabled and the Copy data check box is checked, by default. WFM assumes that you want to use the same data that was used in the source template. If you don't want to, simply uncheck the Copy data check box and change the template type and/or initial value.
To create a template based on an existing data:
- In the Forecast > Templates view, select a business unit or site.
- The templates for this object are displayed in a table.
- Choose a template, click Actions
 , and select Create based on....
 - In Step 1 of the dialog, in the Name field, enter the template name (limited to 127 characters).
- In the Type drop-down list, select the template type.
- See a list of template types here.
- Enter a number in the Initial value field.
- See the Tip above for more information.
- Remove the check mark in the Copy data check box if you do not want to copy data from the source (based on) template.
- Click Next.
- In Step 2 of the dialog, select the activities or multi-site activities for this template.
- Click Create.
- When the confirmation message appears, click OK.
- Your template displays in the list of templates.
Editing templates
In the Template Distribution grid, you can move from cell to cell by using the Enter or Shift+Enter keys on the keyboard. Click a cell and press:
- the Enter key to move the focus to the cell below the one selected.
- the Shift+Enter keys to move the focus to the cell above the one selected.
If you select a cell in the Total or Average row, you can use Enter to move down one cell, but you cannot use Shift+Enter to move up one cell.
To edit a forecast template:
- In the Forecast > Templates view, select a business unit or site.
- The templates for this object are displayed in a table.
- In the table, select the template you want to edit.
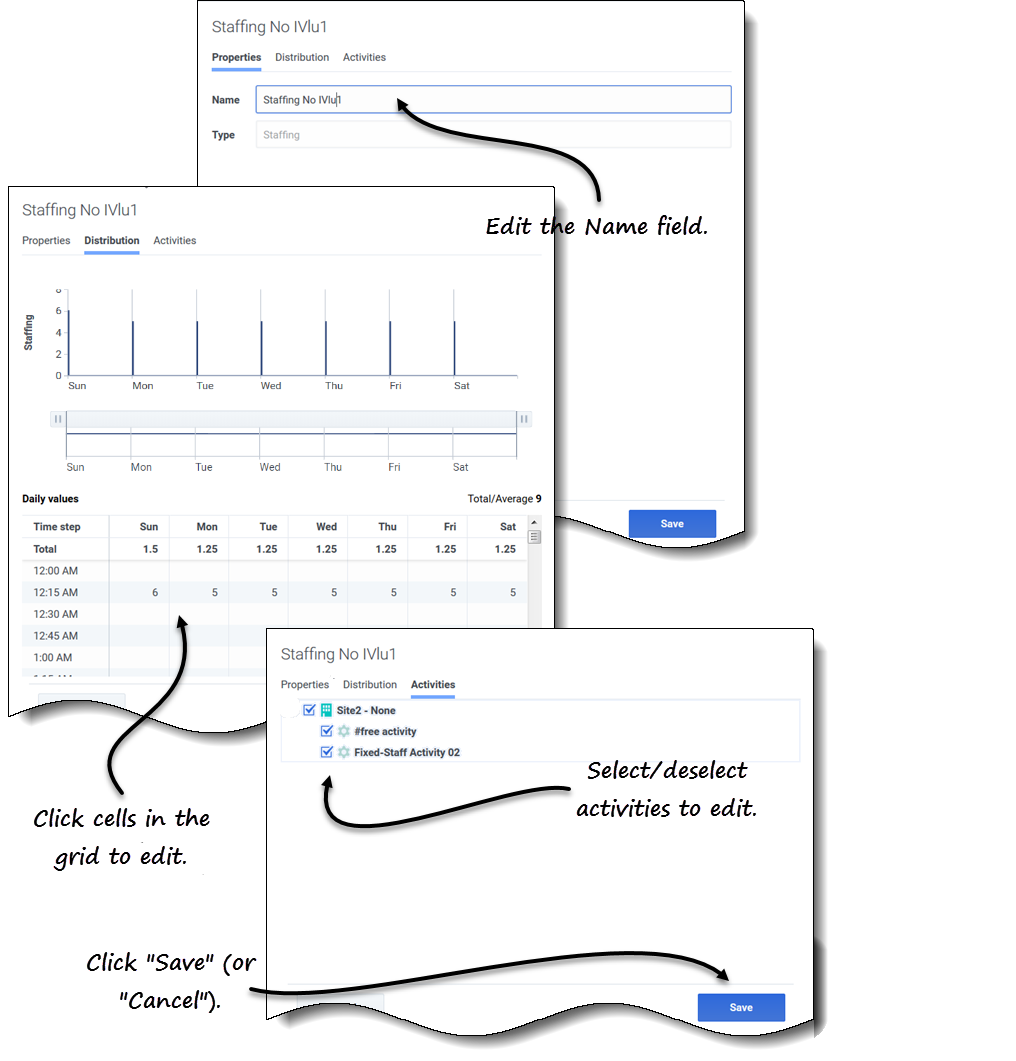
- The Data pane opens, displaying 3 tabs.
- Click any tab to change its settings:
- In the Properties tab, enter a different name for the template. Note that you cannot change the Type.
- In the Distribution tab, click any cell in the table to change its value. The Total/Average values change to reflect any changes you make to the cell values and vice versa.
- In the Activities tab, add or remove activities by checking or clearing the check box next to the activity.
- When you are finished editing, click Save.
- Alternatively, click Cancel at any time to discard any changes you've made.
When you are editing values in the Distribution grid, you can click the Esc key to cancel the action (WFM does not change the value).
If you select a business unit or site, but do not select a template in the table, you'll see the message Select template to edit in the Data pane.
See also, Selecting data to copy and paste.
Deleting templates
To delete a template:
- In the Forecast > Templates view, select a business unit or site.
- The templates for this object are displayed in a table.
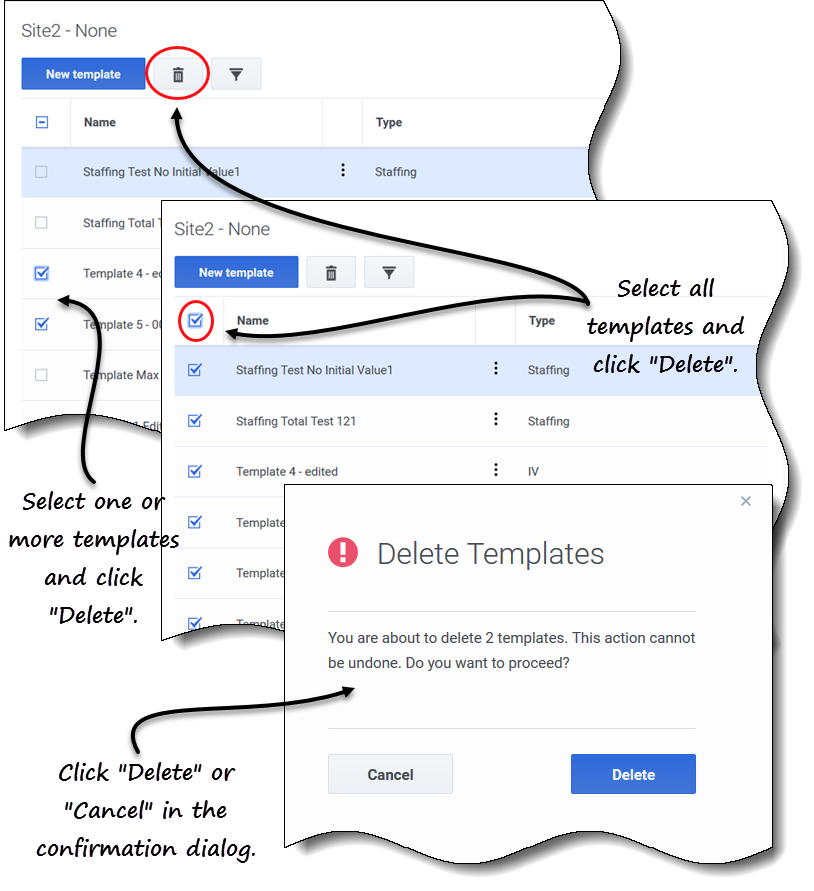
- In the table, select the template that you want to delete.
- In the toolbar, click Delete
 .
. - When the confirmation dialog opens, click Delete to proceed or Cancel to cancel the action.
To delete multiple templates at once:
- Select the templates you want to delete (using the check box beside each template).
- Complete steps 3 and 4 in the procedure above.
To delete all templates in the table:
- Select the top-most check box in the column header (near the Name column header).
- Complete steps 3 and 4 in the procedure above.
If you are deleting a single template, the confirmation dialog contains the template name. If you are deleting multiple templates, the confirmation dialog states the number of templates being deleted.
Filtering templates in the table
To filter the templates in the table:
- In the Forecast > Templates view, select a business unit or site.
- The templates for this object are displayed in a table.
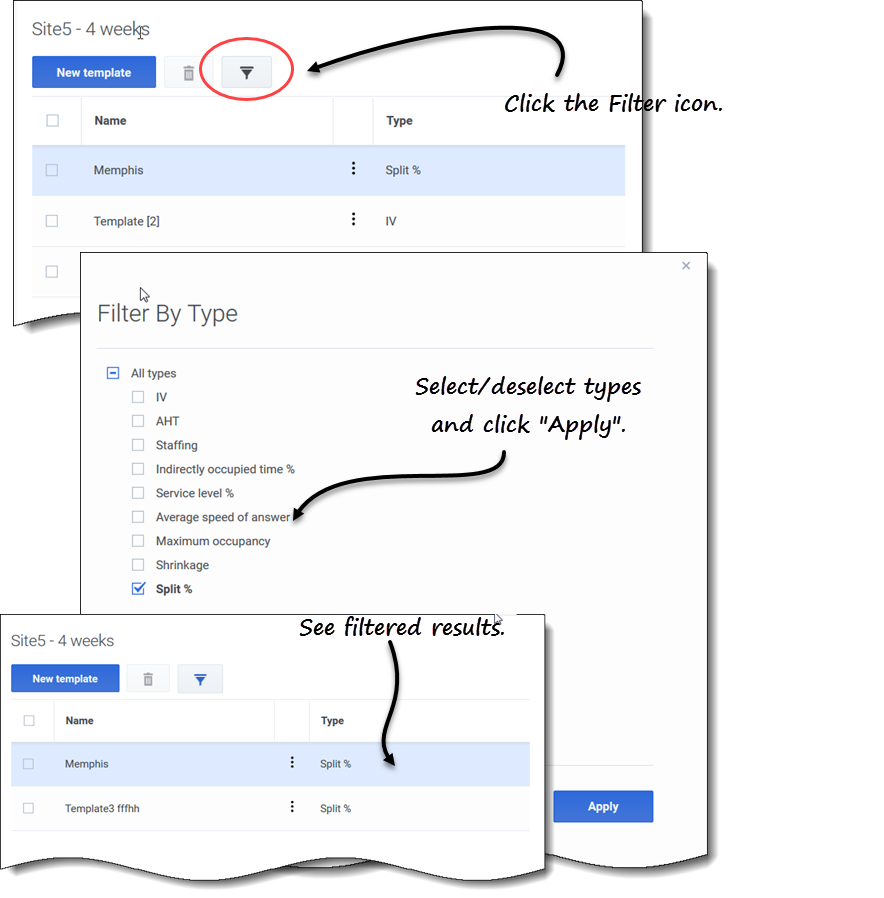
- In the Templates toolbar, click Filter
 .
.
- The Filter By Type dialog opens with all templates types selected by default.
- Deselect any template types you do not want to see in the list and click Apply.
When WFM displays the filtered list of templates, the color of the Filter icon changes to blue. If you then select all template types and click Apply, the Filter icon changes to black.
If there are no templates found of the type you are filtering, you'll see the message No items to display.
WFM preserves your filtered selections if you navigate to another view and return to the Templates view.
Selecting data to copy and paste
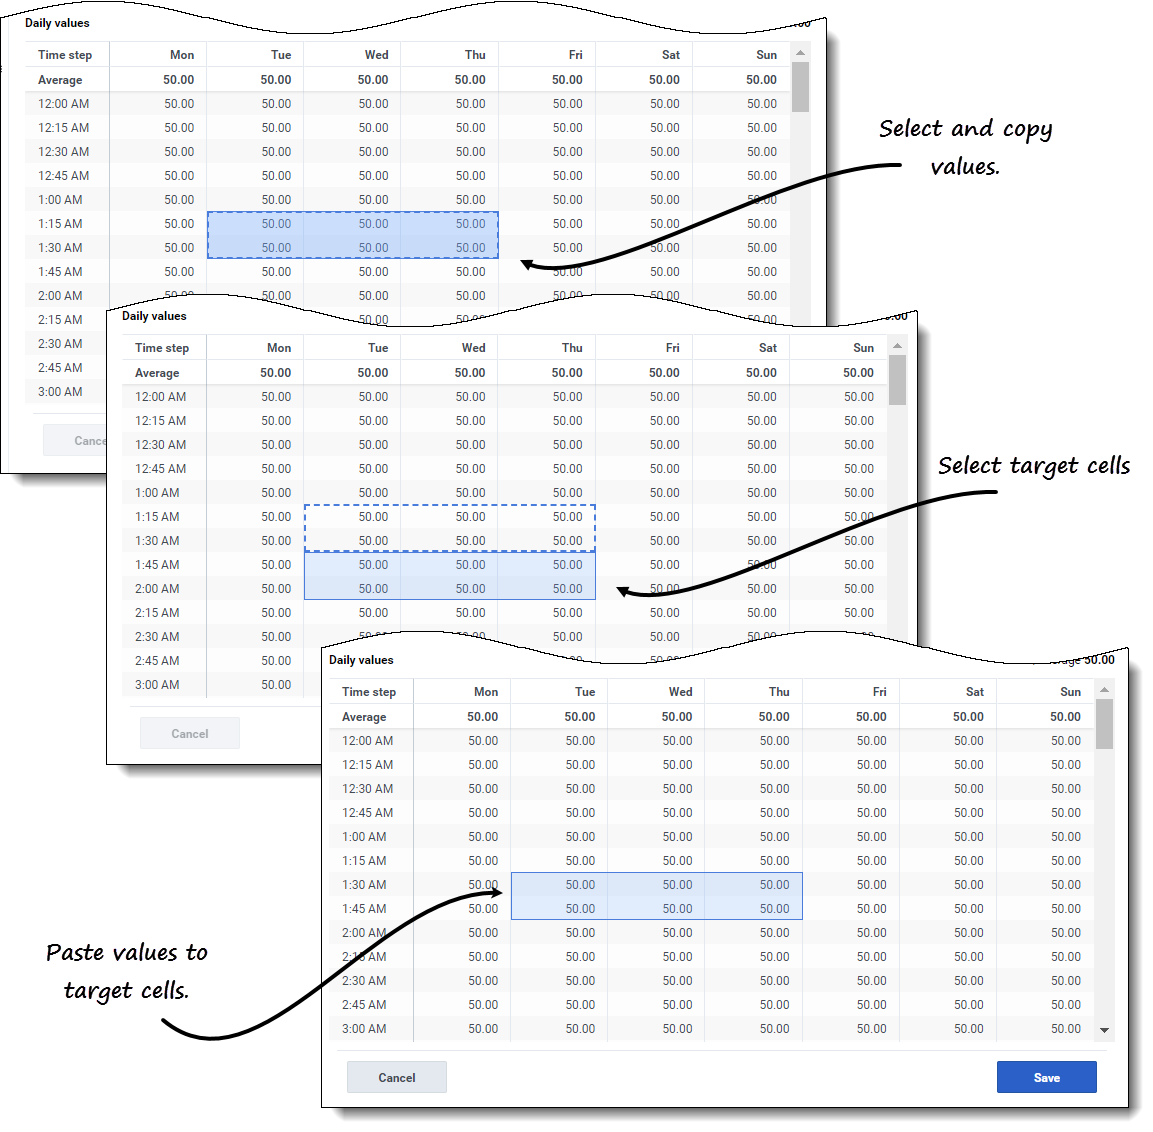
You can use key combinations on the keyboard and mouse to select data in the Template view's Distribution grid for copying and pasting. You can copy/paste within the grid and to/from a document (for example, Excel or NotePad).
For some key combinations, you must select the Daily values row and the Timestep column separately. They cannot be selected with other rows or columns in the grid. Also, timestep values can be pasted only to external sources (not into the grid). You cannot select, copy, or paste the Timestep header row (Mon , Tue. etc.).
When selected, cells are highlighted and bordered with a bold solid line. When copied to the clipboard, they are bordered with a dashed or broken line. Targeted or pasted cells are highlighted and bordered with a bold solid line.
The grid scrolls automatically when you select a range of cells using the Arrow, Home, End, Page Up, or Page Down key, or the Shift+Arrow, Shift+Home, Shift+End, Shift+Page Up, or Shift+Page Down keys.
Attempts to paste any of the following invalid values into the grid or Daily totals/Average row results in the message: Cannot paste invalid values.
- Letters, special symbols, or negative values
- Decimal values for IV
- Values containing more than 9 digits for IV or Staffing
- Values that are out of range.
Shift+arrow keys
Click a cell in the grid and press:
- Shift+up arrow key to select additional cells above the selected cell.
- Shift+down arrow key to select additional cells below the selected cell.
- Shift+right arrow key to select additional cells to the right of the selected cell.
- Shift+left arrow key to select additional cells to the left of the selected cell.
Arrow keys
Click a cell in the grid and press:
- The up arrow key to select the cell immediately above it.
- The down arrow key to select the cell immediately below it
- The right arrow key to select the cell immediately to the right of it.
- The left arrow key to select the cell immediately to the left of it.
Click a range of cells in the grid and press:
- The up arrow key to select the cell immediately above the last cell in the range.
- The down arrow key to select the cell immediately below the last cell in the range.
- The right arrow key to select the cell immediately to the right of the last cell in the range.
- The left arrow key to select the cell immediately to the left of the last cell in the range.
Shift+Home, Shift+End
Click a cell in the grid and press:
- Shift+Home to select additional cells to the left of the selected cell.
- Shift+End to select additional cells to the right of the selected cell.
This key combination has no effect on Time step column.
Home, End keys
Click a cell or range of cells in the grid and press:
- The Home key to select the first cell in that row.
- The End key to select the last cell in that row.
Shift+Page Up, Shift+ Page Down
Click a cell in the grid and press:
- Shift+Page Up to select all cells above the selected cell.
- Shift+Page Down to select all cells below the selected cell.
This key combination has no effect on Daily values row
Page Up, Page Down
Select cells in the grid, and press:
- Page Up to select the first cell in that column within the visible grid area.
- Page Down to select the last cell in that column within the visible grid area.
Clicking these keys selects only the cells within the visible area of the grid. Click these keys more than once to select cells beyond the visible area.
Select a range of cells in the Daily totals row and press:
- Page Up to select the first cell within the selected range.
- Page Down to select the last cell within the selected range.
Ctrl+A
- Click any cell in the grid and press Ctrl+A—All cells in the grid are selected.
- Click any cell in the Timestep column and press Ctrl+A—All cells in the column are selected.
- Click anywhere in the Daily totals/Average row and press Ctrl+A—The entire row is selected.
Drag mouse or mouse pad
- Click any cell in the grid and hold down the right mouse key while dragging the mouse right, left, up, down, or any combination of directions. The range of cells is selected.
- Click any cell in the Time step column and hold down the right mouse key while dragging the mouse up or down. The range of cells in the column is selected.
- Click anywhere in the Daily values row and hold down the right mouse key while dragging the mouse left or right. The entire row is selected.
When dragging the mouse, if cells are selected beyond the visible area of the grid, the grid adjusts and autoscrolls to display the selected cells.
Shift+ mouse-click
- Hold down the Shift key and click any cell in the grid. Using the mouse, click anywhere in the grid in any direction. The range of cells is selected.
- Hold down the Shift key and click any cell in the Time step column. Using the mouse, click anywhere in the column, up or down. The range of cells is selected.
- Hold down the Shift key and click anywhere in the Daily totals/Average row. Using the mouse, click anywhere in the column, right or left. The entire row is selected.
Ctrl-C, Ctrl-V
Select cells in the grid, and press:
- Ctrl-C to copy values in the grid. The message Copied to clipboard appears. Click X to close it.
- Crtl-V to paste values in an Excel spreadsheet or a text editor such as, NotePad.
If more cells are copied than there are cells to paste into, WFM extends the number of cells/column/rows to accommodate the data being pasted.

