What You Need
Before starting to configure your secure connections with TLS, you must have done the the following:
- Generated certificates, with associated private and public keys, and CRLs.
- Made certificates available for applications on hosts.
- Installed the Genesys Security Pack, if you are using native applications on Unix platforms.
Each of these requirements are described below.
TLS Certificates
TLS certificates must be generated and installed appropriately on any host that runs Genesys applications that utilize TLS secure connections. A certificate is generated and signed using a certification authority (CA) entity, which is able and authorized to issue certificates signed with its own name.
Important
Genesys strongly recommends that you use the same CA to generate all the certificates for your contact center environment.
The actual process of certificate generation in a specific environment is highly dependent on the security policies of your IT organization and tools used, and can, therefore, be different from the process described in this chapter. Genesys recommends that you consult with your network administrator before generating certificates for secure data exchange between Genesys components.
Certificates can be purchased from well-known certificate authorities, such as VeriSign. Certificates can be generated and self-signed on Linux using the OpenSSL tool, assisted by scripts distributed with the Genesys Security Pack. Windows Certificate Service can be used to generate and sign certificates. You may self-sign your certificates, or you Windows Certificate Service might already be used in your organization as a part of a chain of trusted authorities.
Generated and signed certificates must also be installed to be used by Genesys components. This procedure differs depending on the host operating system on which the certificates are installed.
Tip
TLS certificates can be stored and used in a number of different formats. Different TLS implementations use different certificate formats. Self-signed certificates, generated using OpenSSL and Genesys Security Pack, can be used across all supported Genesys implementations. For certificates obtained from other sources, you must confirm that their format is compatible with your target platforms.
Recommended Certificate Properties
When retrieving or generating a certificate, the following properties are recommended to ensure the connections using this certificate are as secure as possible:
[+] Show properties
- How is it signed by Issuer (CA)?
- RSA2048+ Public Key (Encryption) Algorithm
- SHA2 (SHA256+) Signature Hash Algorithm
- When does it expire?
- It is critical to have a certificate rotated or replaced before it expires.
- Who is it for?
- Subject and Subject Alternate Name (SAN)
- Subject CN field (Common Name) of the DN (Distinguished Name).
- Most often, it is the host machine’s domain.
- SAN overrides Subject's CN field to allow for list of valid names; Genesys recommends that you set both.
- What is it for?
- KeyUsage, ExtendedKeyUsage
- Authentication of Server, Client, or both.
- Certificates that will be used by Genesys server applications must contain these extended attributes: serverAuth and clientAuth.
- Certificates that will be used by Genesys GUI applications must contain this extended attribute: clientAuth.
The following figure displays an example of a partial certificate, showing some of these recommended properties.
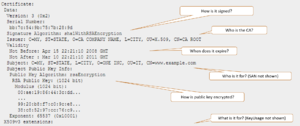
A sample TLS security certificate
Generating Certificates using OpenSSL and Genesys Security Pack
The OpenSSL toolkit can be used to set up a CA infrastructure and issue self-signed certificates. Use this method if certificates are to be utilized in a mixed environment, including Windows and Linux hosts, along with Java PSDK-based components.
Scripts distributed with Genesys Security Pack simplify CA creation and certificate generation. These scripts use the SHA-256 message digest algorithm by default, but allow fallback to SHA-1 if required. Genesys recommends that you do not use SHA-1.
Prerequisites
To generate certificates, you need an OpenSSL command line tool installed on the system. Obtain the most recent valid binary distribution from the
OpenSSL official website.
To utilize Genesys Security Pack scripts, you need a set of standard GNU console utilities, including bash, awk and touch.
Generation Process
| 1. Create a CA directory in which CA files—scripts, configuration files, and generated certificates—will be stored.
|
| 2. Copy the create_ca.sh and create_cert.sh scripts from the installation package to the CA directory that you just created. Make sure that these scripts have executable permissions.
|
3. Run the create_ca.sh script from the bash shell by specifying the proper parameters (described in the table below) in the following command line:
create_ca.sh [-keySz KEY_SIZE] [-dgst DIGEST_ALGORITHM] [-time VALID_TIME] -CN COMMON_NAME [-E EMAIL] [-OU ORG_UNIT] [-O ORGANIZATION] [-L LOCALITY] [-S STATE] [-C COUNTRY]
The parameters are described in the following table:
[+] Show table
| Parameter
|
Description
|
| KEY_SIZE
|
(Optional) The size, in bits, of the CA private key. The default value is 2048 bits.
|
| DIGEST_ALGORITHM
|
(Optional) Digest algorithm to use on certificate generation. The default value is sha256. Valid values are:
sha1 (not recommended), sha224, sha256 (default), sha384, and sha512.
|
| VALID_TIME
|
(Optional) The amount of time, in days, that the CA is valid. The default value is 365 days.
|
| COMMON_NAME
|
(Mandatory) The name of the CA.
|
| EMAIL
|
(Optional) The e-mail address of the person who is responsible for this CA.
|
| ORG_UNIT
|
(Optional) The name of the organization unit that is responsible for this CA.
|
| ORGANIZATION
|
(Optional) The name of the organization that is responsible for this CA.
|
| LOCALITY
|
(Optional) The name of the city.
|
| STATE
|
(Optional) The name of the state or region.
|
| COUNTRY
|
(Optional) The two-letter abbreviation for the country.
|
For example:
create_ca.sh -CN “Basic Certification Authority” -E “youremail@yourdomain.com” -OU “Department” -O “Genesys Telecommunication Labs” -L “Daly City” -S CA -C US
|
4. Generate certificates as required. To generate a certificate for a particular host computer, go to the CA directory in which the CA files are stored, and run the create_cert.sh script from the bash shell by specifying the parameters (see the following table) in the following command line:
create_cert.sh [-keySz KEY_SIZE] [-time VALID_TIME] [-dgst DIGEST_ALGORITHM] -host HOST_NAME -CN COMMON_NAME [-IP HOST_IP] [-E EMAIL] [-OU ORG_UNIT] [-O ORGANIZATION] [-L LOCALITY] [-S STATE] [-C COUNTRY] [-SANdomain "list"] [-SANip "list"]
The parameters are described in the following table:
[+] Show table
| Parameter
|
Description
|
| KEY_SIZE
|
(Optional) The size, in bits, of the host private key. The default value is 2048 bits.
|
| VALID_TIME
|
(Optional) The amount of time, in days, that the certificate is valid. The default value is 100 days.
|
| DIGEST_ALGORITHM
|
(Optional) Digest algorithm to use on certificate generation. The default value is sha256. Valid values are:
sha1 (not recommended), sha224, sha256 (default), sha384, and sha512.
|
| HOST_NAME
|
(Mandatory) The full name of the DNS host.
|
| COMMON_NAME
|
(Mandatory) The name of the host.
|
| IP HOST_IP
|
(Optional) The host IP.
|
| ORG_UNIT
|
(Optional) The name of the organization unit.
|
| ORGANIZATION
|
(Optional) The name of the organization.
|
| LOCALITY
|
(Optional) The name of the city.
|
| STATE
|
(Optional) The name of the state or region.
|
| COUNTRY
|
(Optional) The two-letter abbreviation for the country.
|
| SANip "list"
|
(Optional) Comma-separated Subject Alternative Name list. Should contain IPs.
|
| SANdomain "list"
|
(Optional) Comma-separated Subject Alternative Name list. Should contain domain names.
|
For example:
create_cert.sh -host myHOST.domain1.domain2.com -CN myWorkstation
|
5. If you are installing certificates on any Java-based PSDK applications that cannot get the certificate information from Configuration Server, convert the private key file to PKCS #8 format. Use the following command:
convert_priv_key.sh -in INPUTFILE -out OUTFILE [-informat pfx|pkcs8|pkcs12|rsa] [-outformat pkcs8|rsa] [-encrypt]
The parameters are described in the following table:
[+] Show table
| Parameter
|
Description
|
| INPUTFILE
|
Input private key filename.
|
| OUTFILE
|
Output private key filename.
|
| -informat
|
(Optional) Input private key format. For .pem private key files, use rsa Default is rsa.
|
| -outformat
|
(Optional) Output private key format. For PSDK, use pkcs8. Default is pkcs8.
|
| -encrypt
|
(Optional) Use password encryption for the resulting private key file. Password will be requested interactively.
|
| ORG_UNIT
|
(Optional) The name of the organization unit.
|
|
Certificate Authority Files
After successful script execution, the following data structure is created:
- ca_conf—This directory contains the following files:
- ca_cert.pem—The CA self-signed certificate file for UNIX (or any other implementation where pkcs#8 format is required)
- ca_cert.pfx—The CA self-signed certificate file for Windows or Java (any other implementation where pkcs#12 format is required).
Important
You must copy
ca_cert.pem and
ca_cert.pfx to each computer that will host Genesys components that might require secure data exchange, even if client certificates are not required.
- ca_priv_key.pem—The CA private key.
This file is used to sign all certificates that this CA issues. This file must be read-only, and it must be readable only by the CA administrator account.
- ca.db—The internal CA database used by the OpenSSL toolkit.
- serial.num—The internal CA file that contains the serial number of the next generated certificate. The serial number is a unique identifier of the certificate that the CA issues.
- ca.conf—The internal CA configuration file.
- repository—This directory contains the files that this CA generates.
Host Certificate Files
After successful script execution, the following files are created in the repository directory:
- <serial_#>_<host_name>_cert.pem—The host certificate for UNIX.
- <serial_#>.pem—The auxiliary file for certificate generation for UNIX.
- <serial_#>_<host_name>_priv_key.pem—The host private key for UNIX.
- <serial_#>_<host_name>_cert.pfx—The PKCS (Public-Key Cryptography Standards) #12 file format, including the private key and certificate for Windows.
where:
- <serial_#> is the serial number of the generated certificate. This number is unique for all certificates that this CA generates.
- <host_name> is the name of your host computer, which is the first part of the full DNS host name.
Certificate Revocation Lists
Revocation lists are maintained using plain text files when certificates are managed using OpenSSL or Genesys Security Pack. See Securing Connections Using TLS for details about how to configure Certificate revocation functionality for native applications that rely on Genesys Security pack. Note that for Windows native and .NET applications you must turn off certificate revocation and check if your certificates are produced as discussed in this section.
Generating Certificates Using Windows Certificate Services
This section describes how to create certificates using Windows Certificate Services. If necessary, you can also obtain a certificate from a remote machine. Use these certificates if you intend to run all of your applications on Windows. If you intend to run one or more applications that might require secure connections on UNIX, Genesys strongly recommends that you use OpenSSL to create your certificates. Make sure that certificate templates are properly configured for server and GUI applications to satisfy requirements for necessary certificate attributes, discussed above.
Important
The examples provided in this section assume that Windows Certificate Services have been installed and configured. For information about how to install and configure Windows Certificate Services, see the appropriate Windows documentation.
Generation Process
To generate certificates with Windows Certificate Services, do the following:
1. Generate a certificate on a computer that is running the Windows Server operating system, and that has Windows Certificate Services installed and configured.
[+] Show Steps.
- Open a web browser, and enter the following URL:
http://<server-name>/certsrv
where <server-name> is the server that runs the Windows Server operating system, and on which Windows Certificate Services is installed and configured.
- On the Microsoft Certificate Services Welcome page, click Request a certificate.
- On the Request a Certificate page, click Advanced certificate request.
- On the Advanced Certificate Request page, click Create and submit a request to this CA.
- On the subsequent Advanced Certificate Request page, enter the following information:
- In the Certificate Template section, select an appropriate certificate template—for example, MutualTLS2.
- Enter the full Name of the DNS host as a Fully Qualified Domain Name.
- In the Key Options section:
- Select Create new key set.
- In the Key Size text box, specify the size of the key.
- Select either Automatic key container name or User specified key container name, as appropriate.
- Select Mark key as exportable.
- Click Submit.
After you submit the certificate request, the confirmation page appears, followed by the Certificate Issued page.
- On the Certificate Issued page, click Install this certificate.
- After you accept the system warning prompts that appear, the Certificate Installed page appears.
|
2. If you did not install the certificate in Step 1, retrieve and install it.
[+] Show Steps
- On the Microsoft Certificate Services Home page, click View the status of a pending certificate request.
- Select the appropriate request from the list.
If the certificate request is approved, the Certificate Issued page appears.
- Click Install this certificate to install the certificate.
|
| 3. Configure Microsoft Management Console (MMC). You can use MMC to manage certificates on a Windows platform. See Configuring MMC for Certificate Management.
|
| 4. Install the certificate and private key on the computer that hosts Genesys applications. If this computer is different from the one on which you generated the certificate, you must first export the certificate and its private key.
|
Certificate Revocation Lists
The Microsoft SChannel security provider retrieves Certificate Revocation List (CRL) information for the certificate being verified using a CRL distribution point (CDP) mechanism. If the CDP URL specified in the certificate is not reachable from the current host (or is blocked by a firewall or other network policy), the process of certificate verification might pause for a time interval specified in system settings (15 seconds by default). This might be because the CDP URL is accessible but resides on a slow network resource, or connection quality may be very low, resulting in significant delays when retrieving the CRL. This might lead to various undesired consequences. To avoid these problems, Genesys strongly recommends that you use a local CDP in certificates and make sure all CDPs are accessible without any significant delay. You can also turn off CRL verification using Windows tools; refer to the documentation for your version of Windows.
Installing Certificates on Windows for Native Applications and Applications with a .NET Dependency
Important
For server applications, the certificates must be installed under the Local Computer account. For desktop applications, the certificates must be installed under the Current User account. For more information, see
Managing Certificates in MMC.
To install the certificates, use the following procedure:
[+] Show steps
- From the Windows Start menu, select Run, and then execute the mmc command to start the Microsoft Management Console (MMC).
- On the left pane of MMC, click the Certificates folder. (If there is no Certificates folder on the left pane, see Managing Certificates in MMC.
- Right-click the Trusted Root Certification Authorities folder, and select All Tasks > Import from the shortcut menu. This starts the Certificate Import Wizard.
- On the first Wizard page, click Next.
- On the File to Import page, type the full path to the ca_cert.pfx file or use Browse to navigate to the ca_cert.pfx that was created during CA setup. Make sure you select All Files for the Files of type option, and then click Next.
- On the Certificate Store page, select Place all certificates in the following store. Make sure that the Certificate store text box is set to Trusted Root Certification Authorities. Click Next.
- Click Finish.
- On the left pane, click the Certificates folder.
- On the left pane, right-click the Personal folder, and select All Tasks > Import from the shortcut menu. This starts the Certificate Import Wizard.
- On the first Wizard page, click Next.
- On the File to Import page, type the full name of the <serial_#>_<host_name>_cert.pfx file that was created during certificate generation. Click Next.
- On the Password page, click Next. The host certificates in PKSC #12 format are generated with an empty password.
- On the Certificate Store page, select Place all certificates in the following store. Make sure that the Certificate store text box is set to Personal. Click Next.
- Click Finish.
- Press F5 to update the MMC view.
- On the left pane, select Certificates > Personal > Certificates.
- On the right pane, locate the imported certificate in the list, and double-click it.
- In the Certificate dialog box, click the Details tab.
- To view the certificate thumbprint, select Thumbprint from the list. The thumbprint, consisting of a string of hexadecimal digits, appears in the lower part of the dialog box.
Managing Certificates using MMC on Windows
You can use the Microsoft Management Console (MMC) to manage certificates on a Windows platform.
Configuring MMC for Certificate Management
To configure MMC for certificate management:
[+] Show steps
- From the Windows Start menu, select Run, and execute the mmc command to start the Microsoft Management Console.
- Select File > Add/Remove Snap-in.
- In the Add/Remove Snap-in dialog box, click Add.
- In the Add Standalone Snap-in dialog box, select Certificates from the list and click Add.
- In the Certificates snap-in dialog box, select Computer account and click Next.
Important
To manage certificates for client applications, select
My user account.
- In the Select Computer dialog box, select Local computer and click Finish.
- In the Add Standalone Snap-in dialog box, click Close.
- In the Add/Remove Snap-in dialog box, click OK.
The Certificates item is added under Console Root on the left pane.
You can save the MMC configuration in a file by selecting File > Save As.
Exporting Certificates
If the computer that is running Genesys applications is different from the one on which you generated the certificate, you must first export the certificate and its private key, as follows:
[+] Show steps
- From the Windows Start menu, select Run and execute the mmc command to start the Microsoft Management Console.
- Open your saved console configuration, or select File > Add/Remove Snap-in.
- In the Add/Remove Snap-in dialog box, click Add.
- In the Add Standalone Snap-in dialog box, select Certificates from the list and click Add.
- In the Certificates snap-in dialog box, select Computer account and click Next.
- In the Select Computer dialog box, select Local computer and click Finish.
- In the Add Standalone Snap-in dialog box, click Close.
- In the Add/Remove Snap-in dialog box, click OK.
The Certificates item is added under Console Root on the left pane.
- On the right pane, right-click the certificate in the list. Select All Tasks > Export from the shortcut menu to start the Certificate Export Wizard.
- On the first Wizard page, click Next.
- On the next page, select Yes, export the private key, and click Next.
- On the Export File Format page, the only available export file format will be PKCS #12. Click Next.
- On the Password page, type and confirm your password. Click Next.
- On the File to Export page, specify the path and file name for your certificate. Click Next.
- Click Finish to complete the export procedure.
Obtaining Certificates from a Remote Computer
To obtain a certificate from a remote computer:
[+] Show steps
- From the Windows Start menu, select Run, and execute the mmc command to start Microsoft Management Console.
- Select File > Add/Remove Snap-in.
- In the Add/Remove Snap-in dialog box, click Add.
- In the Add Standalone Snap-in dialog box, select Certificates from the list. Click Add.
- In the Certificates snap-in dialog box, select Computer account and click Next.
- In the Select Computer dialog box, select Another computer and either type the name of the remote target computer or click Browse to search for it. Click Finish.
- In the Add/Remove Snap-in dialog box, click OK.
A new snap-in item is added under Console Root in the main snap-in console window.
You can browse for examples of all the certificates on the target computer, or you can view information about a particular certificate. Depending on the options that you select, MMC also enables you to remotely manage certificates on a target computer.
- On the left pane, select Certificates > Personal > Certificates.
- On the right pane, double-click the certificate in the list.
- In the Certificate dialog box, click the Details tab.
- Select Thumbprint from the list. The value, consisting of a string of hexadecimal digits, appears in the lower part of the dialog box.
- Use the string of hexadecimal digits for the security configuration.
Installing Certificates on UNIX for Native Applications
Important
You must install the CA self-signed certificate file,
ca_cert.pem, the certificate issued by this CA
<serial_#>_<host_name>_cert.pem, and the certificate private key
<serial_#>_<host_name>_priv_key.pem on each computer that hosts Genesys Server applications that might require secure data exchange.
- Copy the ca_cert.pem file to the computer.
- Copy the certificate and private key files to a local directory on the computer, as follows:
<serial_#>_<host_name>_cert.pem
<serial_#>_<host_name>_priv_key.pem
- Make sure that these files are readable by all Genesys applications that are running on this host computer.
Warning
The
<serial_#>_<host_name>_priv_key.pem file contains critical security information. Make sure it can only be accessed by personnel authorized to work with this type of information.
Installing Certificates for Applications with Java dependency
If the Java application is using the file system to access certificates, follow the steps described for native applications using Genesys Security Pack, ensuring that <serial_#>_<host_name>_cert.pem and the private key file is converted to PKCS#8 format <serial_#>_<host_name>_priv_key_NEW.pem.
If the Java application is using a certificate store, for the instructions in Java documentation to install the certificates, ensuring that <serial_#>_<host_name>_cert.pem is converted to PKCS#12 (pfx) format . Typically you will:
- Use the Java command keytool –import x –file y –keystore z.
- If not already created, create a password for the keystore.
Tip
Genesys recommends that you use PEM files with PSDK Java for consistency.
Installing Genesys Security Pack
Important
The Security Pack on UNIX must be installed on each UNIX host computer on which Genesys native applications that use TLS are installed.
Tip
Along with libraries and scripts, a file README.version is installed as a part of Security Pack. If you have to report any security-related issues, you must also include the (cut-and-pasted) contents of this file. The information in this file contains complete Security Pack version information, which is difficult to obtain otherwise.
For information about the operating systems supported by the Security Pack on UNIX, refer to the Genesys Supported Operating Environment Reference Guide.
Genesys Security Pack is consistent with Federal Information Processing Standards (FIPS) starting in release 8.1.1. For information about these standards, and how to enable FIPS in Genesys software, refer to the FIPS section of this Guide.
To install Security Pack, complete the following steps:
- Install the Security Pack on each UNIX host with which secure connections will be configured:
[+] Show steps
- On the Security Pack product CD, in the security_pack directory, open the directory corresponding to your operating system, and locate the shell script called install.sh.
- Run this script from the command prompt by typing the following at the command line:
- When prompted, specify the host name of the computer on which you want to install the Security Pack.
- Specify the full path to the directory in which you want to install the Security Pack. The installation process places the Security Pack in this directory. It also places the following scripts that are used by the OpenSSL tool in that directory:
- create_ca.sh—Creates the CA structure in which CA files and generated certificates are stored.
- create_cert.sh—Creates the certificates to use on UNIX and Windows computers.
Important
- Along with the necessary libraries and scripts, a file README.<version> is installed as part of Security Pack. Contents of this file must be reported (copied and pasted) with any security-related reported issues. This file contains complete Security Pack version information, which can be difficult to obtain otherwise.
- For information about the installed files, see Certificate Generation and Installation.
When the installation process is finished, a message appears, indicating that the installation was successful.
- Set the environment variable that corresponds to your operating system (see the following table), to the path to the Security Pack libraries.
| Operating System
|
Environment Variable Name
|
| AIX
|
LIBPATH
|
| Linux
|
LD_LIBRARY_PATH
|
| Solaris
|
LD_LIBRARY_PATH and/or LD_LIBRARY_PATH_64
|
Warning
Access permissions to the path to the Security Pack libraries, and the libraries themselves, must be set to enable Genesys applications to access them. If necessary, use the
chown command to change the access permissions, as follows:
sudo chown <account name> -R <path to Security Pack libraries>

