Contents
Common forecasting tasks
In some cases, Workforce Management (WFM) enables you to complete the same task in more than one Forecast view. In this topic, you'll find descriptions and procedures to help you complete these common tasks.
Adding and removing activities
Add or remove activities or multi-site activities (MSA) in open scenarios by using the Add activities and Remove activities icons in the toolbar in all Scenarios views (Volumes, Staffing, Shrinkage).
Adding activites or MSA
To add activities or MSA to an existing forecast:
- Open a scenario.
- In the toolbar, click Add activities
 .
.
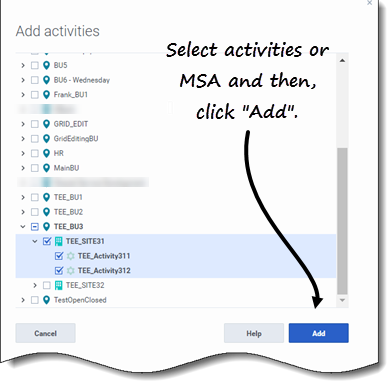
- The Add activities dialog open.
- Expand the tree to select the activities you want to add.
- You can select from multiple sites.
- Click Add.
- When processing is complete, click OK.
Click Cancel at any time to cancel the action and close the dialog.
Removing activities or MSA
To remove activities or MSA from an existing forecast:
- Open a scenario.
- In the toolbar, click Remove activities
 .
.
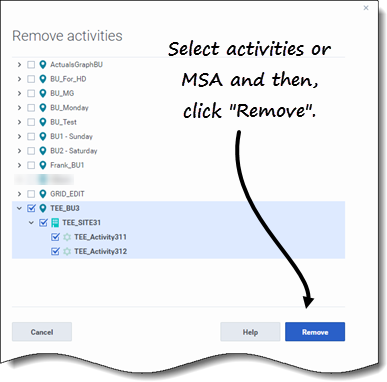
- The Remove activities dialog open.
- Expand the tree to select the activities you want to remove.
- You can select from multiple sites.
- Click Remove.
- When processing is complete, click OK.
Click Cancel at any time to cancel the action and close the dialog.
Saving forecasts as templates
Reuse data in an existing scenario or Master Forecast by using the Save as Template wizard to create a forecast template. You can use this wizard in all Scenarios and Master Forecast views.
To save the forecast as a template:
- Open a scenario or Master Forecast.
- In the Objects pane, select an activity or multi-site activity (MSA).
- This enables the Save as template option.
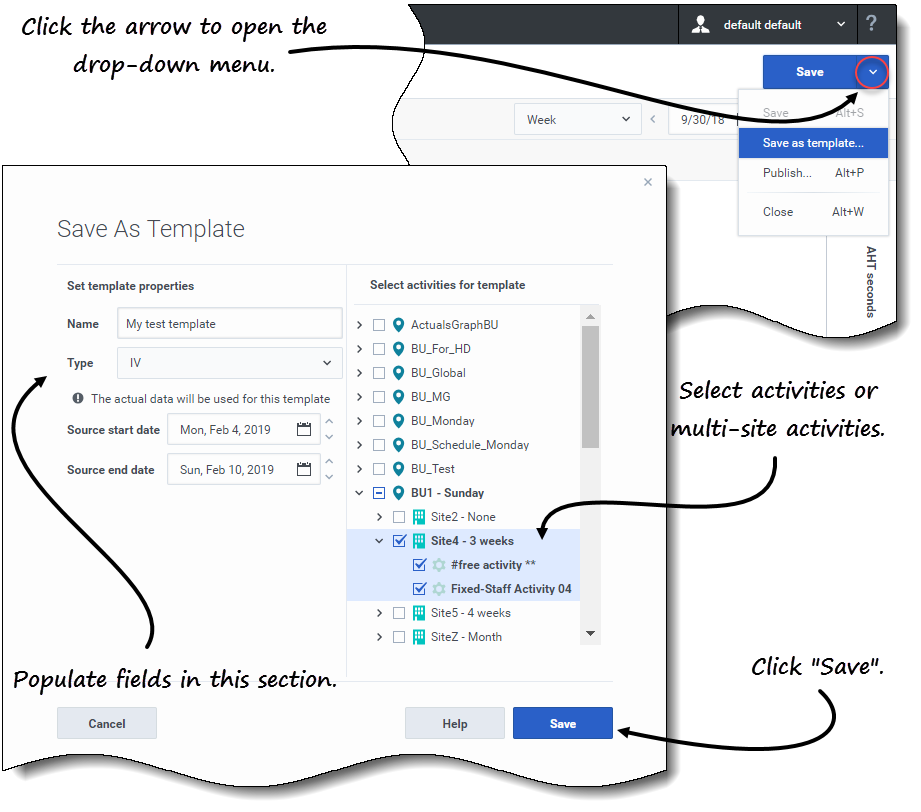
- In the top-right corner of the view, click the down arrow on the Save button.
- When the drop-down menu opens, select Save as template....
- The Save As Template dialog opens.
- In the Name field, enter a name for the new template.
- Select the template type from the Type drop-down list (IV or AHT if opened in the Volumes view).
- This field has a prepopulated value that cannot be changed when you open this dialog in the Staffing or Shrinkage view.
- Select or enter the Source start date and Source end date into the corresponding fields.
- Expand the list of objects on the right to select activities or multi-site activities to use for this template and click Save.
- When the saving process is complete, click OK.
- The new forecast template appears in the Templates view.
- Alternatively, click Cancel to cancel the action and close the dialog.
Commenting in forecasts
Add, open, edit, delete, and sort comments in scenarios or Master Forecasts by using the Comments dialog. You can open this dialog in all Scenarios and Master Forecast views. Watch the video.
Adding and opening comments
To add comments to a forecast:
- Open a scenario or Master Forecast view.
- In the Objects pane, expand the tree and select an activity or multi-site activity.
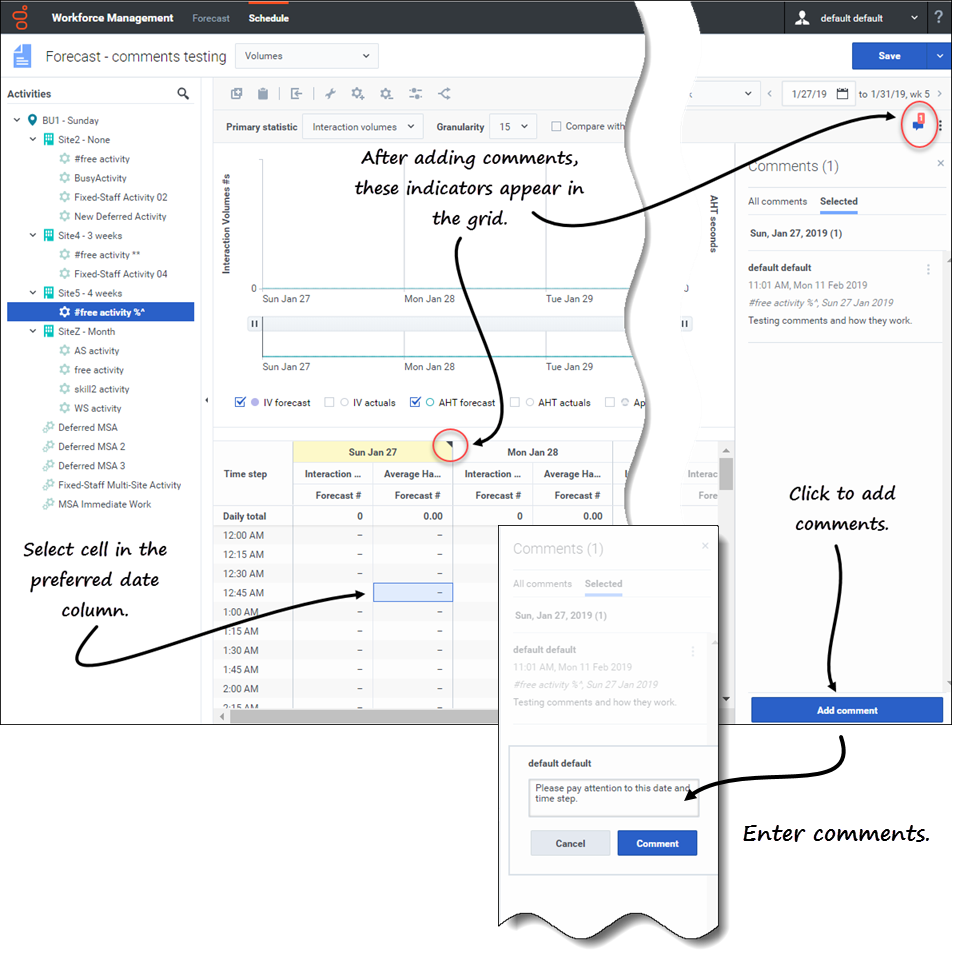
- In the grid, select a cell in the date column where you want to add comments.
- Click Comments
 in the upper-right corner of the view.
- The Comments pane opens.
- Click Add comment.
- Enter your comment in text field (2000 characters, maximum) and click Comment.
- The comment displays on the Selected tab.
After adding comments for a specified date:
- If the selected period is weekly, the column header in the grid displays in yellow. A triangle in the upper-right corner indicates that there are comments for that date.
- If the selected period is monthly or yearly, the cells in the row for that date appear in yellow with the triangle in the upper-right corner.
- In the upper-right corner of the view, the Comments icon shows the total number of comments in red for the selected activity or multi-site activity.
Open the Comments pane in one of two ways:
- Click the triangle in the date cell.
- The Selected tab opens, by default.
- Select an activity and then, click Comments in the upper-right corner of the view.
- The All comments tab opens, by default. If there are no comments for the selected activity, the No comments message displays.
If you select a range of date cells, the Selected tab opens displaying the comments for the first selected date. If you select a date cell that has no comments, the Selected tab opens displaying No comments.
If there is more than 3 lines of text, click More to see the entire comment. Click Less to hide it.
Close the Comments pane by clicking the X in the upper right corner of the pane.
Editing, deleting, and sorting comments
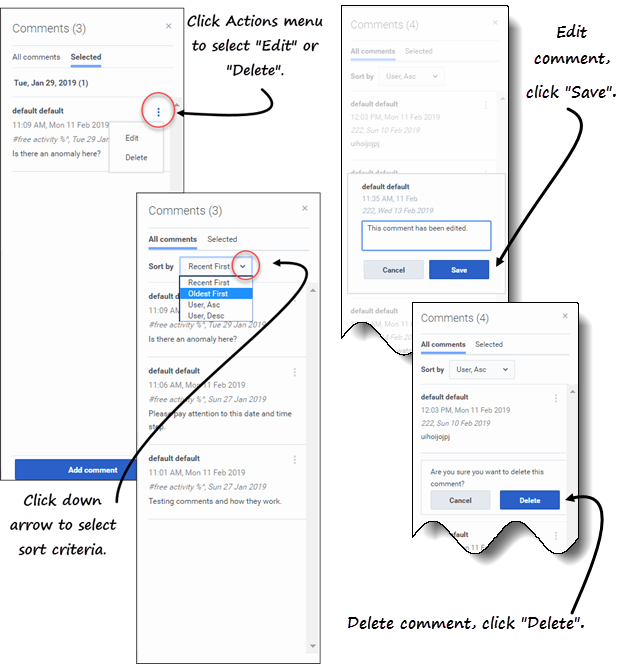
To edit comments:
- Open the Comments pane.
- In the comment you want to edit, click Actions
 to open the drop-down menu.
 - Select Edit.
- When the text box opens, edit the comment.
- Click Save.
You can edit only the comments you created. If you click a comment created by someone else, Delete is the only option displayed in the Actions menu.
To delete comments:
- Open the Comments pane.
- In the comment you want to delete, click Actions to open the drop-down menu.
- Select Delete.
- When asked to confirm the deletion, click Delete.
To sort comments:
- Open the Comments pane.
- Select the tab you want to sort.
- In the Sort by field, click the down arrow to open the menu.
- Select one of four sort criteria: Recent First, Oldest First, User, Asc, or User, Desc.
- The list of comments sorts according to the selected criteria.
The Sort by field is visible only if there are two or more comments in the tab. Selecting User, Asc or User, Desc sorts comments by the user's name in ascending or descending order. Recent First is the default sort order.
Click Cancel at any time to cancel the action when adding, editing, and deleting comments.
Using Search to find objects
Find activities quickly in Scenarios and Master Forecast views by using Search in the Objects pane. Click the ![]() icon at the top of the Objects pane to show or hide the Search field. You can use this search function in all Scenarios and Master Forecast views.
icon at the top of the Objects pane to show or hide the Search field. You can use this search function in all Scenarios and Master Forecast views.
To use search to find objects quickly:
- Open any one of the Scenarios or Master Forecast views.
- If you are in the Scenarios view, click the Actions
 menu and open a scenario.
 - In the Objects pane, click Search
 .
.
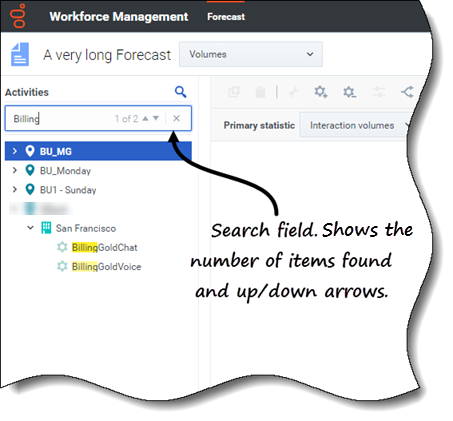
- The Search field is displayed.
- Enter the search criteria. For example, the name of an object (business unit, site, activity, multi-site activity).
- WFM highlights any matching text as you type.
- Click Enter.
- WFM expands the list to show the number of matching objects found and shows the number of matching items in the Search field, together with up/down arrows.
- Click the up or down arrow until you find the object you're searching for.
- Click x to clear the Search field and start a new search.
If WFM does not find matches for the search criteria you've entered, WFM displays 0 of 0 found and no text is highlighted in the list of objects.

