
Contents
Application Configuration
The Application Configuration page is used for configuration of:
- Rollups (or aggregations)
- Associations between applications and agent groups
- Details of applications

Base objects become available for Application rollup configuration (that is, they start appearing on the Available Applications and Available Agent Groups panes of the Advisors Application Configuration page), once they are selected on the Base Object Configuration page. From this point, virtual queues, ACD queues, calling lists, interaction queues, and DN Groups are referred to as Advisors applications.
To configure the hierarchy displayed on the Contact Center Advisor (CCAdv) dashboard and control how applications' metrics are rolled up, you need to create associations between:
- Applications and the business attributes, such as Contact Centers, Application Groups, Reporting Regions, and Operating Units.
- Applications and agent groups
After these associations are established, the aggregation structure becomes available for CCAdv and WA rollup engines and for the Advisors dashboard hierarchy presentation mechanism. In the Advisors administration module, the associated applications and agent groups become visible on the Assigned Applications and Assigned Agent Groups panes of the Application Configuration page.
If you deselect base objects on the Base Object Configuration page, those objects will also disappear from the Available panes of the Advisors Application Configuration page. The objects that were already assigned to the business attributes at the time that the related base objects were deselected on the Base Object Configuration page will be made invisible for CCAdv and WA rollup engines and disappear from the Advisors dashboards. However, deselected objects remain on the Assigned panes of the Advisors Application Configuration page until the associations with business attributes are explicitly removed by an Advisors administrator. If such associations are not removed, and the deselected base objects are later restored, the related Advisors applications and agent groups again become visible for CCAdv and WA rollup engines and re-appear on the CCAdv and WA dashboards.
There are no direct access permissions to applications or agent groups granted to the Advisors users. The visibility of the applications and agent groups on the dashboards is established through access to the business attributes associated with them. Data relating to or depending on business attributes to which users do not have any access permissions will not be displayed.
Access to Advisors business attributes must be configured by an administrator in the Configuration Server used in the Advisors installation.
The process of configuring applications that originate from different base objects is the same. There are, however, some specifics associated with the properties of the base objects that you must consider:
- Interaction queues and DN Groups are not associated with any specific switch. This means that the technical names of the applications originating from these base objects will not contain any switch name.
- DN Groups are, technically-speaking, aggregations of queues. DN Groups can aggregate queues that come from multiple switches. Genesys recommends that you avoid including both a DN Group and a queue (queues) aggregated by the DN Group in the Advisors rollup.
Rollups
The Rollups tab allows you to define how information displays, summarizes, expands, and contracts in the Contact Centers pane on the dashboard.
You assign a contact center, an application group, and a reporting region or operating unit to an application. These assignments are required for the application to display on the dashboard and to be included in the metric rollup for the specific grouping.
You have the option to do bulk configuration of rollup relationships for CCAdv and WA. For information about bulk configuration, see the Performance Management Advisors Deployment Guide.
Filtering the Display of Rollups
You can filter the list of objects in the Rollups display.
Filter by business object and other properties using the menus and the Filter button at the top of the page.
Filter by object type for a contact center using the check boxes that appear at the top of the Rollups tab.
- Voice Queues: For a Genesys data source, select the Voice Queues check box to display the virtual queues, ACD queues, and DN Groups.
- Interaction Queues: For a Genesys data source, select the Interaction Queues check box to display the interaction queues for chat and email.
- Call Types: For a CISCO data source, select the Call Types check box to display the call types.
- Services: For a CISCO data source, select the Services check box to display the services.
Sorting the Display of Rollups
To sort the data in the Rollup table, click a column heading. The arrow in the down or up position indicates which column is sorted.
Assign and Unassign Applications for Rollup
Procedure:
Steps
- Select Rollups.
Use the filter buttons at the top of the page to filter the displayed list of records.
Select one or more applications from the Available Applications table by checking their check box(es).
Click the Assign button. The screenshot shows the Assign Rollups dialog.
 Assign Rollups pageTipThe Assign Rollups dialog does not appear if the required related business attributes were already specified in the filter options. If only some of the mandatory objects are specified, then only the remaining missing ones need to be specified.
Define the rollup by selecting the Contact Center, Application Groups, Operating Unit and/or Reporting Region for this application from the drop-down lists of options.
If you did not select a filter to display the data in the tables, the following defaults are applied:
- SL Threshold Time: 20 sec
- Zero Suppress: No
- Display on Dashboard: Yes
- Include in Rollup: Yes
If you did select a filter, then the values in the filter are applied.
Click Assign to save the changes.
To unassign an application, check its check box in the Assigned table, and click Unassign. No confirmation message is displayed.

Edit an Application Rollup
Procedure:
Steps
Select Rollups.
Use the filter buttons at the top of the page to filter the displayed list of records.
Select an application from Available Applications by checking its check box. You can select multiple applications in the same way. The changes you make will apply to all the applications you select. To navigate to the next or previous page, use the page controls.
Click Edit.
Use the drop-down lists on the Edit Rollups dialog to specify a value for each of the following:
- Contact Center
- Application Group
- SL Threshold Time
- Zero Suppress
- Reporting Region
- Operating Unit
- SL Threshold Time
- Include in Rollup
- Zero Suppress
- Display on Dashboard
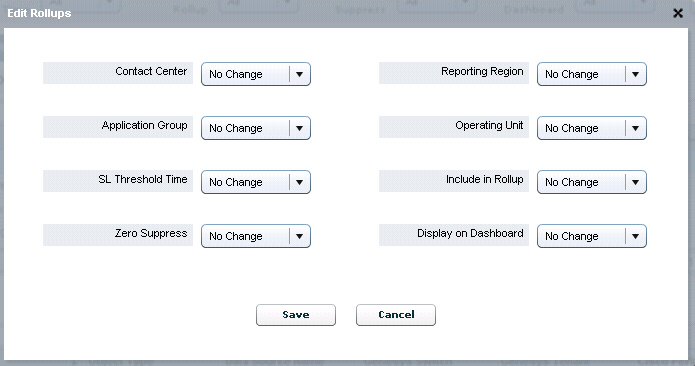 Edit Rollups page
If Include in Rollup is set to No and Display on Dashboard is set to Yes, the application’s metrics values will not contribute to rolled up values, but the application will still appear in the Applications pane when you select the appropriate grouping.
Genesys recommends selecting No for Include in Rollup and Yes for Display on Dashboard only for IVR/VRU-related applications in which you want to display IVR performance in the Applications pane, but not in the Contact Centers pane. The IVR should handle 100% of the calls and the performance could indicate whether or not this is happening or if there might be a problem. In this case, including these numbers in the rollup would inflate the performance of call handling by the agents.
For the violations triggered by threshold rules on an application’s metrics to display on the dashboard, you must select Yes for Include in Rollup.
ImportantYou cannot select an agent group contact center on the Application configuration rollup tab. The association of the application and an agent group contact center is created behind the scenes once you map agent groups to the application and then map the agent groups to the agent group contact center. To map agent groups to agent group contact centers, go to the Agent Group Configuration page.

Applications – Agent Groups tab
For agent groups to display on the dashboard, the Application-to-Agent Group relationship must be created.
The Applications-Agent Groups tab allows you to maintain the associations between applications and agent groups. The screenshot shows the Applications – Agent Groups tab.

You can opt to display either descriptive or technical names of objects by clicking the Display Descriptive Names or Display Technical Names link.
To see the agent groups available to assign to an application, and those already assigned to it, select the application.
Only the agent groups from the same external data source display for the selected application.
You can reverse the order of display by selecting the relevant radio button. When the agent groups display in the left-most pane, select an agent group to see the applications available to assign to the agent group, and those already assigned to it.
Maintaining Applications-Agent Groups Assignments
Multiple edits are not available for assigning lists of agent groups to lists of applications in the administration module. You must edit individual applications to associate with a list of agent groups, or individual agent groups to associate with a list of applications.
Procedure:
Steps
- Select the Applications-Agent Groups tab.
- Select an application or agent group from the left panel. This displays the already assigned applications or agent groups in the Assigned panel on the right. Applications or agent groups that are available for assignment appear in the Available panel.
- To move an object between the Available and Assigned panels, check its check box and click either the up or down arrow between the two panels.
- Click Save.
Application Details
You use the Application Details tab to maintain all the details of an application other than its technical name. The screenshot shows the Application Details tab.

Maintaining application details
Procedure:
Steps
- Click the Application Details tab.
- Edit the details as follows:
- Descriptive Name: Descriptive names display on the dashboard. Hovering over the descriptive name displays the technical name.
- SL Threshold Time: Applicable only to ACD queues, virtual queues and DN Groups. Select a value from the drop-down list. The list of available SL threshold times is predefined. To add additional entries to this list, new entries can be added to the Platform database table SL_THRESHOLD.
- Include in Rollup: Check the box to include the application in rollups.
In addition to this setting, the application must be configured, which means that it must be related to a contact center, application group, reporting region, and/or operating unit.
See Edit an Application Rollup for further information on this option. - Zero Suppress: Check the box to zero-suppress the application. (See Zero Suppression.)
- Display on Dashboard: Check the box to display the application on the user dashboard.
In addition to this setting, the application must be configured, which means it must be related to a contact center, application group, reporting region, and/or operating unit.
See Edit an Application Rollup for further information on this option.
- Click Save.
Application SL Threshold Time Setting Can Override the Time Range Setting
The SL Threshold Time set on the Application Configuration page overrides the Time Range setting at the application level for the default (out-of-box) Service Level metrics. The override is not applicable to custom Service Level metrics created for use in your enterprise. The Figure below shows the Time Range setting in the Report Metric Manager.

For information about changing the default Service Level threshold, see Change the Default Service Level Threshold Setting, which includes the list of default Service Level metrics.
Application-Agent Group Relationships Configuration and the CCAdv Dashboard
Certain specific dashboard functionality is activated when you configure relationships between:
- agent groups and applications
- applications and application groups or applications and contact centers
An application-agent group relationship is created when you assign an agent group to an application.
An application group-agent group relationship is created when you:
- Assign an agent group to an application that is related to an application group.
- Assign an application group to an application that is related to an agent group.
To delete an application-agent group relationship, remove the agent group from the application.
To delete an application group-agent group relationship, do one of the following:
- Remove the application group from all applications that are related to the agent group.
- Remove the relationship between the agent group and all applications that are related to the application group.
An agent group-contact center relationship is created when you:
- Assign an agent group to an application that is related to a contact center.
- Assign a contact center to an application that is related to an agent group.
To delete an agent group-contact center relationship, do one of the following:
- Remove the contact center from all applications that are related to the agent group.
- Remove the relationship between the agent group and all applications that are related to the contact center.
When you change object relationships as described above, there will be a delay in the presentation of the new relationships on the CCAdv dashboard. The CCAdv server checks for updates to this type of information only once each day, overnight. Until then, you will observe some inconsistencies in object relationships on the CCAdv dashboard. See the troubleshooting section, below, to find the sorts of inconsistencies that you can expect to see. Note, however, that there is no such delay related to metrics consistency when you update relationships as described above. Once the relationships are changed, the metric values that depend on the new relationships are correctly derived and displayed within a reasonable period of time.
Dashboard Functionality Dependent on Application-Agent Group Relationships
One of the features of the Contact Center Advisor dashboard is the ability to highlight relationships between objects. For example, selecting an application in the Applications pane should highlight, in the Agent Groups pane, the agent groups that are associated with that application. It is very important to correctly configure object relationships for the Advisors applications. Incorrect configuration of relationships in the administration module results in incorrect relationships on the users' dashboards.
Highlighting agent groups when applications are selected, and vice versa

Configuring correct relationships between applications and agent groups in the Advisors administration module supports the following dashboard functionality: when a user selects an application, the dashboard highlights the associated agent groups.
In the screenshot, you can see that selecting application 7014 in the Applications pane highlights the Group4 and Team4 agent groups in the Agent Groups pane on the CCAdv dashboard.
The reverse is also supported. When a user selects an agent group in the Agent Groups pane on the CCAdv dashboard, the dashboard highlights the associated application in the Applications pane.
In the following sample screenshot, selecting the Team4 agent group highlights application 7014 in the Applications pane. This indicates that Team4 is associated with the 7014 application.

Highlighting objects on the Contact Centers Pane

Configuring relationships between application groups and agent groups in the Advisors administration module determines which agent groups display in the Agent Groups pane when a user selects any kind of object at level 3 or level 2 in the Contact Centers pane. The screenshot shows the CCAdv Contact Centers pane, and identifies what we mean by levels 1, 2, and 3 in the hierarchy.
The type of objects that display at each level of the hierarchy is dependent on the hierarchical grouping that you selected at the top of the Contact Centers pane. The screenshot shows the ![]() hierarchical grouping on the left and the
hierarchical grouping on the left and the ![]() hierarchical grouping on the right.
hierarchical grouping on the right.
When a user selects an object of any kind at either level 3 or level 2 in the Contact Centers pane, the dashboard displays the agent groups and their related applications that are associated with the selected contact center and application group.
Note that all applications that belong to the selected contact center and application group are shown; the relationship to the level 1 grouping is ignored. For example, let's say that five applications are assigned to the same contact center, application group, and operating unit. Two of them are associated with Reporting Region 2 and the rest are associated with Reporting Region 1.

When the user selects Application Group 2 under either Reporting Region 1 or Reporting Region 2, the Applications pane shows, in both cases, all applications that belong to Application Group 2 and the related contact center.

Inconsistencies in Object Relationships on the CCAdv Dashboard
This section describes an object relationship display issue that dashboard users might experience, and provides information about the possible causes.
Issue
An agent group displays in the Agent Groups pane when the dashboard user selects an object on level 2 in the hierarchy (Figure 1, below), but does not display when that user selects the related object on level 3 in the hierarchy (Figure 2).

Possible Causes
- Inconsistent agent group display that is related to object selection in the CCAdv Hierarchy pane is a temporary state that can occur after a change in application-agent group relationships. When this is the cause, the inconsistency will go away during the overnight data update. If you do not want to wait overnight to see consistent results on the dashboard, and an application restart is allowed, then you – or an administrator with sufficient permissions – can restart the CCAdv XML Generator. The restart will reconcile all CCAdv dashboard presentation views based on the latest application-agent group relationship configuration. Note, however, that there is no such delay related to metrics consistency when you update the relationships. Once the relationships are changed, the metric values that depend on the new relationships are correctly derived and displayed within a reasonable period of time without any component restart or nightly update. For more information about Application-agent group relationships and their configuration, see Application-Agent Group Relationships Configuration and the CCAdv Dashboard, above.
- The primary CCAdv XML Generator application stopped running, and the backup application has taken over processing. The agent groups will be displayed for the object at level 3 in the hierarchy when the backup XML Generator reads the relationships during the overnight refresh.