
Contents
Using E-mail Notifications in WFM
This topic provides information about how to use the Notifications module in Workforce Management (WFM) Web for Supervisors to configure email notifications, by site, for the following types of events:
- Schedule trade status changes—This type of notification can be received by both agents and supervisors who are affected by a schedule trade proposal or response.
- Time off request status changes—This type of notification can be received by both agents and supervisors who are affected by a time off request.
- Schedule modifications—This type of notification can be received by the agent who is affected by the schedule change.
The Role of WFM Daemon
A standalone server component, WFM Daemon sends out notifications to agents and supervisors.
Agents and supervisors who are to receive email notifications must have their email addresses configured. These email addresses are stored as part of the Person object in the Genesys Configuration Database and are synchronized into WFM automatically.
Additionally, WFM must be set up properly and connected to a customer-supplied SMTP server. For details about how to configure WFM Daemon to send notifications, see WFM Daemon Options. After you complete these steps,
WFM sends notifications of the selected type(s).Schedule Trade Status Changes
WFM Daemon uses the following rules when sending schedule trade status change notifications:
- Both the proposing agent (creating the trade request) and responding agent (receiving the trade proposal) associated with the selected sites are notified when a trade status is User-declined, User-approved, Auto-declined, Auto-approved, or Cancelled.
- Supervisors who have appropriate security rights and are associated with the selected sites are notified when a trade status is Pending.
- Supervisors who have the appropriate security rights are notified when the Schedule Trade status changes from Pending to any other status.
- The responding agent is notified when the status of a trade proposal is In Review or Open.
- The proposing agent is notified when the response status of a trade proposal is Accepted, In Review, or Cancelled.
Time Off Request Status Changes
WFM Daemon uses the following rules when sending time off status change notifications:
- When a supervisor manually changes agent time off in the Calendar module, the affected agent is notified.
- When an agent requests time off (that is not Auto-declined), supervisors who have the appropriate security rights are notified.
- When automatic Time-Off request status changes occur, supervisors who have the appropriate security rights and affected agents are notified.
- When Time-Off balance-affecting changes occur, supervisors who have the appropriate security rights are notified.
For a complete description of the WFM security roles and privileges, see the Workforce Management Web for Supervisors Help topic Configuration > Roles.
Schedule Modifications
When a supervisor changes one or more scheduled days, WFM sends a schedule modification notification to the affected agent in the configured site and to supervisors who have the appropriate security rights.
Procedures: How to Set Up E-mail Notifications in WFM
To set up email notifications, complete all of the procedures in this section.
Creating and Configuring WFM Daemon
Purpose: To create and configure the WFM Daemon Application object.
Start of Procedure
- In Genesys Administrator, create the WFM Daemon Application and install it.
See Creating Application Objects Manually. - Configure the WFM Daemon’s connection to the WFM Server Application.
See Component Connections. - Configure the SMTP server settings for the WFM Daemon.
See the WFM Daemon's SNMP configuration section.
End of Procedure
Configuring a Security Role
Purpose: To create a user security role to access email notifications.
Start of Procedure
- In WFM Web for Supervisors' Configuration module, select Roles.
- In the Role pane, click New.
A new security role appears in the Role pane with a default name. - In the Role Privileges pane, change the Name of the role (if desired).
- In the list of Role Privileges, expand Notifications and check the boxes beside the privileges you want to assign to this role.
ImportantBe sure to uncheck all privileges in the entire list that you do not want to assign to this role.
- Click Save.
End of Procedure
Assigning a Security Role to a User
Purpose: To assign a security role to a user, enabling access email notifications.
Start of Procedure
- In WFM Web for Supervisors' Configuration module, select Roles.
- At the top of the Role Privileges pane, click Users, and choose one of the following:
- Click Assign Users to assign a WFM user to this role.
A new pane opens, containing a list of WFM users. - Click Import Genesys User to assign a Genesys user to this role.
A new pane opens, containing a list of Genesys users (in Genesys Administrator).WarningNew users are automatically granted access to all modules, objects, and sites
End of Procedure
Adding E-mail Addresses to the WFM Database
Purpose: To add Supervisor and Agent email addresses to the WFM Database, so they can receive notifications.
Start of Procedure
- In Genesys Adminstrator, enter these email addresses into the Supervisor and Agent person objects.
After WFM synchronization the email address will be available in the WFM Database.
End of Procedure
Enabling Notifications in Web Supervisor
Purpose: To configure the Web Supervisor Application to enable notifications.
Start of Procedure
- In WFM Web Supervisors' Configuration module, select Notifications.
All three supported email notification types are listed in the left-side navigation pane. - Select the one that you want to enable and in the right-side pane, click the Targets tab.
- Check the sites for which you want to enable notifications. See the figure below.
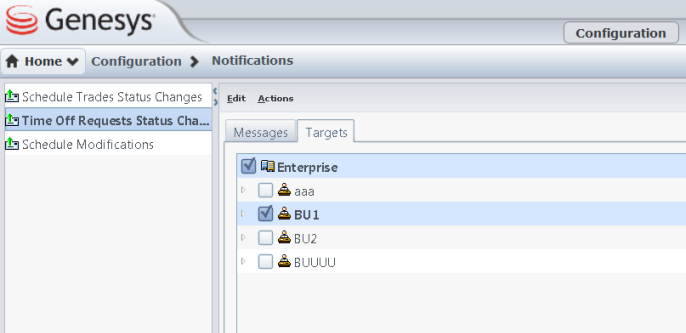
Figure: WFM Web Supervisor, with Notifications Selected - Use the Messages tab to configure the email Subject and Message for all email notifications of this type. You can change the text or keep the default.
If the WFM Daemon is running and properly connected to a running SMTP server, you can now use the feature. (You can check WFM Daemon’s status in the Windows Services Control Panel or through Solution Control Interface.)
For additional information, including descriptions of the rules that generate notifications, see The Role of WFM Daemon.

End of Procedure