Contents
WhatsApp Message Templates
This page explains how to create a structured message for WhatsApp.
Structured messages for WhatsApp (also known as message templates) use specific message formats that your company can use to notify customers about things such as an upcoming appointment or promote a product with a marketing message. You can use eServices Manager to create and format the structured message for WhatsApp.
Click here for the message template request form.
Starting June 1, 2023, WhatsApp is expanding their conversation-based pricing model to move from two conversation categories (User-initiated and Business-initiated) to four categories. Business-initiated conversations will be unbundled into three categories reflecting three key use cases: Utility, Authentication and Marketing. User-initiated conversations will be renamed to Service conversations. We have updated the request form to account for these categories when selecting your Template Category.
Before you begin filling in this form, be sure to check out the following articles from WhatsApp:
- Updates to Conversation-based Pricing
- New Guidelines for Utility, Authentication and Marketing Templates
- Additional information on Message Templates
Creating a structured message for WhatsApp
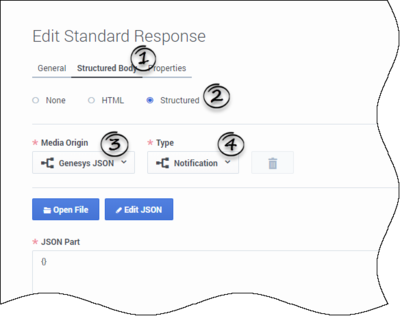
- Create a standard response.
- Go to the Structured Body tab.
- Select Structured.
- In the Media Origin menu, select Genesys JSON.
- In the Type menu, select Notification.
- Click Edit JSON to configure the structured message. See the Configuring the structured message section below for more information.
- Optionally, you can directly edit the JSON associated with the media type in the provided field, or click Open File to load a JSON file from your local machine.
- Optionally, add field codes.
- ImportantYou must not use double-quotation marks (") for field codes that are used in structured messages. Use single quotation marks (') instead.
- Click Create.
Configuring the structured message
Starting with version 9.0.000.09, you can edit a Media Notification template of the standard response that was previously created and saved in UCS. In addition, starting with version 9.0.002.05, you can view a JSON structure.
A short video on how to configure a Media Notification template:
Media Notification template: Body section
After you click Edit JSON, an editor appears that allows you to edit the mandatory Body section of the structured message.
In the ID field, enter the namespace@element_name ID for the structured message (provided in WhatsApp Manager after WhatsApp has approved the message).
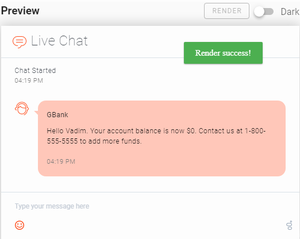
In the Content area, compose the content of your message. For example, let's say you want to create a message to let customers know when their account balance is $0. Enter the following message: Hello Customer. Your account balance is now $0. Contact us at 1-800-555-5555 to add more funds.
You can use field codes to introduce parameters for known data. For example, instead of Customer, you can use <$Contact.FirstName$>. In the Content area, remove Customer and then click ![]() to add parameters. Notice how a variable has been added to the Content area (as this is the first variable, it's {{1}}). In the Parameters section, you can define the {{1}} variable as such:
to add parameters. Notice how a variable has been added to the Content area (as this is the first variable, it's {{1}}). In the Parameters section, you can define the {{1}} variable as such:
- Name—Enter the name of the variable. For example, Customer.
- Value—Enter the field code to use. For ease of use, you can:
- Enter a temporary value in the Value field.
- Click Save to save the message template and return to the New/Edit Standard Response window.
- In the JSON Part section, find the temporary parameter value you used earlier (for example, "value": "Sample_Value") and select the sample value.
- Click Insert Field Code.
- Select a field code and click OK to insert it, together with its required delimiters (<$ $>), into the standard response.
- ImportantOnly use field codes in parameter values.
The Content area now looks like this:
As you edit the Content area, a live preview appears on the right to show you how the message will appear to the customer. Field codes are rendered when the message is inserted into a WhatsApp interaction by an agent in Workspace. However, when eServices Manager detects a field code in the message, you can click Render (located above the live preview area) to render the field code with its default value.
Optionally, you can use the toolbar in the Content area to use bold (B), italics (I), strikethroughs (S), and highlights (<>).
When you are done, click Save.
Media Notification template: optional sections
Starting with version 9.0.002.05, the Media Notification template adds the following optional sections:
- Header
- Footer
- Buttons
Header
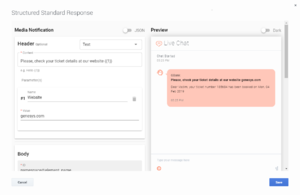
In the Header section, you can configure content that is displayed at the top of the Body section of a WhatsApp notification-type message:
- Text—A header containing the text content with one parameter or without parameters. The parameter value can contain field codes.
- Media—A header containing the media content of the following types: file, image, or video.
Media content can be used for:
- Sending personalized content—A media file, image, or video is added from the header when an agent sends a message to a particular customer. Note that the header contains only definition of the media content type but not a media file itself. The media file can be customized and inserted into a WhatsApp interaction by an agent in Workspace.
- Sending common content—A media file, image, or video is uploaded to the header through a corresponding Upload button and then automatically attached to a message when it sends out.
In the Footer section, you can configure the static text content that is displayed below the Body section of a WhatsApp message, by selecting Text and entering the footer content.
Buttons
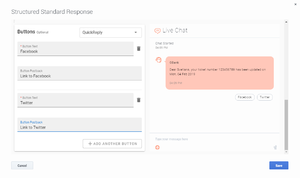
In the Buttons section, you can configure predefined button sections that are displayed at the bottom of a WhatsApp message. The following Button options are available:
- QuickReply—Enables adding up to three quick replies buttons and contains the following items:
- Button Text—Populates with a value from the WhatsApp template. The button text is returned along with the Button Postback text to the webhook when a user clicks the button.
- Button Postback—Populates with the Postback text (Optional).
- CallToAction—Enables adding up to two call-to-action buttons and contains the following items, depending on the action type:
- Call Phone Number:
- Button Text—Populates with the button text from the WhatsApp template.
- Action Type—Call Phone Number.
- Phone Number—Populates with the phone number from the WhatsApp template.
- Visit Website:
- Button Text—Populates with the button text from the WhatsApp template.
- Action Type—Visit Website.
- URL—Populates with the URL from the WhatsApp template. The URL can contain one parameter. The parameter value is used at the end of the URL.
- Call Phone Number:
Interactive messages
Starting with 9.0.004.01, eServices Manager supports Interactive messages. Interactive message templates offer the customer a choice of responses to the last agent or last chat bot message in the transcript. Selecting one of these buttons sends that reply to the agent as an inbound text message. This saves the customer from having to type a response manually.
eServices Manager does not support field validation. Users must refer to the latest WhatsApp documentation, Sending Interactive Messages for more information.
Currently, the Reply Buttons and List Messages templates are supported.
Reply Buttons
Reply Button is a media origin type that allows you to set up to 3 buttons that a customer can choose from.
You can configure the following options:
- Header—Enter a text message or attach any media content of the following types: file, image, or video.
- Body—Enter a context of the message.
- Footer—Enter the static text content that is displayed below the Body section.
- Buttons—Enter a label for each button in the Button Text field.
List Messages
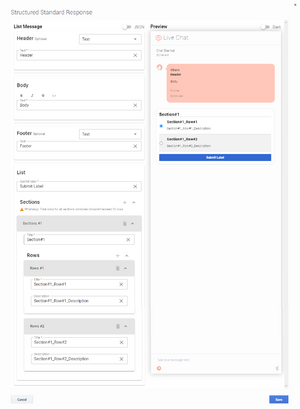
List Message is a media origin type that allows you to set up to 10 menu options that a customer can choose from. You can configure the following options:
- Header—Enter a text message.
- Body—Enter a context of the message.
- Footer—Enter the static text content that is displayed below the Body section.
- List
- Submit label—Enter a label for the submit button.
- Sections—Enter a section name in the Title field. There can be multiple sections. Each section can have one or more rows.
- Rows—Enter a Title and Description for each row. Each row is shown as an option for the customer to choose.
Dark mode
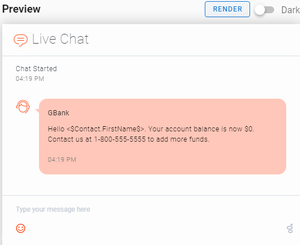
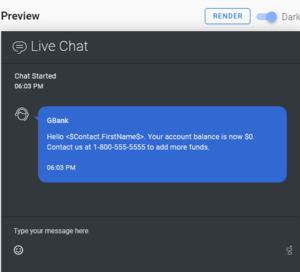
Optionally, you can select Dark to use dark mode. Below is a comparison:
- Dark off:
- Dark on:
Language and country in Notification template
After a Notification is created for Genesys JSON, the JSON Part field contains the key-value pair (KVP), language, with values from the language and country options of the Language business attribute values. You can configure the values for the language and country options under the Language business attribute values using instructions provided in the Configuring language and country for WhatsApp structured messages section.
- This feature is only available starting with the version 9.0.001.08 and later.
- Values of the language KVP are not updated in Genesys JSON under standard response if you cut, copy, paste, or import a standard response with Genesys JSON.
- Values of the language KVP are not updated in Genesys JSON under standard response if you modify the values for the language and country options under the Language business attribute values.
- Genesys recommends that you delete the language KVP in Genesys JSON under standard response, click Edit JSON, and click Save to change the values of the language KVP. The JSON Part field gets updated with the correct values for the language KVP.
For more information, refer to the How to Configure Languages section of the Chat Server Administration guide.

