Contents
Apple Business Chat
This page explains how to create a structured message for Apple Business Chat. It also documents the various types of messages you can send to customers.
Creating a structured message for Apple Business Chat
- See the Apple Business Chat documentation for more information on using structured messages with Apple Business Chat.
- Any text you enter in the Plain text part field in the General tab appears as the name of the structured message in the agent desktop and in the chat transcript. If you do not enter text in the Plain text part field, the Name field of the standard response is used.
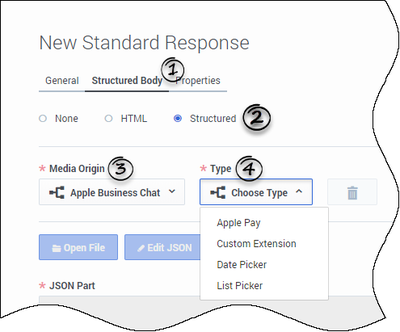
- Create a standard response.
- Go to the Structured Body tab (formerly the HTML tab).
- Select Structured.
- In the Media Origin menu, select Apple Business Chat.
- In the Type menu, select one of the following types:
- Apple Pay—Allow the customer to provide payment information.
- Custom Extension—Use a Custom Interactive Message that provides functionality from a standalone iMessage app or an iOS app. Click here to view the Apple documentation.
- List Picker—Allow the customer to select an option in a list.
- Time Picker—Allow the customer to select a date or time.
- Rich Link—Show an inline preview of a URL that contains an image or video.
- Optionally, you can directly edit the JSON associated with the media type. Click Edit JSON to edit the JSON in the provided field, or click Open File to load a JSON file from your local machine.
- Optionally, add field codes.
- Click Create.

Apple Pay
This option allows the customer to provide payment information using Apple Pay.
You can configure the following options:
Apple Pay tab
- Merchant ID—Enter your Merchant ID (provided by Genesys Hub).
- Merchant Name—Enter your Merchant Name (provided by Genesys Hub).
- Supported Countries—The list of countries to support, specified by ISO country code.
- Country Code—Your company's two-letter ISO 3166 country code.
- Currency Code—Your company's three-letter ISO 4217 currency code for the payment.
Line Items tab
Click + to add a line item for which the customer can pay. You can configure the following options:
- Label—Enter a description of the line item.
- Amount—Enter the amount of money required to purchase the line item.
- Type
- final—Select this option if the cost has been finalized and all required information has been gathered from the customer.
- pending—Select this option if the cost has not been finalized and the customer must provide more information (for example, an address to calculate shipping costs).
- Total Label—The name of the field that shows the total price (for example, Total Price).
- Total Amount—Automatically calculates the total amount of money for all line items.
- Total Type
- final—Select this option if the cost has been finalized and all required information has been gathered from the customer. This option is only available if all line item Type values are set to final.
- pending—Select this option if the cost has not been finalized and the customer must provide more information.
You can click + to add more line items to the list. Or, you can select a line item and click the trashcan icon to remove it from the list.
Shipping Methods tab
Click + to add a shipping method. You can configure the following options for each item:
- Label—Enter text to describe the shipping method (for example, Standard Shipping).
- Identifier—Enter a unique identifier for the shipping method (for example, standard).
- Shipping Detail—Enter additional text about the shipping method (for example, Ships in 24 hours).
- Amount—Enter the shipping cost.
- Type
- final—Select this option if the cost has been finalized and all required information has been gathered from the customer.
- pending—Select this option if the cost has not been finalized and the customer must provide more information (for example, an address to calculate shipping costs).
- not applicable—Select this option if the cost and type are not applicable and must be excluded from the payment.
You can click + to add more shipping methods to the list. Or, you can select a shipping method and click the trashcan icon to remove it from the list.
Other Fields tab
Requested Billing Fields
Select the billing fields that the customer must provide to use Apple Pay. Refer to the Apple Business Chat documentation for more information.
Requested Shipping Fields
Select the shipping fields that the customer must provide to use Apple Pay. Refer to the Apple Business Chat documentation for more information.
Merchant Capabilities
Select the payment capabilities that you support for Apple Pay. Refer to the Apple Business Chat documentation for more information.
Supported Networks
Select the payment networks that you support for Apple Pay. Refer to the Apple Business Chat documentation for more information.
Received Message tab
These options specify how the message appears to the receiving customer.
- Title—Provide a title for the received message.
- Style—Select Icon, Small, or Large to specify the size of the image in the received message.
- Image—Click Add Image to select an image to attach to the received message. Or, if you have previously attached an image, click Remove to remove the attached image.
A live preview appears on the right to show you how the message will appear to the customer. You can also click Render Field Codes to render field codes and associated variables, if any, that are in the live preview. Variables are rendered with their default value.
JSON tab
View the JSON associated with this Apple Pay message.
Custom Extension
This option uses a Custom Interactive Message that provides functionality from a standalone iMessage app or an iOS app.
You can configure the following options:
Custom Extension tab
These options refer to values specific to your application. For more information, refer to the Apple Business Chat documentation on the Apple website.
- Application Name—The name of the custom extension.
- Application ID—The App Store identifier of the custom extension.
- Team ID—Provide your Team ID.
- Extension ID—Provide your Extension ID.
Parameters tab
Click + to create a parameter (key-value pair) to be passed to your custom extension.
The number and types of parameters you must create are specific to the design and functionality of your custom extension. Therefore, you must consult with the developer of the custom extension to determine which parameters are needed to support the custom extension.
Refer to the Apple Business Chat documentation for more information.
Received Message tab
These options specify how the message appears to the receiving customer.
- Title—Provide a title for the received message.
- Subtitle—(Optional) Provide a subtitle for the received message.
- Secondary Subtitle—(Optional) Provide a secondary subtitle that is right aligned.
- Tertiary Subtitle—(Optional) Provide a tertiary subtitle that is right aligned.
- Image Title—The attached image's title, which appears in larger type at the bottom of the image.
- Image Subtitle—The attached image's subtitle, which appears in smaller type at the bottom of the image.
- Image—Click Add Image to select an image to show in the preview. Or, if you have previously attached an image, click Remove to remove the attached image.
A live preview appears on the right to show you how the message will appear to the customer. You can also click Render Field Codes to render field codes and associated variables, if any, that are in the live preview. Variables are rendered with their default value.
JSON tab
View the JSON associated with this custom extension.
Time Picker
This option allows the customer to select a date or time.
You can configure the following options:
Time Picker tab
- Title—Provide a title for the Time Picker.
- Location—(Optional) Describe a location for the Time Picker event.
- Latitude—(Optional) Provide a latitude for the location.
- Longitude—(Optional) Provide a longitude for the location.
- Radius—(Optional) The location radius, in meters. If the latitude and longitude fields are missing or empty, this field is ignored.
Timeslots tab
Click + to add a timeslot for the customer to select.
On the right, specify a Start Date for when you want the timeslot to begin. You can click the Start Date to specify a date and time.
In the Duration section, drag the sliders to specify the duration of the timeslot in hours and/or minutes.
Optionally, you can create additional timeslots by clicking +. Or, you can select a timeslot in the list and click the trash icon to delete it.
A live preview appears on the right to show you how the message will appear to the customer. You can also click Render Field Codes to render field codes and associated variables, if any, that are in the live preview. Variables are rendered with their default value.
Received Message tab
These options specify how the message appears to the receiving customer.
- Title—Provide a title for the received message.
- Subtitle—(Optional) Provide a subtitle for the received message.
- Style—Select Icon, Small, or Large to specify the size of the image in the received message.
- Image—Click Add Image to select an image to attach to the received message. Or, if you have previously attached an image, click Remove to remove the attached image.
A live preview appears on the right to show you how the message will appear to the customer. You can also click Render Field Codes to render field codes and associated variables, if any, that are in the live preview. Variables are rendered with their default value.
Reply Message tab
These options specify the appearance of the customer's response after he or she has made a selection.
- Title—Provide a title for the reply message.
- Subtitle—(Optional) Provide a subtitle for the reply message.
- Style—Select Icon, Small, or Large to specify the size of the image in the reply message.
- Image—Click Add Image to select an image to attach to the reply message. Or, if you have previously attached an image, click Remove to remove the attached image.
A live preview appears on the right to show you how the message will appear to the customer. You can also click Render Field Codes to render field codes and associated variables, if any, that are in the live preview. Variables are rendered with their default value.
JSON tab
View the JSON associated with this Time Picker.
List Picker
This option allows the customer to select one or more items from a list.
You can configure the following options:
List Picker tab
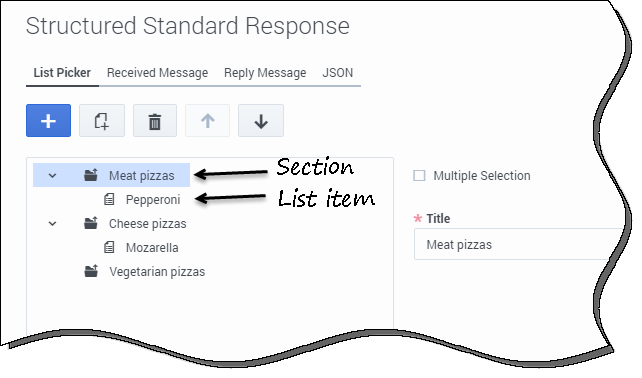
A List Picker consists of sections and items. Sections can have one or more items for the customer to select.
For example, a pizzeria might use a List Picker to offer various pizzas for the customer to select. This list might consist of the following:
- Meat pizzas
- Pepperoni
- Cheese pizzas
- Mozzarella
- Vegetarian pizzas
In eServices Manager, this list is represented as the following:
Your first step is to create a section. Click + to add a section. On the right, specify a Title for the section.
You can click + to add more sections to the list.
Next, you can create items within a section. First, ensure you have selected the section in which you want to create an item. Next, click ![]() to create the item.
to create the item.
On the right, specify a Title for the list item. Optionally, add a Subtitle that further describes the list item.
In the Image section, click Add Image to upload an image to display with this list item. If you have already uploaded an image, you can click Remove to remove the image from this list item.
Once you have multiple sections or items in the list, you can select a section or item and click the arrows to rearrange their order.
To remove a section or item, select it and click the trashcan icon.
A live preview appears on the right to show you how the message will appear to the customer. You can also click Render Field Codes to render field codes and associated variables, if any, that are in the live preview. Variables are rendered with their default value.
Received Message tab
These options specify how the message appears to the receiving customer.
- Title—Provide a title for the received message.
- Subtitle—(Optional) Provide a subtitle for the received message.
- Style—Select Icon, Small, or Large to specify the size of the image in the received message.
- Image—Click Add Image to select an image to attach to the received message. Or, if you have previously attached an image, click Remove to remove the attached image.
A live preview appears on the right to show you how the message will appear to the customer. You can also click Render Field Codes to render field codes and associated variables, if any, that are in the live preview. Variables are rendered with their default value.
Reply Message tab
These options specify the appearance of the customer's response after he or she has made a selection.
- Title—Provide a title for the reply message.
- Subtitle—(Optional) Provide a subtitle for the reply message.
- Style—Select Icon, Small, or Large to specify the size of the image in the reply message.
- Image—Click Add Image to select an image to attach to the reply message. Or, if you have previously attached an image, click Remove to remove the attached image.
A live preview appears on the right to show you how the message will appear to the customer. You can also click Render Field Codes to render field codes and associated variables, if any, that are in the live preview. Variables are rendered with their default value.
JSON tab
View the JSON associated with this List Picker.
Rich Link
A Rich Link shows a preview of a URL that contains an inline image or video. Unlike normal URLs, customers can view the media immediately without having to click a "Tap to Load Preview" message.
You can configure the following options:
Rich Link tab
- Title—Specify a title for the Rich Link that will appear in the chat.
- URL—Specify the target URL for the Rich Link.
- Type—Select one of the following:
- image—Click Add Image to select an image to show in the preview. Or, if you have previously attached an image, click Remove to remove the attached image.
- video—Specify the URL where the video is hosted.
- If you selected video, you can still add an image by selecting Add Image. Click Add Image to select an image to show in the preview. Or, if you have previously attached an image, click Remove to remove the attached image.
A live preview appears on the right to show you how the message will appear to the customer. You can also click Render Field Codes to render field codes and associated variables, if any, that are in the live preview. Variables are rendered with their default value.
JSON tab
View the JSON associated with this Rich Link.


