
Installing the Plug-in for Genesys Administrator Extension
The Genesys Web Engagement Plug-in for Genesys Administrator Extension allows you to to use the Script Generator tool to create a JavaScript code snippet for your web pages to enable Web Engagement monitoring. The plug-in also allows you to create categories, which you need if you implement the Simple Engagement model.
Once installed, the plug-in adds a new Web Engagement section to the Configuration menu in GAX.
Prerequisites
- Your environment includes Genesys Administrator Extension. See Genesys environment prerequisites for compliant versions. For more information about installing the Genesys Administrator Extension, refer to the Genesys Administrator Extension Deployment Guide.
- Installation must be driven from the host where you intend to install the plug-in.
- In Genesys Administrator, navigate to Provisioning > Environment > Applications, select the Genesys Administrator Extension server, and stop it.
- In your installation package, locate and double-click the setup.exe file.
- Click Next. The Choose Destination Location screen appears.
- Browse to the installation folder or use the default location and click Next. The Ready to Install screen appears.
- Click Install. The Genesys Installation Wizard indicates it is performing the requested operation for the Genesys Proactive Engagement Plug-in for GAX. When through, the Installation Complete screen appears.
- Click Finish to complete your installation. As a result of the installation, a new file called gax-plugin-webme.jar is copied to the <GAX installation>\webapp\WEB-INF\lib\ folder.
- In Genesys Administrator, navigate to Provisioning > Environment > Applications, select the Genesys Administrator Extension server, and start it.
- Open Genesys Administration Extension in a web browser with the following URL: http://<GAX_host_name>:<GAX_port>/gax/.
- <GAX_host_name> — The name or IP address of the host for Genesys Administration Extension.
- <GAX_port> — The default port for Genesys Administration Extension.
- GAX now includes the Proactive Engagement menu with the following Web Engagement items: Categories and Script Generator.
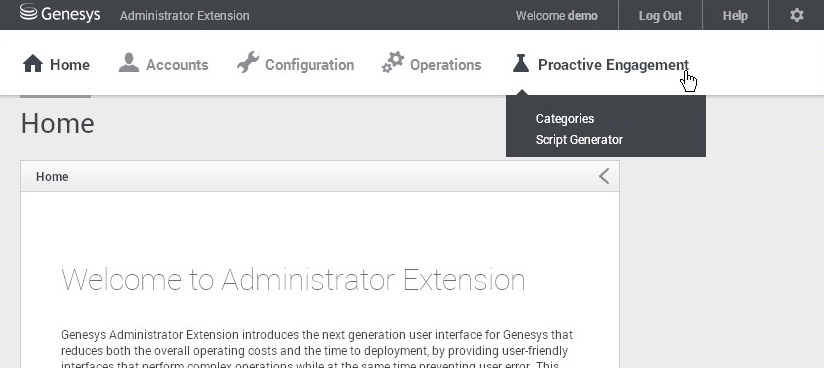 The Proactive Engagement menu in Genesys Administrator Extension.

Prerequisites
- Your environment includes Genesys Administrator Extension. See Genesys environment prerequisites for compliant versions. For more information about installing the Genesys Administrator Extension, refer to the Genesys Administrator Extension Deployment Guide.
- Installation must be driven from the host where you intend to install the plug-in.
- In Genesys Administrator, navigate to Provisioning > Environment > Applications, select the Genesys Administrator Extension server, and stop it.
- In your installation package, locate and double-click the install.sh file.
- Enter the path where you want the plug-in to be installed.
- Click Install. The Genesys Installation Wizard indicates it is performing the requested operation for the Genesys Proactive Engagement Plug-in for GAX. When through, the Installation Complete screen appears.
- Click Finish to complete your installation. As a result of the installation, the gax-webme-plugin-[version].jar and wmcategory-[version].jar files are copied to the [Genesys Administrator Extension Tomcat server]/webapps/gax/WEB-INF/lib/ folder.
- In Genesys Administrator, navigate to Provisioning > Environment > Applications, select the Genesys Administrator Extension server, and start it.
- Open Genesys Administration Extension in a web browser with the following URL: http://<GAX_host_name>:<GAX_port>/gax/.
- <GAX_host_name> — The name or IP address of the host for Genesys Administration Extension.
- <GAX_port> — The default port for Genesys Administration Extension.
- GAX now includes the Proactive Engagement menu with the following Web Engagement items: Categories and Script Generator. The Proactive Engagement menu in Genesys Administrator Extension.
Next Steps
- Now that you have installed Genesys Web Engagement and its plug-ins, you can refer to Configuring Features to enable GWE features such as the Pacing Algorithm, Authentication, SSL, Chat and Voice Channels, and UTF-8.
This page was last edited on December 17, 2014, at 14:20.
Comments or questions about this documentation? Contact us for support!