
Deploying and Configuring the Genesys Web Engagement Cluster
Complete the procedures on this page if you are following the Genesys Web Engagement Clustering deployment scenario, which is appropriate for a production environment.
- Review the Prerequisites
- Setting Up Load Balancer Access for Web Engagement-Specific Config Layer Objects
- Configuring the Frontend Server Nodes
- Configuring the Backend Server Nodes
- Configuring Load Balancing
- Configuring Cassandra for the Cluster
- Enabling SSL for the Cluster
- Configuring Rules Deployment for the Cluster
- Starting the Server Clusters
Review the Prerequisites
Before you begin, make sure to complete the following prerequisites:
- You installed the Web Engagement Frontend and Backend servers on the same host in a test environment.
- In the test environment, you successfully developed and tested an application for serving your site, including definitions of categories and rules deployment.
- In this procedure, it is assumed that your test and production environments share the same Configuration Management Environment (CME). If this is not the case, you should clone the Frontend Server and Backend Server application objects into your production CME before you begin.
- You stopped your Frontend Server, Backend Server, and Proxy, if they are running.
Setting Up Load Balancer Access for Web Engagement-Specific Config Layer Objects
Start
- Open Genesys Administrator and navigate to Provisioning > Environment > Applications. Select the application defined for the Web Engagement Backend Server and click Edit...
- Change the host of the application to the host planned for your Backend cluster load balancer. See Load Balancing for more information.
Note: You may need to create this host object. For details about creating host objects in Genesys Administrator, see the Configuring Hosts section in the Management Framework 8.1 Deployment Guide. - Change all ports for the application to the port for the Backend cluster load balancer.
- Run the Provisioning Tool using the -overwrite parameter. This prepares all the related objects in your Configuration Management Environment (scripts, transactions, and so on) to work with load balancing. See Automatic Provisioning for more information about using the tool.
End
You should use this Backend Server application with changed host and port (to point to the load balancer) as the connection to the Interaction Workspace application. See Installing the Plug-in for Interaction Workspace for details.
Back to top
Configuring the Frontend Server Nodes
Complete the steps below for each planned node in your Frontend Server cluster.
Start
- In Genesys Administrator, navigate to Provisioning > Environment > Applications. Select your Frontend Server application and click Edit...
- Clone the Frontend Server application by clicking 'Save & New. Update the following fields:
- Enter an application name.
- Remove the connection to the Backend Server.
- Specify the host and ports (including the secure port, if needed) where the Frontend Server node will run.
- Select the Options tab and configure the following:
- In the [log] section, update the all option and provide a distinct file name for this application. For example, c:\logs\WebEngagement\Web_Engagement_Frontend_Node_1. This lets you to distinguish between the logs produced by the different nodes in the cluster.
- In the [settings] section, set the value of the loadbalancer option to schema://BackendLoadBalancerHost:BackendLoadBalancerPort/backend
Where:- schema — http or https
- BackendLoadBalancerHost — The FQDN or IP address of the host for the Backend cluster load balancer. This should be the value set in step 2 of the Update the Backend Server Application procedure.
- BackendLoadBalancerPort — The port of the Backend cluster load balancer.
- Copy the GWE_Installation_Home\servers\frontend\ directory to the host planned for this node.
- In the copied folder, change the following value in either setenv.bat (for Windows) or setenv.sh (for Linux):
- Set the APP_NAME option as the name of the application on this Node.
- Click Save & Close.
End Back to top
Configuring the Backend Server Nodes
Complete the steps below for each planned node in your Backend Server cluster.
Start
- In Genesys Administrator, navigate to Provisioning > Environment > Applications. Select your Backend Server application and click Edit...
- Clone the Backend Server application by clicking Save & New. Update the following fields:
- Enter an application name.
- Remove the connection to the Frontend Server.
- Specify the host and ports (including secure port, if needed) where the Backend Server node will run.
- Select the Options tab and configure the following:
- In the [log] section, update the all option and provide a distinct file name for this application. For example, c:\logs\WebEngagement\Web_Engagement_Backend_Node_1. This lets you to distinguish between the logs produced by the different nodes in the cluster.
- In the [settings] section, set the value of the loadbalancer option to schema://FrontendLoadBalancerHost:FrontendLoadBalancerPort/frontend
Where:- schema — http or https
- FrontendLoadBalancerHost — The FQDN or IP of the host for the Frontend load balancer.
- FrontendLoadBalancerPort — The port of the Frontend load balancer.
- Copy the GWE_Installation_Home\servers\backend\ directory to the host for this node.
- In the copied folder, change the following value in either setenv.bat (for Windows) or setenv.sh (for Linux):
- Set the APP_NAME option as the name of the application on this Node.
- In the copied folder, open the etc\cassandra.yaml file and confirm that the data_file_directories, commitlog_directory, and saved_caches_directory parameters are correct. See Configuring Cassandra for the Cluster for details.
End Back to top
Configuring Load Balancing
Genesys Web Engagement allows you to implement load balancing for your Backend Server and Frontend Server clusters using any third-party load balancer that supports cookies and encoding-based routing methods.
For load balancing details and a sample configuration for Apache, see Load Balancing. Back to top
Configuring Cassandra for the Cluster
Genesys Web Engagement version 8.1.2 includes an embedded Cassandra database (version 1.2.15). When you create a cluster of Backend Servers you are also creating a cluster of embedded Cassandra databases that need to be configured to work together. For information about hardware considerations for Cassandra nodes, refer to the Cassandra documentation: http://www.datastax.com/documentation/cassandra/1.2/cassandra/architecture/architecturePlanningHardware_c.html and the Sizing information for GWE.
Complete the steps below on each of your Backend Servers to configure the embedded Cassandra nodes.
Prerequisites
- You installed the Backend Server on each node. See Configuring the Backend Server Nodes for details.
- You know the IP address of each node in your Backend Server cluster.
- Determine which nodes will be seed nodes. (Cassandra nodes use the seed node list for finding each other and learning the topology of the ring.)
- You completed Generic Cassandra Configuration procedures on each of your nodes.
You can find more information about configuring a Cassandra cluster in the Cassandra documentation: http://www.datastax.com/documentation/cassandra/1.2/cassandra/initialize/initializeSingleDS.html
Start
- For each Backend Server, open the the backend/etc/cassandra.yaml file with a text editor.
- Edit the specified strings:
num_tokens: 256 listen_address: <backend-node_ip_address> rpc_address: 0.0.0.0 seed_provider: - class_name: org.apache.cassandra.locator.SimpleSeedProvider parameters: - seeds: "<seed_node1_ip>,<seed_node2_ip>,..."- <backend-node_ip_address> — The IP address of the Backend Server.
- <seed_node1_ip>,<seed_node2_ip>,... — The IP address of each Backend Server seed node in your cluster.
- Save your changes.
End Back to top
Enabling SSL for the Cluster
The Jetty web server supplied with the Genesys Web Engagement solution includes a self-signed certificate that you can use for a Standalone deployment. For a Clustering deployment, you should use a certificate issued by a third-party Certificate Authority.
For details, see the procedures to enable SSL. Back to top
Configuring Rules Deployment for the Cluster
Complete this procedure to configure the Rules Authoring Server and one of your Backend Servers to enable rules deployment over the Frontend Server cluster. Rules are deployed in two stages:
- Genesys Web Engagement detects whether all the Frontend Servers are running. If one is down, Web Engagement stops the rules deployment.
- The rules are deployed to the Frontend Servers. If one Frontend Server goes down, the deployment is marked as unsuccessful. Note: Web Engagement cannot rollback the rules from the already processed Frontend Servers. After an unsuccessful deployment, the CEP rules might have an incorrect state (the rules might be inconsistent between cluster nodes).

Prerequisites
- You must choose one of your Backend Servers (any node in the cluster) to be in charge of rules deployment over the cluster. After this configuration step, this Backend Server will be able to publish rules for all the Frontend Servers of the cluster.
Start
- In Genesys Administrator, select the Backend Server you want to handle rules deployment and click Edit... to check its configuration. Select the Configuration tab. Make sure that the listening ports include a port with the following:
- The ID is backend/data/rules/deploy
- The Protocol is http.
 Listening ports
- If you have more than one Frontend server in your cluster, add all the Frontend Servers to the Connections on the Backend Server responsible for rules deployment.
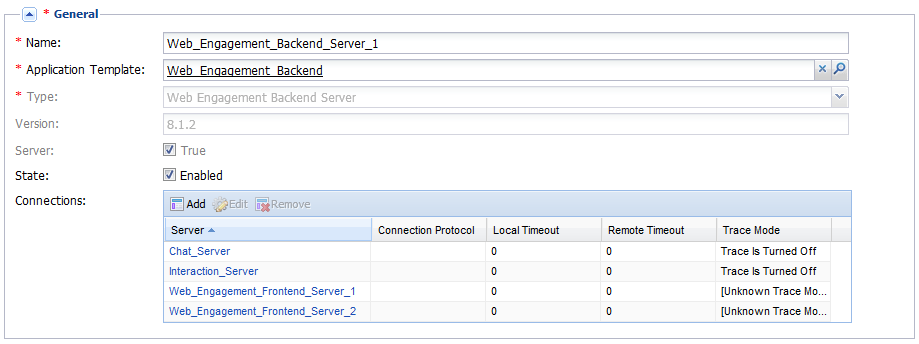 Connections to all the Frontend Servers
 - Click Save & Close.
- Open your Genesys Rules Authoring Server Application. In the Connections section, add a connection to the Backend Server for rules deployment.
- Click Save & Close.


End
Next Steps
- You can now deploy rules. But first, make sure that the Backend Server in charge of rules deployment and all the Frontend servers are up and running. See Starting the Server Clusters for details.
Starting the Server Clusters
Start
- Start the Frontend load balancer and the Backend load balancer.
- Start the Backend cluster:
- Start the Backend Server on the node(s) that is the cluster's seed and wait until it is running.
- Start the Backend Server on the other nodes of the cluster and wait until they are running.
- Start the Frontend cluster:
- Start the Frontend Server on the nodes of the cluster and wait until they are running.
End
Categories are updated by Web Engagement servers "on the fly" and no additional configuration is necessary.
To change actual rules in the deployed Web Engagement cluster, see Managing Rules in the User's Guide.