
Installing the Genesys Web Engagement Servers
Complete the procedures on this page if you are following the Genesys Web Engagement Standalone deployment scenario, which is appropriate for a lab environment.
- Importing the Backend Server Application Template
- Creating the Backend Server Application
- Configuring the Backend Server Application
- Configuring a Connection to a Cluster of Chat Servers (Optional)
- Installing the Backend Server
- Importing the Frontend Server Application Template
- Creating the Frontend Server Application
- Configuring the Frontend Server Application
- Installing the Frontend Server
Importing the Backend Server Application Template
Start
- Open Genesys Administrator and navigate to Provisioning > Environment > Application Templates.
- In the Tasks panel, click Upload Template.
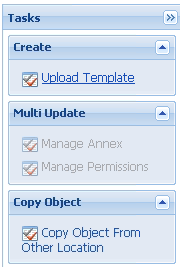 Upload Template link in the Tasks panel
 - In the Click 'Add' and choose application template (APD) file to import window, click Add.
- Browse to the Web_Engagement_Backend.apd file or, if your Configuration Server does not support Web Engagement specific types, select Web_Engagement_Backend_Generic.apd, available in the templates directory of your installation CD. The New Application Template panel opens.
- Click Save & Close.

End
Creating the Backend Server Application
Prerequisites
- You completed Importing the Backend Server Application Template.
Start
- Open Genesys Administrator and navigate to Provisioning > Environment > Applications.
- In the Tasks panel, click Create New Application.
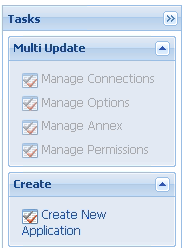 Create New Application link.
 - In the Select Application Template panel, click Browse for Template and select the Backend Server template that you imported in Importing the Backend Server Application Template. Click OK.
- The template is added to the Select Application Template panel. Click Next.
- In the Select Metadata file panel, click Browse and select the Web_Engagement_Backend.xml file or select the Web_Engagement_Backend_Generic.xml file if you chose Web_Engagement_Backend_Generic.apd in Step 4 of Importing the Backend Server Application Template. Click Open.
- The metadata file is added to the Select Metadata file panel. Click Next.
- In Specify Application parameters:
- Enter a name for your application. For instance, Web_Engagement_Backend_Server.
- Enable the State.
- Select the Host on which the Backend Server will reside.
- Click Create.
- The Results panel opens.
- Enable Opens the Application details form after clicking 'Finish' and click Finish. The Backend Server application form opens and you can start configuring the Backend Server application.
 Backend Server application opened in Genesys Administrator.


End
Configuring the Backend Server Application
Prerequisites
- You completed Creating the Backend Server Application.
Start
- If your Backend Server application form is not open in Genesys Administrator, navigate to Provisioning > Environment > Applications. Select the application defined for the Web Engagement Backend Server and click Edit....
- In the Connections section of the Configuration tab, click Add. The Browse for applications panel opens. Select the Genesys application defined for Interaction Server, then click OK.
- Repeat the previous step for Stat Server and Chat Server. Optionally, you can also add a connection to Orchestration Server or Message Server (to apply the network logging option).
- Note: You must add a connection to the Frontend Server after you complete Configuring the Frontend Server Application.
- Select the Chat Server row in the list of connections and click Edit. In the Connection Info window, select the webapi port for the ID. Click OK.
 You must set the ID to the webapi port.
- Note: Genesys Web Engagement also supports Chat Server clusters. To configure the Web Engagement Backend Server to work with a cluster of Chat Server objects, see Configuring a Connection to a Cluster of Chat Servers (Optional).
- Expand the Server Info pane.
- In the Tenant section, click Add and select your tenant. For instance, Environment. Click OK.
- Note: The Frontend Server and Backend Server applications should belong to the same Tenant. See Multi-Tenancy for details.
- If your Host is not defined, click the lookup icon to browse to the hostname of your application.
- In the Listening Ports section, create the default port by clicking Add. The Port Info dialog opens.
- Enter the Port. For instance, 9081.
- Choose http for the Connection Protocol.
- Click OK. The HTTP port with the default identifier appears in the list of Listening ports.
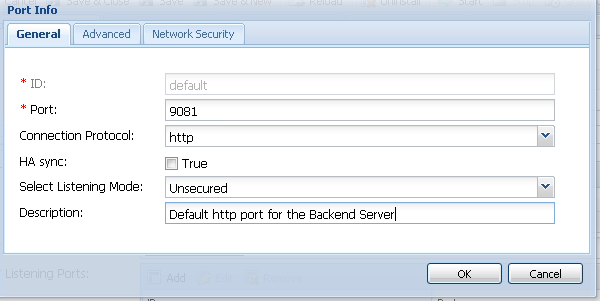 Default HTP port
- Optionally, you can add a secure listening port for authenticated users, secured connections, and secure chat. Click Add.The Port Info dialog opens.
- Enter https for the ID field. This specific ID is required in GWE 8.1.2.
- Enter the Port. For instance, 9443.
- Enter https for the Connection Protocol.
- Choose Secured for the Listening Mode.
- Click OK.
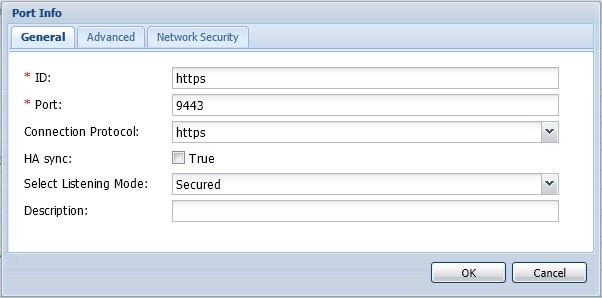 Secure listening port
- Create the port with the backend/data/rules/deploy identifier by clicking Add.
- Enter backend/data/rules/deploy for the ID.
- Enter the same port value as you did for the default port. For instance, 9081.
- Select http for the Connection Protocol.
- Click OK. The HTTP port with backend/data/rules/deploy ID appears in the list of Listening ports.
- Optionally, you can explicitly add a Jetty stop port for the Backend Server. If you do not define a stop port, it is auto-generated when you start the server. To specify the stop port, click the Add button. The Port Info dialog opens.
- Enter stop for the ID field. This specific ID is required.
- Enter the Port. For instance, 18081.
- Click OK. The stop port appears in the list of Listening ports.
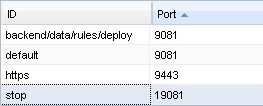 Listening ports
- Ensure the Working Directory and Command Line fields contain "." (period). They are automatically populated when the Backend Server is installed.
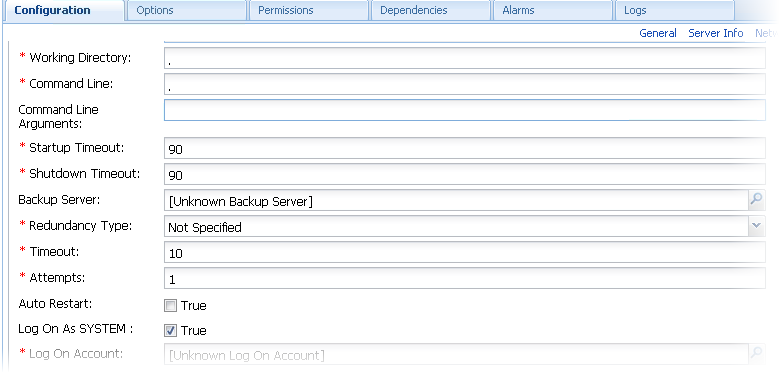 Commands
 - Click Save.
- The Confirmation dialog for changing the application's port opens. Click Yes.
- (Optional) Select the Options tab. In the [log] section, the all option is set to stdout by default. Enter a filename if you wish to enable logging to a file. For example, you can enter stdout, C:\Logs\WebEngagement\Backend_Server to force the system to write logs in the console and in a file.
- (Optional) You need to create a webengagement annex only if your Web Engagement Backend Server application's type is Genesys Generic Server. Click New in the Options tab. The New Options dialog opens.
- Select Annex for Location.
- Enter webengagement for Section.
- Enter type for Name.
- Enter backendserver for Value.
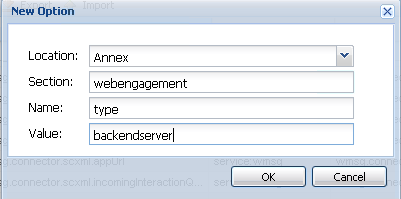 Backend type.
 - Click OK to create the new annex. You can see it by selecting Advanced View (Annex) in the View selector.
- Click Save & Close. If the Confirmation dialog opens, click Yes.


End
Configuring a Connection to a Cluster of Chat Servers (Optional)
Complete the steps below to configure a cluster of Chat servers for the Backend Server.
Start
- In Genesys Administrator, navigate to Provisioning > Environment > Applications, select your Backend Server application, and click Edit.
- In the Connections section, add a connection to Solution Control Server and an Application Cluster application that has connections to one or more Chat servers.
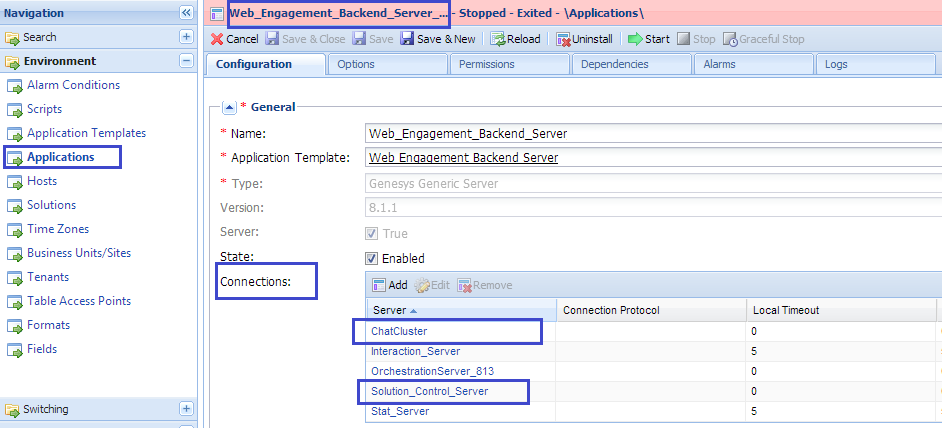 The Backend Server has a connection to the ChatCluster Application Cluster application.
 - Click Save & Close
- Open your Application Cluster application.
- In the Connections section, add connections to one or more Chat Servers.
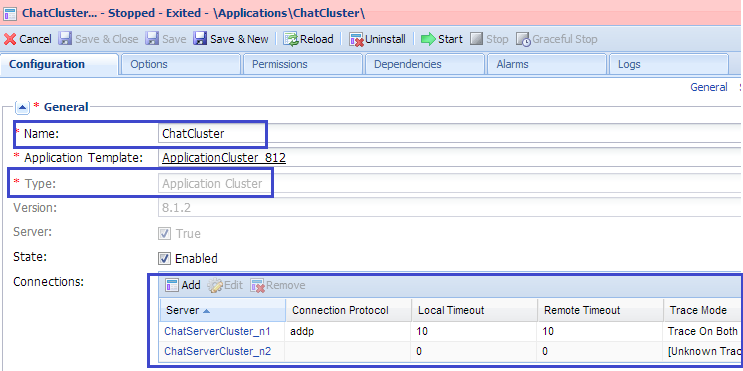 The ChatCluster application has connections to two Chat servers.
 - Click Save & Close.


End Back to top
Installing the Backend Server
Install the Backend Server on Windows or Linux.
Prerequisites
Start- In your installation package, locate and double-click the setup.exe file. The Install Shield opens the welcome screen.
- Click Next. The Connection Parameters to the Configuration Server screen appears.
- Under Host, specify the host name and port number where Configuration Server is running. (This is the main "listening" port entered in the Server Info tab for Configuration Server.)
- Under User, enter the user name and password for logging on to Configuration Server.
- Click Next. The Select Application screen appears.
- Select the Web Engagement Backend Server Application that you are installing. The Application Properties area shows the Type, Host, Working Directory, Command Line executable, and Command Line Arguments information previously entered in the Server Info and Start Info tabs of the selected Application object.
- Click Next. The Choose Destination Location screen appears.
- Under Destination Folder, keep the default value or browse for the desired installation location.
- Click Next. The Backup Configuration Server Parameters screen appears.
- If you have a backup Configuration Server, enter the Host name and Port.
- Click Next. The Ready to Install screen appears.
- Click Install. The Genesys Installation Wizard indicates it is performing the requested operation for Backend Server. When through, the Installation Complete screen appears.
- Click Finish to complete your installation of the Backend Server.
- Inspect the directory tree of your system to make sure that the files have been installed in the location that you intended.
Prerequisites
Start- Open a terminal in the Genesys Web Engagement CD/DVD or the Genesys Web Engagement IP, and run the Install.sh file. The Genesys Installation starts.
- Enter the hostname of the host on which you are going to install.
- Enter the connection information to log in to Configuration Server:
- The hostname. For instance, demosrv.genesyslab.com.
- The listening port. For instance, 2020.
- The user name. For instance, demo.
- The password.
- If the connection settings are successful, a list of keys and Web Engagement applications is displayed.
- Enter the key for the Web Engagement Backend Server application that you created previously in Configuration Server.
- Enter the location where Genesys Web Engagement is to be installed on your web server.
Note: This location must match the previous settings that you entered in Configuration Server. - If you have a backup Configuration Server, enter the Host name and Port.
- If the installation is successful, the console displays the following message:
Installation of Genesys Web Engagement Backend, version 8.1.x has completed successfully. - Inspect the directory tree of your system to make sure that the files have been installed in the location that you intended.
Importing the Frontend Server Application Template
Start
- Open Genesys Administrator and navigate to Provisioning > Environment> Application Templates.
- In the Tasks panel, click Upload Template. Upload Template link in the Tasks panel
- In the Click 'Add' and choose application template (APD) file to import window, click Add.
- Browse to the Web_Engagement_Frontend.apd file or, if your Configuration Server does not support Web Engagement specific types, select Web_Engagement_Frontend_Generic.apd, available in the templates directory of your installation CD. The New Application Template panel opens.
- Click Save & Close.
End
Creating the Frontend Server Application
Prerequisites
- You completed Importing the Frontend Server Application Template.
Start
- Open Genesys Administrator and navigate to Provisioning > Environment > Applications.
- In the Tasks panel, click Create New Application.
- In the Select Application Template panel, click Browse for Template and select the Frontend Server template that you imported in Importing the Frontend Server Application Template. Click OK.
- The template is added to the Select Application Template panel. Click Next.
- In the Select Metadata file panel, click Browse and select the Web_Engagement_Frontend.xml file or select the Web_Engagement_Frontend_Generic.xml file if you chose Web_Engagement_Frontend_Generic.apd in Step 4 of Importing the Frontend Server Application Template. Click Open.
- The metadata file is added to the Select Metadata file panel. Click Next.
- In Specify Application parameters:
- Enter a name for your application — for instance, Web_Engagement_Frontend_Server.
- Enable the State.
- Select the Host on which the Frontend Server will reside.
- Click Create.
- The Results panel opens.
- Enable Opens the Application details form after clicking 'Finish' and click Finish. The Frontend Server application form opens and you can start configuring the Frontend Server application.
 Frontend Server application opened in Genesys Administrator.

End
Configuring the Frontend Server Application
Important
After completing this procedure, you can open the Backend Server application and add a connection to the Frontend Server.Prerequisites
- You completed Creating the Frontend Server Application.
Start
- If your Frontend Server application form is not open in Genesys Administrator, navigate to Provisioning > Environment > Applications. Select the application defined for the Web Engagement Frontend Server and click Edit....
- In the Connections section, click Add. The Browse Applications dialog opens. Select the Backend Server application and click OK. Optionally, you can repeat this step to configure a connection to Message Server, which will enable you apply the network logging option.
- Select the Backend Server row in the list of connections and click Edit. In the Connection Info window, set http for the Connection Protocol. Click OK. Note: If you skip this step, the Web Engagement solution will not work.
 Set the Connection Protocol to http.
 - Expand the Server Info pane.
- In the Tenant section, click Add and select your tenant. For instance, Environment. Click OK.
- Note: The Frontend Server and Backend Server applications should belong to the same Tenant. See Multi-Tenancy for details.
- If your Host is not defined, click the lookup icon to browse to the hostname of your application.
- In the Listening Ports section, create the default port by clicking Add. The Port Info dialog opens.
- Enter the Port. For instance, 8081.
- Choose http for the Connection Protocol.
- Click OK.
- Optionally, you can add a secure listening port by clicking the Add button. The Port Info dialog opens.
- Enter https for the ID field. This specific ID is required in GWE 8.1.2.
- Enter the Port. For instance, 8443.
- Choose https for the Connection Protocol.
- Choose Secured for the Listening Mode.
- Click OK.
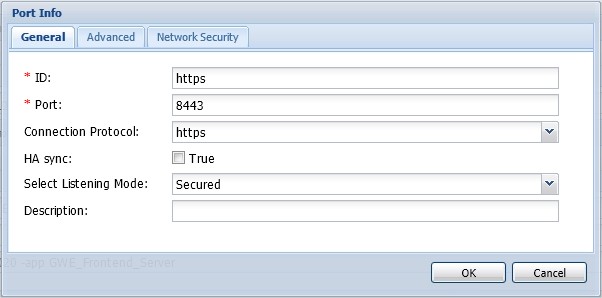 Secure listening port
- Optionally, you can explicitly add a Jetty stop port for the Backend Server. If you do not define a stop port, it is auto-generated when you start the server. To specify the stop port, click the Add button. The Port Info dialog opens.
- Enter stop for the ID field. This specific ID is required.
- Enter the Port. For instance, 18081.
- Click OK. The stop port appears in the list of Listening ports.
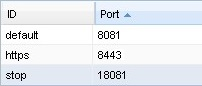 Listening ports
- Ensure the Working Directory and Command Line fields contain "." (period). They are automatically populated when the Frontend Server is installed.
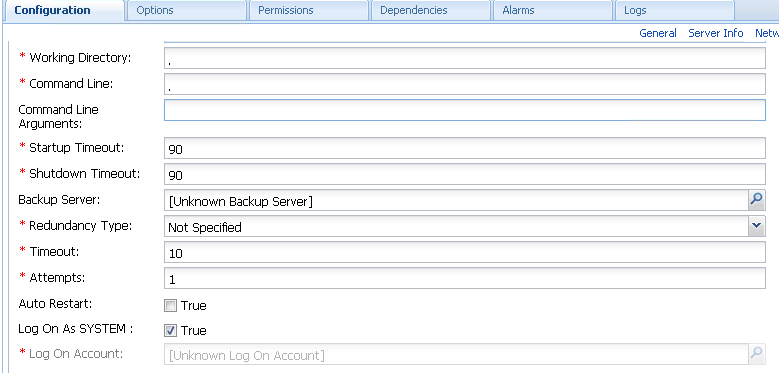 Commands for the Frontend Server.
 - Click Save.
- The Confirmation dialog for changing the application's port opens. Click Yes.
- (Optional) Select the Options tab. In the [log] section, the all option is set to stdout by default. Enter a filename if you wish to enable logging to a file. For example, you can enter stdout, c:\logs\WebEngagement\Frontend_Server to force the system to write logs in the console and in a file.
- (Optional) You need to create a webengagement annex only if your Web Engagement Frontend Server application's type is Genesys Generic Server. Click New in the Options tab. The New Option dialog opens.
- Select Annex for Location.
- Enter webengagement for Section.
- Enter type for Name.
- Enter frontendserver for Value.
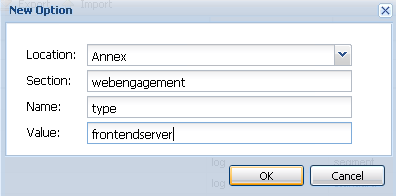 Annex for the Frontend.
 - Click OK. You can see it by selecting Advanced View (Annex) in the View selector.
- Click Save & Close. If the Confirmation dialog opens, click Yes.


End
Next Steps
Open your Backend Server application and add a connection to the Frontend Server.
Installing the Frontend Server
Install the Frontend Server on Windows or Linux.
Prerequisites
Start- In your installation package, locate and double-click the setup.exe file. The Install Shield opens the welcome screen.
- Click Next. The Select Installed Application screen appears.
- Select the Backend Server application you created in Creating the Backend Server Application.
- Click Next. The Connection Parameters to the Configuration Server screen appears.
- Under Host, specify the host name and port number where Configuration Server is running. (This is the main "listening" port entered in the Server Info tab for Configuration Server.)
- Under User, enter the user name and password for logging on to Configuration Server.
- Click Next. The Select Application screen appears.
- Select the Web Engagement Frontend Server Application that you are installing. The Application Properties area shows the Type, Host, Working Directory, Command Line executable, and Command Line Arguments information previously entered in the Server Info and Start Info tabs of the selected Application object.
- Click Next. The Backup Configuration Server Parameters screen appears.
- If you have a backup Configuration Server, enter the Host name and Port.
- Click Next. The Ready to Install screen appears.
- Click Install. The Genesys Installation Wizard indicates it is performing the requested operation for Frontend Server. When through, the Installation Complete screen appears.
- Click Finish to complete your installation of the Frontend Server.
Prerequisites
Start- Open a terminal in the Genesys Web Engagement CD/DVD or the Genesys Web Engagement IP, and run the Setup.sh file. The Genesys Installation starts.
- Select the Backend Server application you created in Creating the Backend Server Application.
- Enter the hostname of the host on which you are going to install.
- Enter the connection information to log in to the Configuration Server:
- The hostname. For instance, demosrv.genesyslab.com.
- The listening port. For instance, 2020.
- The user name. For instance, demo.
- The password.
- If the connection settings are successful, a list of keys and Web Engagement applications is displayed.
- Enter the key for the Web Engagement Frontend Server application that you created previously in Configuration Server.
- If you have a backup Configuration Server, enter the Host name and Port.
- If the installation is successful, the console displays the following message: Installation of Genesys Web Engagement Frontend, version 8.1.x has completed successfully.
Back to top
Next Steps
- You can now Configure Genesys Rules System to work with GWE.
This page was last edited on December 15, 2014, at 15:29.
Comments or questions about this documentation? Contact us for support!