Managing Cases
The tabbed sections below outlines our support processes and recommended best practices for managing Cases with Genesys Customer Care.
Only Designated Contacts are allowed to create a new Case, update/close existing Case or reopen a Case.
Other employees who work for Genesys direct Customers, Partners, Resellers, or End Users can request Read-Only access to My Support to view Cases opened by Designated Contacts on behalf of their company.
Finding a Case
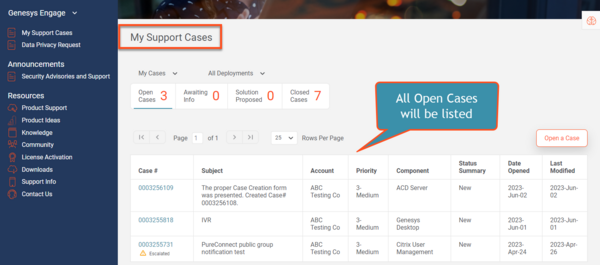
The My Support Cases page allows you to easily view all Non-Closed cases raised against all Case Types that you are named as the Case Contact. By default, when you first log into the My Support Portal, you will be directed to the My Support Cases page.
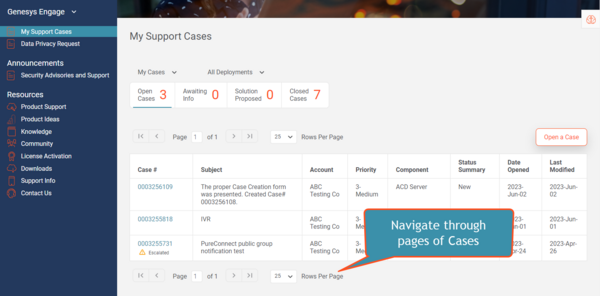
By default, My Support Cases displays up to 25 cases. If you have more than 25 cases open, you can navigate through them or change the number of cases per page by using the navigation toolbar that appears after your list of open cases.
View all your Organization's Cases
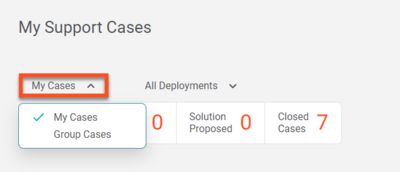
To view all the Cases open for your organization, click My Cases and select Group Cases from the drop-down menu.
How to Update a Case
You can update a Case on My Support, by Email, or by Phone, using the instructions below.
Updating a Case from My Support Portal
1. Login to My Support Portal using the corporate email listed in your user profile.
2. You will automatically be directed to the My Support Cases page.
3. Select the Case for which you are providing an update.
4. You can also:
- Enter the Case number in the search box.
- Search using a pre-defined query or by End User in the same search box.
5. Select the Case for which you are providing an update.
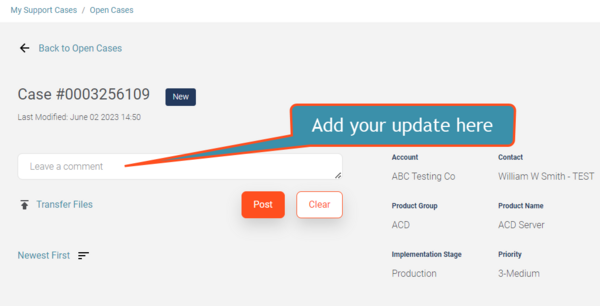
6. Enter your comment in the Leave a comment field, then select Post.
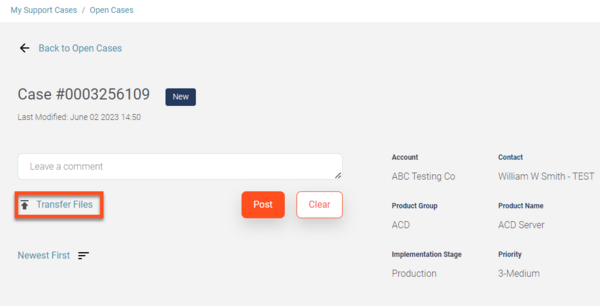
7. Files can be uploaded to the Case using the Transfer Files function.
NOTE: If the Case is in Awaiting Info or Solution Proposed status, posting an update will also change the Case Status to Open.
You will now see your update(s) in the Case Updates section of the Case.
Updating a Case by Email
Replying to either an email originating from the Case or an automated Case notification will update the Case automatically. An email originating from a Case includes a special Reference ID, which ties all replies to the Case. If you start a new email and send it to Product Support, it will not link to the case automatically, even if you have specified a case number. Such emails will be processed by the Product Support Admin team and may be manually linked to the case specified, but automatic linkage will not occur unless the email body contains the Reference ID.
NOTE: If the Case is in Awaiting Info or Solution Proposed status, and the Case contact replies to an Email originated from the Case, this will also change the Case Status to Open. In addition to this, will also see the Email updates in the Case Updates section of the Case.
Updating a Case by Phone
A Designated Contact may update a Case by calling Product Support, see the Contact Us page. You may be required to provide your PIN and the 10-digit Case Number.
Transfer Files to/from Case
Genesys provides a file transfer tool on My Support to allow customers to upload logs and other files that may be needed to help resolve Cases. Clicking the Transfer Files button within any non-closed Case launches the browser-based File Transfer Client, which provides the following features:
- Secured data transfer over HTTPS
- Sending multiple files concurrently
- File transfer resume capability
- Integrity validation
- No file size limit
Browser Settings and Other System Requirements
To use the built-in file transfer tool, the following settings must be in place:
- The browser running the client must have cookies enabled.
- The browser must allow pop-ups from the following servers for the Transfer Files functionality to work properly.
- https://eftgateway-us.genesys.com
- https://eftgateway-emea.genesys.com
- https://eftgateway-apac.genesys.com
The following browser versions are currently supported:
- Internet Explorer v11 or later
- Chrome v44 or later
- Firefox v39 or later
- Safari v8 or later on Mac OS
How to upload a file to a Case
1. Open the Case on the My Support Portal.
2. Click the Transfer Files function.
3. A warning page will appear, which explains that you should not upload regulated, sensitive, or personal data with this tool. Click Acknowledge.
4. You can then drag and drop files and folders from your desktop to the File Transfer client. You can also view files you have previously uploaded and view files that have been shared with you.
Temporary FTP Accounts
A situation may arise when the file transfer tool on My Support cannot be used for a given transaction. To address this need, Genesys has established the Temporary FTP Account process.
For a given Case, you can ask Customer Care to create a temporary FTP account, and then use an SFTP client application of your choice to transfer the files.
SFTP clients for Windows:
- WinSCP
- FileZilla
- CuteFTP
- PSFTP
- Core FTP
- Fire FTP
SFTP clients for macOS:
- FileZilla
- ClassicFTP
- Fire FTP
- Secure FTP
- Cross FTP
Unix users can use the SFTP utilities built into the operating system.
Once the temporary account is created, it will be associated with the given Case and remain active for the next 5 days (120 hours total). The login credentials along with the expiration date will be displayed in the Temporary FTP Account section of the Case details page while the temporary account is active.
Data Retention Policy
Thirty (30) days after a Case is Closed, the data uploaded for that case will be deleted.
Case Status Definitions
Genesys Customer Care uses the following support Case statuses to manage the issue resolution process:
| CASE STATUS | SUBSTATUS | DESCRIPTION |
|---|---|---|
| Open | New | Waiting to be reviewed |
| Investigation | When Customer Care is researching the Case | |
| Engineering Request | When Customer Care has engaged Engineering to progress the Case | |
| Maintenance Review | When Customer Care is investigating the entitlement and Service Contract | |
| Third Party Pending | Used if we have logged a fault with a Third Party and are waiting for a response | |
| Awaiting Information | Information Required From Customer | Used when Customer Care requires additional information from the Customer to advance the Case |
| Solution Proposed | Replied | Used when Customer Care has provided a solution to resolve the Case and customer confirmation is needed to confirm that it solved the problem or answered the question. |
| Fixed - Software Provided | Used when software has been provided to resolve the Case | |
| Closed | Resolved | Used when the Case has been closed because the issue was resolved |
| Cancelled | Used when there is no longer an issue, or Customer Care cannot gather enough information to pursue further |
Auto Follow-Up Process
The Automated Follow-up Service is designed to ensure timely and proactive follow-up with customers when we need information to advance a Case towards resolution. Automated Follow-ups will be sent to the Customer Contact on the Case according to the rules outlined below.
Auto Follow-Up #1: When Customer Care proposes a solution or requests information for an open Case, a follow-up timer is started for that Case. If there is no customer response within two (2) days, an automated Email is sent to the customer contact who opened the Case, with a reminder of the customer action requested (provide information or accept/reject solution), and a link to access the Case.
Auto Follow-Up #2: If there is no customer response within five (5) days after Customer Care proposes a solution or requests information for a Case, a second automated Email is sent to the customer contact who opened the Case. This email contains a reminder of the customer action requested (provide information or accept/reject solution), and a link to access the Case.
Auto Follow-Up #3: If there is no customer response within ten (10) days after Customer Care proposes a solution or requests information for a Case, the Case is closed and a final auto follow-up Email is sent to the Customer Contact who opened the Case. All information in the Case will remain intact for one month (including any logs or attachments). The customer can reopen it only by a telephone call to Customer Care.
NOTE:
- This automated follow-up process applies to all Cases with Critical, High, Medium or Low priority.
- Automated follow-ups are not used for Critical - Production Down cases.
- The follow-up timer could start and stop several times for a given case. Some examples of requests that start the follow-up timer:
- Send environment information
- Describe what happened before application failure
- Send product logs
- Verify proposed solution

