Cases
Only Designated Contacts are allowed to create a new Case, update/close an existing Case or reopen a Case.
Other employees who work for Genesys direct Customers, Partners, Resellers, or End Users can request Read-Only access to My Support to view Cases opened by Designated Contacts on behalf of their company.
1. Login to the My Support Portal.
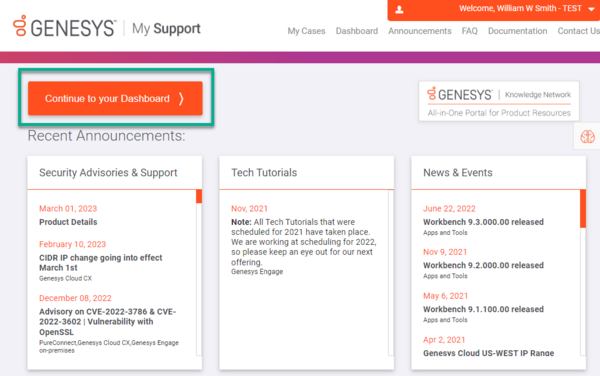
2. If any announcements pop-up, click Continue to your Dashboard:
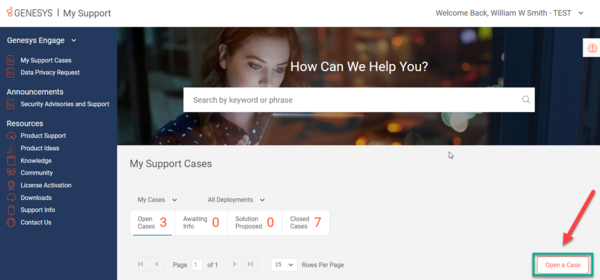
3. The My Support Portal will automatically open to your My Support Cases page. From there, click the Open Case button:
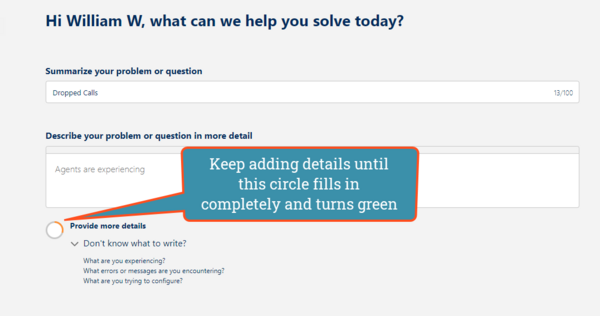
4. A new page will open that says, "Hi <your name>, what can we help you solve today?.", fill out the form as follows:
- Summarize your problem or question:
- *There's a limit of 1000 characters
- *Make your summary short, but as specific as possible
- *There's a limit of 1000 characters
- Describe your problem or question in more detail:
- * Add as many specific details as possible. The more information, the better.
- * After this field, there is a small yellow circle that will fill in as you type more in the description field. After the circle, there will be the words, Provide more details. Once you have added a minimum of 10 words, the circle will fill in green and the words will change to "Thank you!"
- * After the circle, there is a header that says, "Don't know what to write?" and provides a list of prompts that will help you think of details you should include in your description of your problem or question.
- Component: Our AI will auto-select a Component based on the text of summary and description, but if it is incorrect, you can select another by selecting another Component or through More Options.
- Click Next.
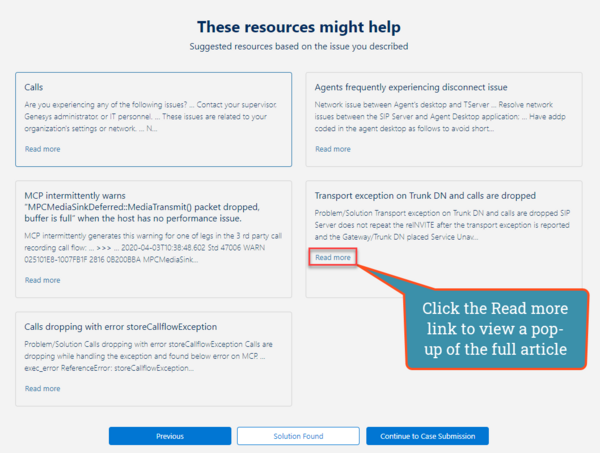
- The next page, titled These resources might help, will present you with a selection of titles that include summaries of Knowledge Articles that may solve your problem.
- * If you click Read more on the tile, a pop-up will appear showing a preview of the article
- * A link to the article page is included at the beginning of the pop-up
- * To close the pop-up, click X near the upper-right corner of the pop-up window
- * After closing the pop-up, a message will appear in that article tile asking "Your opinion can help others. Was this helpful?" You can select between Yes or No. Please take the time to select one as this will help the AI learn which articles are helpful for specific inquiries.
- * After reviewing possible solutions, scroll to the end of the page and click either Solution Found or Continue to Case Submission.
- * If you click Solution Found, a pop-up message will appear saying "We're glad you found the answer!", click Confirm.
- * If you click Continue to Case Submission, a new form will appear. Fill in the rest of the details to the best of your ability.
How to Create Cases
1. The Deployment, Component, Subject, and Description will autofill based on the initial problem or question form.
2. Pick a Priority for your Case:
- High: You are able to perform job functions but performance is degraded or limited.
- Medium: Your ability to perform job functions is largely unaffected, but noncritical functions or procedures are unusable or hard to use. A workaround is available.
- Low: The Genesys Component is available and operational; trivial impact to your business operations or you require information or assistance on product capabilities or configuration.
- NOTE: You may notice that Critical is not a priority option. A Critical Case is one where you are experiencing a severe problem resulting in an inability to perform a critical business function. There is no workaround. If you are experiencing a Critical problem, then submit the Case as a High priority and call Product Support phone support directly: Phone Support
- NOTE: You may notice that Critical is not a priority option. A Critical Case is one where you are experiencing a severe problem resulting in an inability to perform a critical business function. There is no workaround. If you are experiencing a Critical problem, then submit the Case as a High priority and call Product Support phone support directly: Phone Support
- High: You are able to perform job functions but performance is degraded or limited.
3. Pick an Implementation Stage: Production or UAT (User Acceptance Testing)
4. If there is a security threat, check the Is there a security threat? box
5. Pick a Case Sub Type:
- Question: You don't know how to do something
- Problem: Something is broken or not working correctly
- Question: You don't know how to do something
6. Enter details on Business Impact: How is this case affecting the operation of your business? Can you not do certain tasks? Is it slowing down your call center staff?
7. Enter # of Agents Affected.
8. Enter External Ref # if you have one.
9. Click Submit. This will take you back to the My Support Cases page, with a small pop-up in the upper right-hand corner, confirming that you successfully submitted your case. Your case will also appear at the beginning of the Cases table on the My Support Cases page.


