Export and Import SMART Instructions
An exported SMART definition can be used for a number of purposes:
- To create a backup copy of the set of instructions.
- To transfer definitions from a test environment to the real system used by your company.
- To send the output to another location within your company for importing into a different SMART implementation.
- To send the output to Genesys staff for testing or when you are having a problem with the system
SMART export files have an .upf extension.
When exporting SMART topic, program and/or category definitions remember the following:
- If you select a folder, all of the items in the folder are selected and exported.
- If you select All in the tree list, all of the definitions of the selected type are selected and exported.
- If you do not make a selection, all items in the currently displayed Manager are included in the export file. For example, if the Topic Manager tab is open, but no topics are selected, all of the topic definitions are included in the export file.
- When you export a program, all topics included in the program are exported along with the program. When you export a Parent Category, all of its sub-Categories are included in the export file.
- When exporting a category, its sharing settings are not exported with it. If you import the category at a later time, it will contain the All sharing settings. By default, categories are shared with all SpeechMiner users. You can change this by specifying groups, work groups, roles, and/or specific users with whom a category should be shared. Category sharing does not affect which interactions a user can see or play back.
Procedure
- Verify that the topics, programs and/or categories you want to export are not open or locked.
- Select the topics, programs, categories or folders you want to export.
- Click Export
 .
. - Click Browse
 to select the location of the export file.
 - Click Export.
- Click OK to complete the export process.
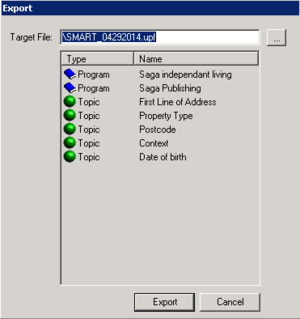
The Export list dialog box opens. If you chose to export specific items, they are listed in the dialog box.
The export file is created. When the process is complete, a confirmation message appears.
Related Topics
Locking and Unlocking Topics, Programs and Categories
Topics
Programs
Categories
SpeechMiner User Manual
When you import a .upf file, you can select which items to import.
Procedure
- Click Import
 .
. - Click Browse
 to select the location of the file you are importing.
 - Select the file and click OK.
- Verify that the items you want to import are selected. If there are items in the list that you do not want to import, clear their check boxes.
- Click Import.
- Click OK to complete the export process.
The Import dialog box opens.
The import process begins. If you are importing items that already exist in SMART, you are prompted to confirm that you want to replace the existing items with the items in the file you are importing. When the process is complete, a confirmation message appears.
Related Topics
Topics
Programs
Categories
SpeechMiner User Manual


