contact.history.media-filters
Section: interaction-workspace
Default Value: voice,email,chat,sms
Valid Values: A comma-separated value of valid media type names including: voice,email,chat,sms,facebook,facebooksession,facebookprivatemessage,twitter,twitterdirect
Changes Take Effect: When the application is started or restarted.
Modified: 8.5.104.15, Social Media Plugin 9.0.002.05
Specifies the list of media types that can be used to filter the 'Contact History', 'My History', and the result list of 'Interaction Search'.
workbin.twitter.draft
Section: interaction-workspace
Default Value: Twitter Workbin Draft
Valid Values: The name of a valid Script object of type Interaction Workbin that is owned by Agents.
Changes Take Effect: At start/restart
The name of the workbin that is used to store draft Twitter posts.
workbin.facebook.draft
Section: interaction-workspace
Default Value: Facebook Workbin Draft
Valid Values: The name of a valid Script object of type Interaction Workbin that is owned by Agents.
Changes Take Effect: At start/restart
The name of the workbin that is used to store draft Facebook interactions.
facebooksession.background-color-external
Section: interaction-workspace
Default Value: #FFF5F5F5
Valid Values: Color hexadecimal (#RRGGBB)
Changes Take Effect: Immediately
Background color for external messages.
facebooksession.background-color-error
Section: interaction-workspace
Default Value: #FFFF6347
Valid Values: Color hexadecimal (#RRGGBB)
Changes Take Effect: Immediately
Background color for error messages.
facebooksession.background-color-client
Section: interaction-workspace
Default Value: #FFDBE5F4
Valid Values: Color hexadecimal (#RRGGBB)
Changes Take Effect: Immediately
Background color for client messages.
facebooksession.background-color-agent
Section: interaction-workspace
Default Value: #FFF3F7FB
Valid Values: Color hexadecimal (#RRGGBB)
Changes Take Effect: Immediately
Background color for agent messages.
twitter.mention-regex
Section: interaction-workspace
Default Value: @(\w+)
Valid Values: Valid regular expression
Changes Take Effect: Immediately
Highlights mentions and makes them clickable.
twitter.hashtag-regex
Section: interaction-workspace
Default Value: (?:(?<=\s)|
Valid Values: Valid regular expression
Changes Take Effect: Immediately
Highlights hashtags and makes them clickable.
facebook.hashtag-regex
Section: interaction-workspace
Default Value: (?:(?<=\s)|
Valid Values: Valid regular expression
Changes Take Effect: Immediately
Highlights hashtags and makes them clickable.
twitter.url-regex
Section: interaction-workspace
Default Value: ((http|https|ftp)\:\/\/)?[a-zA-Z0-9\-\.]+\.[a-zA-Z]{2,3}(\:[a-zA-Z0-9]+)?(\/)?([a-zA-Z0-9\-\._\?\,\'\/\\\+\&\%\$\#\!\=\~\)\(\*\:])*
Valid Values: Valid regular expression
Changes Take Effect: Immediately
Modified: 9.0.012.51
Regular expression for identifying Twitter interaction url links
facebook.url-regex
Section: interaction-workspace
Default Value: ((http|https|ftp)\:\/\/)?[a-zA-Z0-9\-\.]+\.[a-zA-Z]{2,3}(\:[a-zA-Z0-9]+)?(\/)?([a-zA-Z0-9\-\._\?\,\'\/\\\+\&\%\$\#\!\=\~\)\(\*\:])*
Valid Values: Valid regular expression
Changes Take Effect: Immediately
Modified: 9.0.012.51
Regular expression for identifying url links
twitter.outbound-queue
Section: interaction-workspace
Default Value: *queue name*
Valid Values: Valid queue name.
Changes Take Effect: At start/restart
Specifies the name of the queue in which an outbound interaction is to be placed when an agent is done editing it.
facebook.outbound-queue
Section: interaction-workspace
Default Value: *queue name*
Valid Values: Valid queue name.
Changes Take Effect: At start/restart
Specifies the name of the queue in which an outbound interaction is to be placed when an agent is done editing it.
twitter.default-queue
Section: interaction-workspace
Default Value: *queue name*
Valid Values: Valid queue name.
Changes Take Effect: At start/restart
Specifies the name of the queue in which outbound interactions are first created. This name must be identical with the the name of the default queue in the Business Process that the plugin uses.
facebook.default-queue
Section: interaction-workspace
Default Value: *queue name*
Valid Values: Valid queue name.
Changes Take Effect: At start/restart
Specifies the name of the queue in which outbound interactions are first created. This name must be identical with the the name of the default queue in the Business Process that the plugin uses.
Social Media Plugin for Workspace Desktop Edition
Contents
Overview
Genesys provides a plugin that adds functionality to Workspace Desktop Edition, enabling agents to handle social media interactions.
Prerequisites
- Workspace Desktop Edition 8.5.1 or later.
Outline of Deployment
You can install the plugin for Workspace Desktop Edition using ClickOnce deployment or non-ClickOnce deployment procedure.
- When installing Persistent Agent Chat for Facebook, a mandatory upgrade of the latest version of Workspace Desktop Edition (WDE), and Social Media Plug-in for Workspace Desktop Edition is required.
- If you are using Digital Messaging Server, then a mandatory upgrade of the latest version of WDE, Social Media Plug-in for WDE, Genesys Cloud API Driver for Facebook, and Genesys Cloud API Driver for Twitter is required.
Installation
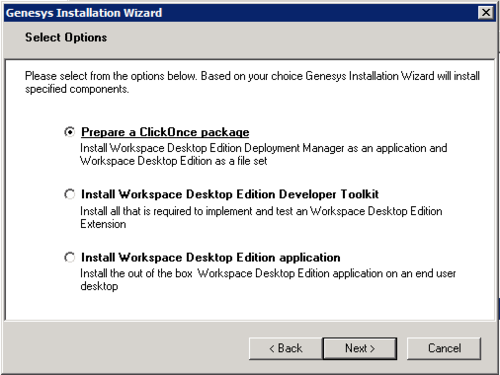
- Install WDE using the Prepare a ClickOnce package option. For detailed information on ClickOnce deployment of WDE, see WDE Deployment Procedures.
- Install Social Media Plugin for Workspace Desktop Edition.
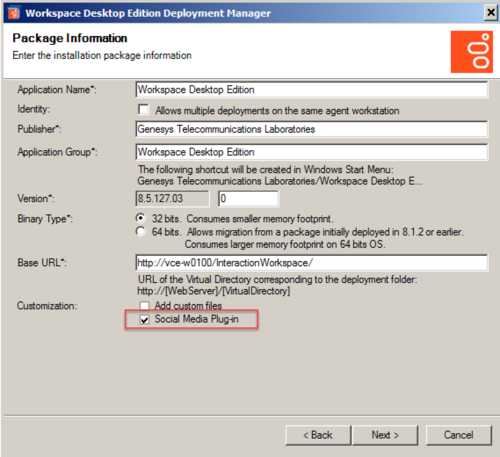
- Select Social Media Plug-in when creating deployment package using Workspace Desktop Edition Deployment Manager.
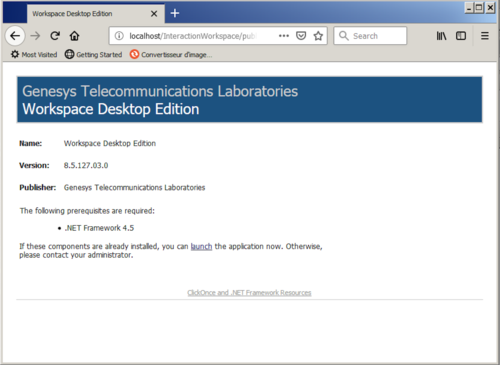
- Deploy Workspace Desktop Edition and Social Media Plugin for Workspace Desktop Edition via the published page.
Upgrade
- Uninstall the existing Social Media Plugin for WDE.
- Install the new plugin.
- Select Social Media Plug-in when creating deployment package using Workspace Desktop Edition Deployment Manager.
- Deploy Workspace Desktop Edition and Social Media Plugin for Workspace Desktop Edition via the published page.
Uninstall
- Uninstall the existing Social Media Plugin for WDE.
- Create deployment package using Workspace Desktop Edition Deployment Manager without selecting Social Media Plug-in .
- Deploy Workspace Desktop Edition via the published page.
- Configure Interaction Workspace. Note that to use role-based access control, you must use Genesys Administrator to configure Workspace Desktop Edition and the plugin.
- Install Interaction Workspace using the non-ClickOnce deployment procedure, also known as "installing the Interaction Workspace Application."
- Configure and install the social media plugin, being sure that your configuration procedure includes importing the template and metadata for the plugin (see
Genesys Administrator 8.1 Help for information on importing metadata). This makes roles and other required items available.
- Assign privileges, if you are using role-based access control.
- You must assign all Workitem privileges. The plugin does not support unassigned Workitem privileges.
- Assign <socialmedia> privileges.
- Provide values for the configuration options that you added to your Interaction Workspace Application, as described in the next section of this page.
Configuration Options
Refer to the interaction-workspace section to learn about the configuration options for the Social Media plugin in detail. This section provides an outline of the options. Click the option for the description in the pop-up.
Queue Options (mandatory)
You must set a value for these options.
Regex Options
These options allow for certain strings to be highlighted and made clickable when interactions are displayed.
- facebook.url-regex
- twitter.url-regex
- facebook.hashtag-regex
- twitter.hashtag-regex
- twitter.mention-regex
Color Options
These options allow messages to be displayed in different colors in the Facebook Session view using Hexadecimal color codes.
- facebooksession.background-color-agent
- facebooksession.background-color-client
- facebooksession.background-color-error
- facebooksession.background-color-external
Workbin Options
Media Filters in WDE
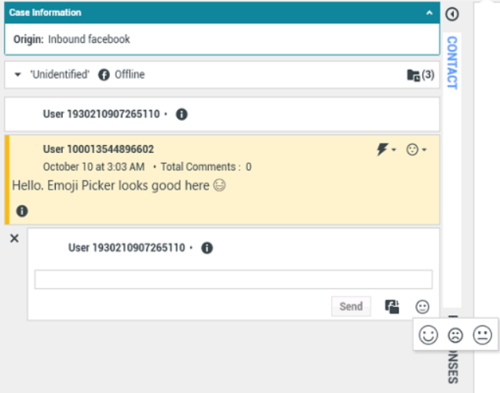
Emoji Picker
Enabling Emoji Picker
Social Media Plugin for Workspace Desktop Edition uses the following configuration options to display emojis in inbound interactions and in emoji picker:
- facebook.font-name
- twitter.font-name
To connect the emoji picker for Facebook and Twitter we have to add in WDE configuration settings in existing interaction-workspace section keys:
- facebook.emojis-business-attribute
- twitter.emojis-business-attribute
Set the value of the these attributes options to the name of a Business Attribute that defines the emojis that you want to support. It can be one common attribute, for example "Emojis", per both facebook and twitter mediatypes or different like for example "FacebookEmojis" and "TwitterEmojis".
Valid Values: The name of a Business Attribute that defines a set of emojis.
Changes take effect: At the next interaction.
Use the following steps to create a Business Attribute that defines the emojis that your agent can send:
- Create a new Business Attribute with a name (for example "Emojis"). This is the Business Attribute that you set as the value of the chat.emojis-business-attribute option.
- In the Attribute Value tab of the Business Attribute, create one value for each emoji Unicode character that you want to support.
- Name each value with a unique name, such as the number of the Unicode character that you want to support. The Display Name that you define is displayed in a tooltip when an agent hovers their mouse pointer over an emoji before selecting it from the chat text field tools.
- For each attribute value, configure the code option and assign to it the value of the emoji Unicode character. The value of the Unicode emoji format is 1F6nn where nn are digits in hex format; for example: 1F607
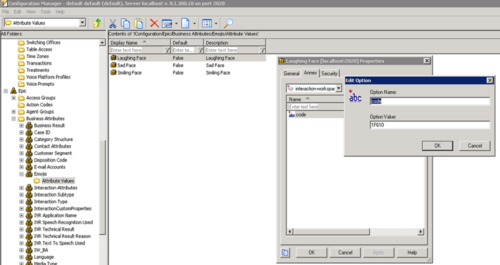
The following procedure explains how to set up a sample laughing face emoji that has a Unicode = 1F610:
- Under the Emojis business attribute, create a new Business Attribute Value.
- Update the fields in the General tab with relevant information.
- Create a new section called interaction-workspace in the Annex tab.
- In the interaction-workspace section, create a new option with Option Name = code, and Option Value = 1F610
- Save this Business Attribute Value. This configured emoji will appear in Emoji Picker now.
Enabling Emojis in WDE
Twitter and Facebook interactions support Unicode 6 emojis from an installed font such as Segoe UI Emoji. To enable emojis, you must:
- Add the following parameters to the Digital Messaging Server init file JavaServerStarter.ini under the [JavaArgs] section:
- -Dfile.encoding=UTF-8
- -Dfile.client.encoding=UTF-8
- -Dclient.encoding.override=UTF-8
- ImportantTo avoid data corruption, you must ensure that all components in the chain of communication use UTF-8 encoding.
- Install the font Segoe UI Emoji from https://www.dafontfree.net/freefonts-segoe-ui-emoji-f63785.htm.
- Set the font name and font size for Twitter inbound interaction text and the font name for Twitter outbound interaction text by adding these options to the WDE configuration settings under the "interaction-workspace" section:
- twitter.font-name=“Segoe UI Emoji”
- twitter.font-size=[specify font size if you need to change the default of 14]
- Set the font name and font size for Facebook inbound interaction text and font name for Facebook outbound interaction text by adding these options to the WDE configuration settings under the interaction-workspace section:
- facebook.font-name=“Segoe UI Emoji”
- facebook.font-size=[specify font size if you need to change the default of 14]
- The related map between emoticons and emojis is defined in the file EmoticonsEmojis.xml, where you can add, update, or remove emoticon-emoji pairs. After editing this file, you must restart WDE.
Installing codecs for video and audio attachments
- Install the latest K-Lite codec pack using the link: https://codecguide.com/download_kl.htm .
- Install the latest QuickTime from Apple using the link: https://support.apple.com/downloads/quicktime .
- Ensure that you have Windows Media Player installed. Otherwise, install it using the link: https://support.microsoft.com/en-us/help/14209/get-windows-media-player .
- If you are on a Windows Server edition, turn on Desktop Experience.
- Reboot your OS.

