WhatsApp Business Account
Also known as a WABA. An account that is required to use the WhatsApp Business Solution and to access the WhatsApp Business APIs.
Glossary
WhatsApp Business Account
Also known as a WABA. An account that is required to use the WhatsApp Business Solution and to access the WhatsApp Business APIs.
Glossary
Contents
Creating a WhatsApp Channel
Genesys Hub supports WhatsApp Business and includes an API connector for WhatsApp. The WhatsApp channel allows consumers to connect with brands and brands to connect with consumers from the WhatsApp Messenger app on their smartphone. This document describes how to create and activate a WhatsApp channel in Genesys Hub.
This topic contains the following sub-topics:
- Prerequisites
- Creating a Hub account
- Creating a WhatsApp channel
- Registering a WhatsApp channel
- Activating a WhatsApp channel
- Migrating your existing phone number from other CSP to Genesys
- Adding a business profile
Prerequisites
- You must have a designated business number that complies with the WhatsApp requirements and is able to receive voice calls and text messages (SMS). For information on the requirements, refer to https://developers.facebook.com/docs/whatsapp/guides/phone-number.
- You must have a valid GARN code to complete the WhatsApp on-boarding setup. When you buy a Genesys product, you receive a GARN code which is used for billing purposes.
Creating a Hub account
The first step of deploying a WhatsApp channel is to create an account within the Hub component of Social Engagement. Refer to the Create an Account section for instructions on how to set up an account. You can also log in with your existing account if you are already a registered Hub user.
Creating a WhatsApp channel
- Log on to your Hub account via https://socialanalytics.genesyscloud.com .
ImportantWe recommend that you always use https://socialanalytics.genesyscloud.com to access Hub. But if you prefer a static URL, you can alternatively use https://static.socialanalytics.genesyscloud.com .
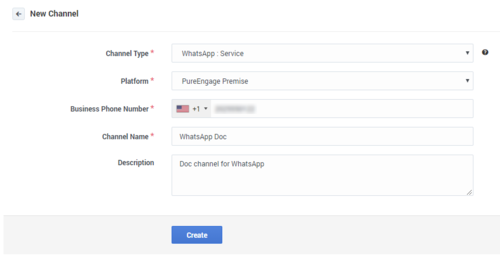
- Click Add Channel.The New Channel page is displayed.
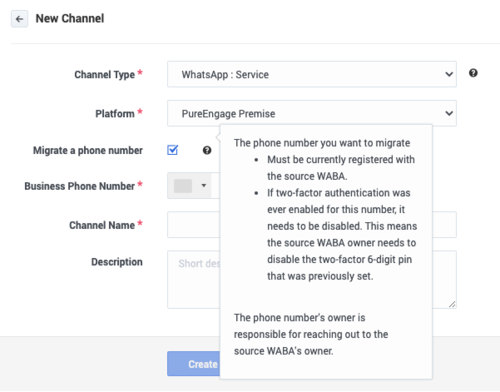
- Select WhatsApp: Service from the Channel Type drop-down list.
- Choose Genesys Engage Premise from the Platform drop-down list.
- Enter your business phone number in the Business Phone Number field.
Important
- If you want to create more than one WhatsApp channel, you must use a unique phone number for each channel.
- If your phone number is registered with other CSP (Content Service Provider) and you want to migrate to Genesys, you can select the Migrate a phone number option. For more information, see Migrating your existing phone number from other CSP to Genesys.
- Enter a channel name and description.
ImportantChannel name is used as the phone display name in WhatsApp and it is visible to consumers interacting with the brand in WhatsApp Messenger. You must ensure that the name complies with WhatsApp policies. For more information on WhatsApp policies, see https://developers.facebook.com/docs/whatsapp/guides/vname .
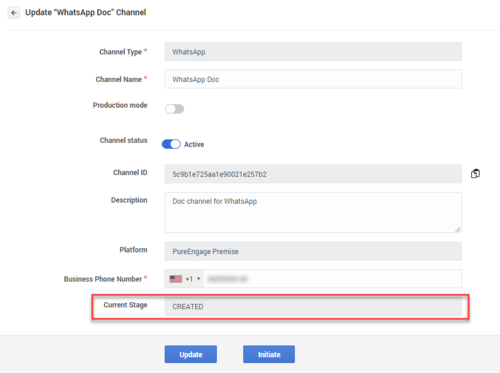
- Click Create. The channel is now in the CREATED stage.
The channel goes through the following stages in the activation process:
- CREATED - The first stage after channel creation.
- INITIATED - The channel is under review by Genesys.
- VERIFIED - The channel information was reviewed and is correct.
- REGISTERED or REJECTED - The channel can be registered or rejected by Genesys team based on the provided channel data.
- ACTIVATED - The channel is activated and is enabled for WhatsApp Business.
Registering a WhatsApp channel
You must request Genesys to register your channel before proceeding with activation. After you initiate this request, the Genesys team starts verifying, provisioning, and configuring all the required infrastructure for your business contact number to function and service your consumers.
- Log on to your Hub account via https://socialanalytics.genesyscloud.com .
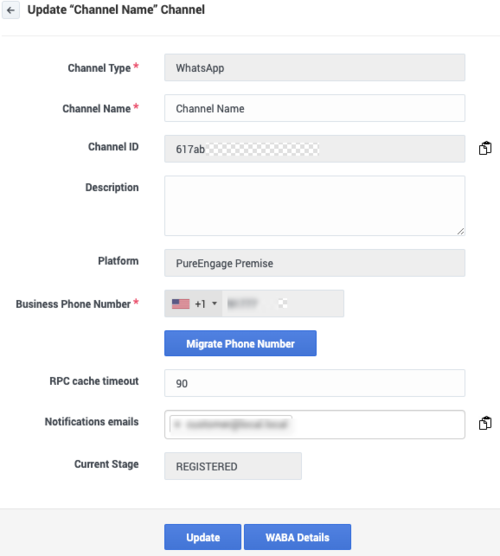
- Access My Channels and click on your channel name. The Update Channel page is displayed.
- Enter email addresses of the contacts who must be notified on events related to the channel in the Notify emails field.
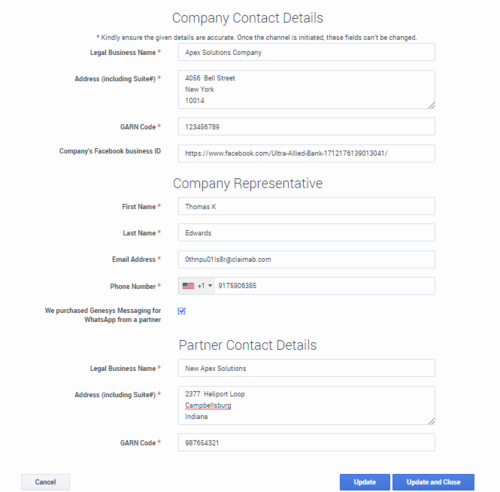
- Click WABA Details. A form to enter your WhatsApp Business Account details is displayed.
- Fill in your WhatsApp Business Account details along with your company representative's contact information and click Update WABA.
Tip
- If your Hub account has another WhatsApp channel with WABA details already filled in, select the channel from which you want to import the details in the Populate Details from another channel drop-down list.
- If you have purchased Genesys WhatsApp Messaging Solution from a partner, select We purchased Genesys Messaging for WhatsApp from a partner and enter the partner contact details in the Partner Contact Details section.
- Click Initiate to request Genesys for a review. A confirmation message is displayed indicating that the request to review and register the channel has been received by Genesys. The channel is now in INITIATED stage.
You may be contacted by your Genesys representative to verify your WhatsApp channel, so make sure that all email addresses for the users registered in your account are valid. Once the initial validity has been checked, Genesys will set the channel state to VERIFIED. After Genesys completes the full review, you will receive an email indicating whether your request was approved. Your channel will now have one of the following states and your next step can be:
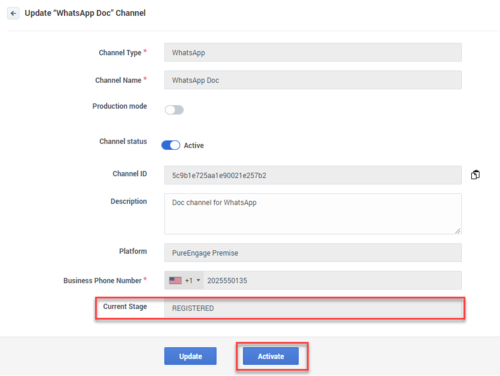
- REGISTERED - Activate the channel using the Activate button.
- REJECTED - Update the channel data such as phone number and channel name, and initiate the review again using the Initiate button.
- You cannot edit the business phone number and channel name when your channel is in INITIATED stage. If you want to update these details, contact your Genesys representative.
- If your channel is rejected, contact your Genesys Representative to understand the reason for rejection.
- When your WhatsApp channel reaches the REGISTERED stage, the channel remains as REGISTERED for a maximum of two weeks until activated or rejected. After this period, you must initiate the channel registering process again.
Activating a WhatsApp channel
You can proceed with activation as soon as you have received an email from Genesys confirming that your channel is registered.
- Log on to your Hub account via https://socialanalytics.genesyscloud.com .
- Access My Channels and click on your channel name. The Update Channel page is displayed.
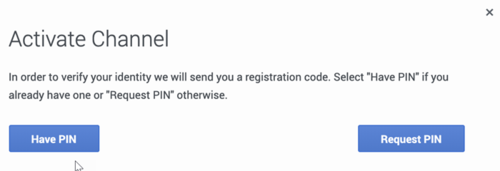
- Ensure that the current stage is shown as REGISTERED and click Activate. A window is displayed for a PIN activation process.
TipIf you have selected the Migrate a phone number option during channel creation, the Activate button is not displayed. Additionally, the channel is automatically activated after the migration process is completed.
- Click Request PIN.
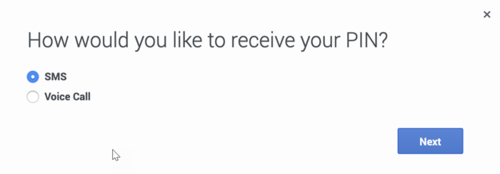
- Select a mode of communication to receive the PIN and click Next.
- After receiving the PIN, enter the PIN and click Activate. Your channel is activated.
Migrating your existing phone number from other CSP to Genesys
You can migrate a phone number from other content service provider to Genesys.
- Create a WhatsApp channel. Enable the Migrate a phone number option and enter the existing phone number while creating the channel. See Creating a WhatsApp channel.
- Register the WhatsApp channel. While registering, you must enter your Facebook Business ID in the WhatsApp Business Account form. See Registering a WhatsApp channel.
TipTo find your Facebook Business ID, see Find your business ID in Business Manager.
- After your channel is approved and registered by Genesys, navigate to the Update Channel page, and click Migrate Phone Number. The Migrate phone number pop-up window is displayed.
- Click Initiate migration and follow the activation process. See Activating a WhatsApp channel
- After entering your PIN and clicking Submit, your phone number is migrated and the channel is activated.
Adding a business profile
After your channel activation, you can add a business profile to the channel.
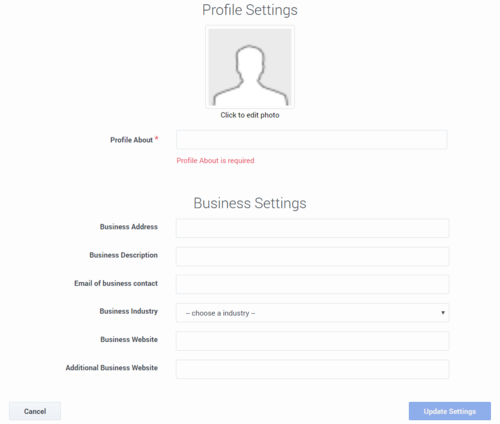
- Click Business Settings on the Update Channel page. The Profile Settings screen displays.
- You can upload or edit your business profile picture using the Click to edit photo option.
- Enter a profile description in the Profile About field. This field is mandatory.
- Provide information about your business such as address, email, industry, and website. For more information on the WhatsApp business verticals that are displayed in the Business Industry drop-down field, see https://developers.facebook.com/docs/whatsapp/api/settings/business-profile#verticals .
- Click Update Settings to save the business profile.
Viewing WABA Billing
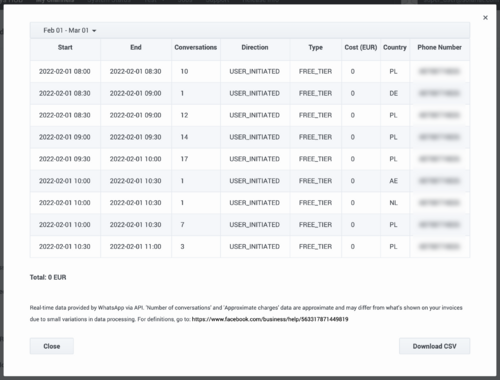
WhatsApp billing analytics is available for customers with WhatsApp Business Accounts (WABA) managed by or shared with Genesys. Follow these steps to view the detailed conversation analytics for the configured WABA:
- Access the WhatsApp channel page and click WABA Billing. A pop-up window is displayed.
- Select a date range. The billing analytics pertaining to the selected period are displayed.
- Click Download CSV to export the analytics to a CSV file.

