Stream_Manager
A Genesys client application that generates and processes media streams in Real-Time Transfer Protocol (RTP) format, in order to provide announcements and music to callers who are queued on Routing Points and ACD Queues. It can also serve as a music server or as a Multipoint Conference Unit (MCU). Stream Manager supports different types of codecs, in order to stream media files in the appropriate codec format.
Glossary
Media Control Platform
The core component of the Genesys Voice Platform (GVP) 8.x that executes the actual voice applications in the GVP solution. In addition, it is used by other communication layer components, such as SIP Server, to provide broader customer service scenarios, such as agent interactions, and many other functions.
Glossary
Post Installation Configuration
Contents
- 1 Post Installation Configuration
- 1.1 Tomcat
- 1.2 IIS/NET Preferences
- 1.3 Internet Information Services (Windows 11)
- 1.4 Internet Information Services (Windows 7 and earlier)
- 1.5 MIME Types
- 1.6 Debugging in MCP
- 1.7 Configuring the GVP Debugger
- 1.8 Enabling Debugging in the Media Control Platform (MCP)
- 1.9 Configuring the ORS Debugger
- 1.10 TCP Ports (Firewalls)
- 1.11 GAX Server Preferences
- 1.12 Business Rule Preferences
- 1.13 Proxy Settings
- 1.14 Prompt Resource Validation
- 1.15 Configuration Server Connection
- 1.16 TLS Support for Configuration Server
- 1.17 Configuration Server Preferences
- 1.18 ORS and Routing Point Configuration
- 1.19 Using Stream Manager for Voice Treatments
- 1.20 Hiding Capabilities
- 1.21 Context Services Preparation
- 1.22 Upgrading Projects and Diagrams
- 1.23 Migrating IRD Strategies
- 1.24 Deploying Projects to Tomcat
- 1.25 Installing the Business Rules Plugin
- 1.26 Preferences and Options
- 1.27 Hiding Data in Logs
This chapter contains post-installation tasks to be performed after installing and launching Composer.
Tomcat
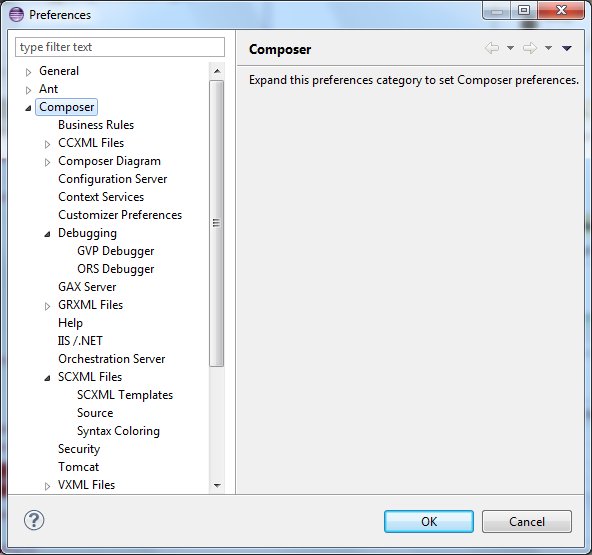
Before you can start to create a Java Composer Project that you will deploy later on a Tomcat application server, you must configure Tomcat settings for Composer (Window > Preferences > Composer > Tomcat). The figure below shows the Composer Preferences dialog box fully expanded.
- For information on configuring Tomcat for voice applications, see the Tomcat section in Callflow Post Installation in the Composer 8.1.5 Help.
- For information on configuring Tomcat for routing applications, see the Tomcat section in Workflow Post Installation in the Composer 8.1.5 Help.
IIS/NET Preferences
If you plan to use IIS as your web server for testing and deployment, you will also need to configure IIS preferences in Composer so that your applications can be auto-deployed to IIS from within the workbench. Composer can work only with IIS installed on the local machine. You can work with both Tomcat and IIS from the same installation of Composer.
- For more information, see Internet Information Services in Callflow Post Installation.
Internet Information Services (Windows 11)
Before you can start to create a .NET Composer Project that you will deploy later on a Microsoft Internet Information Services (IIS) web server, you must do the following:
- Configure IIS/.NET Preferences in Composer.
- Allow the ASP.NET Web Service extension in Internet Information Services (IIS) Manager.
Disabling UAC
To address any potential deployment failures when using IIS, Genesys recommends adjusting the User Account Control (UAC) for all Composer supported Windows operating systems (Use the User Account Control Settings on Windows 11) to reduce UAC pop-ups when Composer deploys applications to IIS. Alternatively, run Composer’s Eclipse with Administrative Privileges.
Additional Windows Features
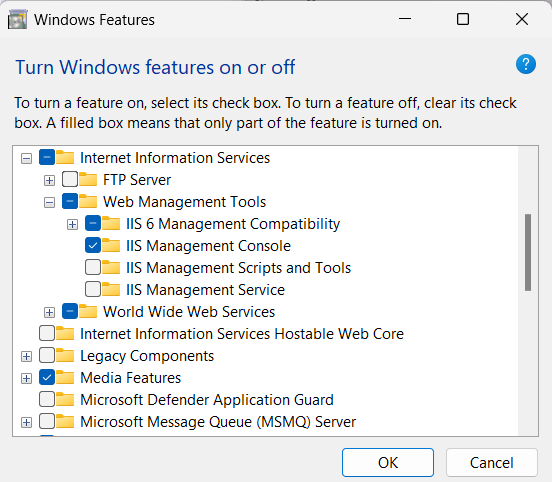
Enable these features in Internet Information Services > World Wide Web Services > Application Development Features:
- ASP.NET 4.8
- .NET Extensibility 4.8
- ISAPI Extensions
- ISAPI Filters
Allowing ASP.NET Web Service Extensions in IIS
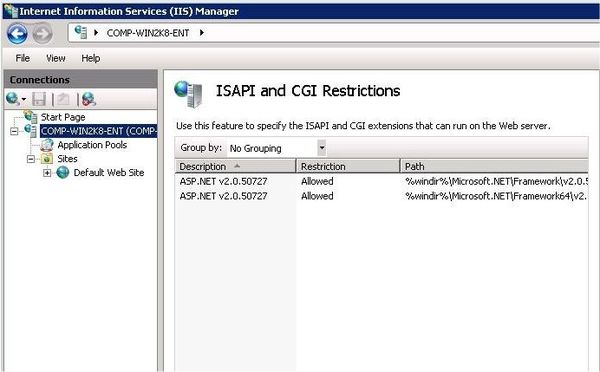
In the ISAPI and CGI Restrictions view, you can find the entries for ASP.NET. Make sure the Allowed status is set to True for the ASP.NET entries, especially for the version you're using, for example, ASP.NET v4.0.30319.
- Open IIS Manager and select your local workstation name.
- Select ISAPI and CGI Instructions and ensure ASP.NET version(s) are allowed (see figure below).
WSE and .NET Projects
Microsoft Web Services Enhancements (WSE) is required for creating .NET projects in Composer. The installer is available from Microsoft software downloads (external website, URL might change). If the installer does not support your OS, these steps give a workaround:
- Download the Microsoft WSE 3 msi installer bundle.
- Use 7Zip to extract the contents to a folder.
- In Composer, select Window > Preferences > Composer > IIS/.NET .
- Set the Microsoft WSE 3.0 Installed Path field the $Folder\Microsoft.Web.Services3.dll file.
- Create your Composer .NET Projects.
Alternatively the NuGet package manager can be used to install Microsoft.Web.Services3.
Internet Information Services (Windows 7 and earlier)
Before you can start to create a .NET Composer Project that you will deploy later on a Microsoft Internet Information Services (IIS) web server, you must do the following:
- Configure IIS/.NET Preferences in Composer.
- Allow the ASP.NET Web Service extension in Internet Information Services (IIS) Manager (see figure below).
Disabling UAC
To address any potential deployment failures when using IIS, Genesys recommends disabling the User Account Control (UAC) for all Composer supported Windows operating systems (Control Panel > User Accounts > Use User Account Control ).
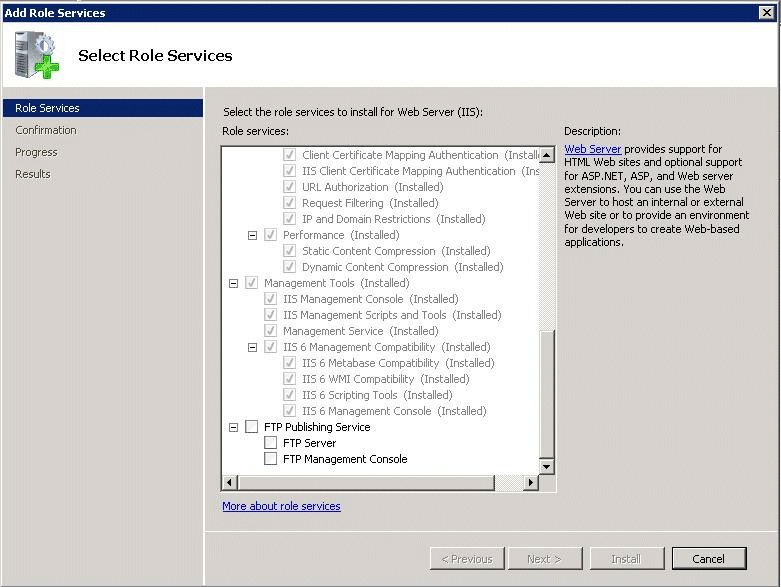
IIf running on IIS 7 (Windows Vista, Windows 2008) or IIS 7.5 (Windows 7), during the installation of IIS, the IIS Metabase and IIS 6 configuration compatibility feature must be installed. Select Control Panel > Programs and Features > Turn Windows features on or off > Roles > 'Select Role Services (see figure below).
If this feature is not turned on, you cannot deploy a .NET Composer Project
Allowing ASP.NET Web Service Extensions in IIS
- Open Microsoft Internet Information Services (IIS) Manager on your computer. The Internet Information Services (IIS) Manager window is displayed.
- In the left panel, double-click the Web Service Extensions folder.
- In the right panel, select the ASP.NET entry.
- Exit Microsoft Internet Information Services (IIS) Manager.
WSE and .NET Projects
Microsoft Web Services Enhancements (WSE) is required for creating .NET projects in Composer. However, the WSE installer may not install on Windows 2008. These steps give a workaround:
- Download the Microsoft WSE 3 "msi" installer bundle.
- Use 7Zip to extract the contents to a folder.
- In Composer, select Window > Preferences > Composer > IIS/.NET .
- Set the Microsoft WSE 3.0 Installed Path field the $Folder\Microsoft.Web.Services3.dll file.
- Create your Composer .NET Projects.
MIME Types
- Open Internet Information Services (IIS) Manager on your computer.
- Right-click your web site (such as Default Web Site ), and select Properties .
- Click the HTTP Headers tab.
- Click the MIME Types button to display the MIME Types dialog box.
- Add the following MIME types for IIS 6.0 or 7.0:
- By default the SCXML mime type is already configured in the bundled Tomcat server. If you are using IIS you need to configure following MIME types:
- Make sure that ASP.NET extensions are enabled in your IIS. Right-click on the default web site and verify that the ASP.NET tab shows the correct version.
- Make sure that ASP.NET is enabled on your virtual directory and set to the correct version. Right-click on the .NET Composer Project virtual directory and verify that the ASP.NET tab shows the correct version.
- Make sure that scripts have execute permissions on your virtual directory. Right-click on the virtual directory, select Properties , and check the Execute Permissions pulldown menu. It should say Scripts only or Scripts and Executables (if you intend to run executables which is usually not done).
vox = application/octet-stream
vxml = text/xml
grxml = application/srgs+xml
wav = application/octet-stream
 ** .json = text/json
 ** .scxml = text/plain
 ** .xml = text/xml
Debugging in MCP
To use the GVP debugging feature of Composer, the Media Control Platform (MCP) must be configured in Composer Preferences. For more information, see Callflow Post Installation, Media Control Platform section.
Configuring the GVP Debugger
In order to make test calls, you must configure (GVP) Debugger Preferences. The GVP Debugger used to debug voice applications allows you to debug an application by having the GVP Media Control Platform (MCP) initiate a call to a softphone. Once the call is answered, the MCP runs the application. You can then interact with the application just as if the call was initiated from the softphone.
For more information, see Callflow Post Installation, GVP Debugger section.
Enabling Debugging in the Media Control Platform (MCP)
To use the GVP debugging feature of Composer, the Media Control Platform (MCP) must be configured in Composer Preferences.
For more information, see Callflow Post Installation, Media Control Platform section.
Configuring the ORS Debugger
Composer provides real-time debugging capabilities for Orchestration Server (ORS) routing applications. The ORS Debugger is integrated within the workflow designer for making test calls, creating breakpoints, viewing call traces, stepping through an SCXML document/workflow, and debugging applications. In order to use the ORS Debugger, you must first set ORS Debugger Preferences.
For more information, see Workflow Post Installation, ORS Debugger sectioin.
TCP Ports (Firewalls)
If you have a local firewall on the development server (for example, Windows Firewall on Windows XP/Windows Server 2003), make sure that the TCP ports have been opened in Composer Preferences.
For more information, see Callflow Post Installation, Firewall section.
GAX Server Preferences
GAX refers to a Genesys Administrator Extension plug-in application used by the Genesys web application, EZPulse, which enables at-a-glance views of contact center real-time statistics in the GAX user interface.
You must set GAX Preferences if you plan on using the Operational Parameter Management (OPM Block) to work with Genesys Administrator Extension. Composer diagrams connect to the GAX server using the login credentials you enter in GAX Preferences when fetching audio resource parameters.
For more information, see GAX Server Preferences.
Business Rule Preferences
Composer interfaces with the Genesys Rules Engine, which is part of the Genesys Rules System. A business rule is an external piece of business logic, which can be customized, and then invoked by Genesys applications.
You can use Composer's Business Rule block to request the Genesys Rules Engine to execute a Rule Package in a routing workflow or voice callflow and write the results back to a variable.
If you plan to use the Business Rule block, you must set Business Rule Preferences. See Business Rule Common Block, Business Rule Preferences section.
Proxy Settings
This section describes how to configure proxy settings in Tomcat and a local proxy.
Configuring Proxy Settings for a Local Proxy
If you have a local proxy on your network, you will have to configure the proxy settings to get the parsing of the Web Services Description Language (WSDL) in the Web Service block.
- Inside Composer, configure proxy settings by going to: Window > Preferences > General > Network Connections. If necessary, provide the proxy authentication details:
- Select Manual proxy configuration and provide the HTTP proxy and Port .
- Provide the User Name and Password for authentication.
- Click Apply and OK .
Configuring Proxy Settings in Tomcat
Starting with 8.1.420.14, Composer supports Tomcat 7. Composer installation adds the role for manager-gui to Tomcat configuration for callflows and workflows.
If you will be Deploying a Java Composer Project, Composer bundles Tomcat for running test applications, such as routing applications. Proxy settings have to be configured in the bundled Tomcat web server for the back-end pages to access the Web if you plan to use the Web Request and Web Service blocks.
- To configure proxy settings in the bundled Tomcat web server, add the following lines to the catalina.properties file that is found within the ..\tomcat\conf folder in the Composer installation path:
- Restart the Tomcat service from Windows Services: ComposerTomcat .
http.proxyHost=hostip
http.proxyPort=port of Proxy
http.proxyUser=username
http.proxyPassword=password
The username and password must be the same as what was provided in the manual proxy configuration
Proxy Configurations for .NET Composer Projects
Each .NET Composer Project will have its own web.config file that needs to be updated for configuring the proxy settings.
If your IIS web server is behind a proxy server and Web Request or Web Service blocks are used in a callflow, you must configure proxy settings in your .NET Composer Project. To configure proxy settings in a .NET Composer Project:
- Open the web.config file.
- Go to the <system.net> section.
- To use the default System proxy settings: <proxy usesystemdefault="true"/>
If the default settings do not automatically detect the proxy server settings:
- Set proxy usessystemdefault to false .
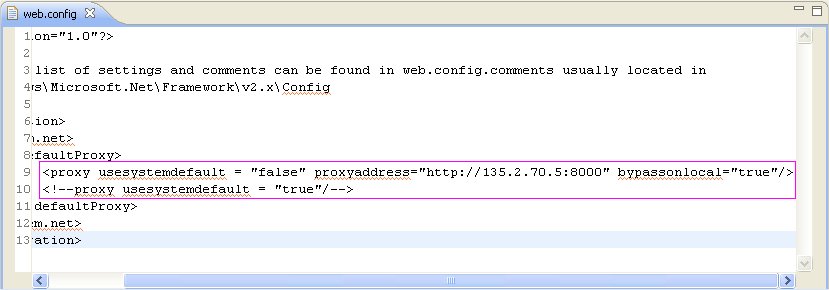
- Explicitly designate the proxy server: ''<proxy usesystemdefault="false" proxyaddress="http://address" bypassonlocal="true"/>''
An example is shown below.
Prompt Resource Validation
This Composer Preference enables diagram validation warnings where prompt audio resources no longer exist in the given file path. If the audio file is no longer present, the diagram block will show a warning icon. For more information, see:
- Enable Validation for Prompt Resources in Diagram Preferences.
- Prompt Resource Validation in Callflow Post Installation.
Configuration Server Connection
When creating routing applications in Composer, you use the Configuration Database and Configuration Server. For example, when using the Target block Targets Property to route to agents or agent groups, you select targets (agents(Person), Agent Groups, and other objects) defined in the Configuration Database.
You may develop routing applications:
- With a connection to Configuration Server or
- In an "offline" mode, without connecting to Configuration Server.
The dialog box for connecting to Configuration Server appears when you select Connect from the Configuration Server menu within Composer.
For more information, see Configuration Server in Workflow Post Installation.
TLS Support for Configuration Server
You. have the option of using a secure Transport Layer Security (TLS) connection when connecting to Configuration Server. The procedure for doing so is summarized below.
- Generate and install certificates. See section “Certificate Generation and Installation” of the Genesys Security Deployment Guide for instructions.
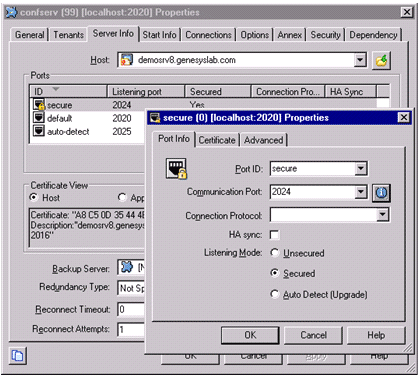
- Add a secure listening port in the Configuration Server configuration. See section “Genesys TLS Configuration” of the Genesys Security Deployment Guide for instructions. An example configuration is shown below.
- Enable the secure connection mode when initiating the connection in Composer. In the Connect to Configuration Server dialog box, select Use secure connection.
Configuration Server Preferences
Set Configuration Server Preferences to control routing predefined statistics creation, ExpressionBuilder object validation, and Configuration Database object preferences.
Inactivity Timeout
If you have authenticated with Configuration Server, Composer times out after a configurable number of minutes of inactivity. In this case, you must reauthenticate in order to continue working with Configuration Server database objects. For Composer, inactivity is defined as a period of time with no mouse usage (click, move, and so on) or keyboard entry. For instructions on implementing this time, see the Inactivity Timeout chapter of the Genesys Security Deployment Guide.
ORS and Routing Point Configuration
When creating routing applications, in addition to specifying the HTTP request parameters, both Universal Routing Server (URS) and Orchestration Server (OS) must be properly configured.
For more information, see the Orchestration section in Workflow Post Installation.
For information on additional options that must be set, consult the following:
- Universal Routing 8.1 Deployment Guide, Orchestration Support chapter.
- Orchestration Server 8.1.4 Deployment Guide, SCXML Strategy Support and Configuring Orchestration Server chapters.
Specifying the URL of the Starting SCXML Page
- In Genesys Administrator, in the Provisioning tab, select Switching > Switches .
- Click the DNs tab.
- Select the DN that corresponds to the Routing Point where the built-in root strategy is loaded.
- In the Annex tab for this Routing Point, add an orchestration section.
- In that section create an option named application and for its value enter script:<object name> where <object name> is the name of Script object of type Enhanced Routing that represents the SCXML application and contains the URL of the starting SCXML page of this application deployed on an application server. This URL needs to be accessible from the Orchestration Server host.
For complete details on this step and other routing configuration details, consult:
- The Orchestration Server 8.1.4 Deployment Guide, SCXML Application Development chapter.
Important! If you have both Composer and Interaction Routing Designer set up in the same environment, check in IRD’s Loading View that you have not loaded an IRD routing strategy on the same Routing Point DN where the built-in strategy is loaded. This will create a conflict and cause your SCXML-based strategy not to launch.
Using Stream Manager for Voice Treatments
When creating routing applications, if you plan to use Stream_Manager to play voice treatments via the Treatment blocks for workflows (such as Play Sound), additional configuration tasks are required.
For more information, see Workflow Post Installation, Stream Manager section.
Hiding Capabilities
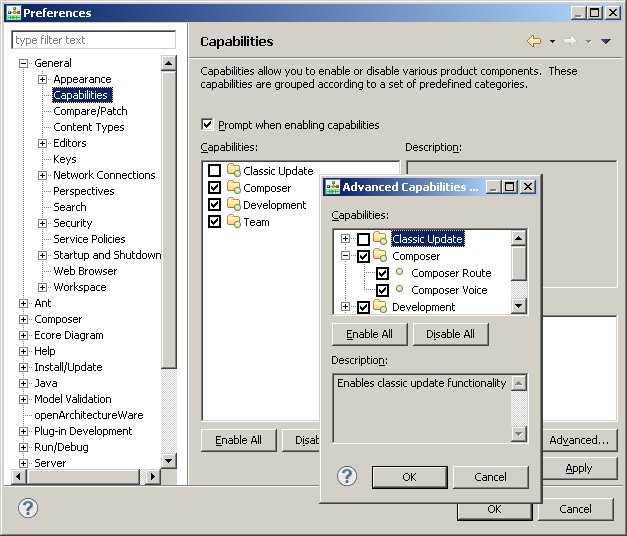
You may hide voice or routing capabilities through a General Preference setting (Window > Preference s > General > Capabilities ).
Capabilities Preferences
For more information, see Enabling-Disabling Functionality and Hiding File Types.
Context Services Preparation
Context Services refers to an optional capability of Universal Contact Server (UCS) and its UCS Database, a repository of customer-related, service, and interaction-centric data (current and historical) from Genesys and third party sources. You can use the Context Services Blocks for service personalization, offer personalization, service resumption. and enhanced reporting.
For information, see Setting Context Services Preferences.
TLS Support When Connecting to Context Services
The optional procedure below summarize how to configure a secured connection between Composer and Universal Contact Server (UCS) during application design. During runtime, the connection to UCS is initiated by Orchestration Server (ORS) or GVP.
For routing applications, no specific additional client-side configuration is needed for ORS.
For voice applications, GVP does not initiate a TLS connection to the UCS.
To use a TLS connection when using Composer to connect to UCS:
- Generate and install a certificate in Universal Contact Server as described in Using TLS with UCS.
- Export the certificate generated in step 1 with a command like:
[JRE Home\bin\]keytool -export -v -alias FRBRED0H001435.emea.lucent.com -file certificate.cer-keystore certificate.jks -storepass theKeystorePassword
Details for using the genkey command are available at the Oracle download site. See .../tooldocs/windows/keytool.html#genkeyCmd.
- Copy the .cer certificate file generated in step 2 to the Composer host.
- In the Composer/Security preference page, import the certificate exported in step 2.
- In the Composer /Context Services preference page, enable the TLS by selecting TLS in the Security Settings area.
Using Context Services Authentication During Design
This section summarizes how to configure Composer to connect to Universal Contact Server using authentication when designing routing applications.
At this time, there is no support for authentication during runtime. Orchestration Server and GVP do not initiate an authenticated connection to the UCS.
To use an authenticated connection when connecting to the UCS, you need to:
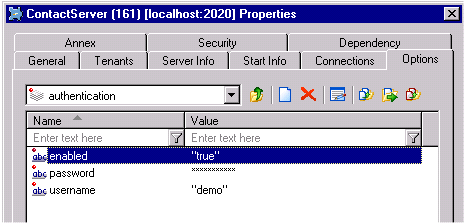
- Set the authentication mode to true in the UCS configuration.
Universal Contact Server Application, Authentication Section
See the Context Services wiki for details.
- Open the Context Services Preferences page.
- In the Security Settings area, select Use authentication .
Enter the username and password and click ''Test Connection .
Upgrading Projects and Diagrams
While working with Composer, if you want to use a previously-created Composer Project and Project diagrams, an upgrade is required.
For more information, see Getting Started With Composer, Upgrading Projects and Diagrams.
- Genesys recommends that you create a dedicated workspace for 8.1 Projects and do not reuse previously created workspaces. This will provide a clean separation between the two versions as well as ensure that a backup copy is preserved for later reference or rollback.
- Some previously created workflow diagrams cannot be upgraded. For more information, see the Migrating IRD Strategies section below.
- Callflow diagrams designed prior to version 8.1.1 and upgraded to 8.1.1, 8.1.2, 8.1.3 and 8.1.4 versions will not have the BlockName variables automatically filled with the block output for the User Input blocks (Menu, Input, Record and Transfer). This implicit variable has been replaced by the Output Result property, where you must add/assign a variable to collect the output result of the Block.
- Starting with 8.1.410.14, the Upgrade Diagram files and Generate Code' dialog contains a Validate check box, which is optional. Select it if you want validation to be done after an upgrade. When this option is selected during a Project upgrade, validation will be done after generating code and the error marker will be shown in the Problems view, Project Explorer view and diagram. This validation is not applicable for a command line upgrade. Validation can be a time-consuming, especially for asp/jsp files. This option is introduced to provide backward compatibility. If you want a quick upgrade, ignore the option.
- For additional upgrade information, see the Composer 8.1.x release notes.
Migrating IRD Strategies
Composer 8.1.2 allows you to migrate some routing strategies created with Interaction Routing Designer 8.0+ into Composer Projects as SCXML-based workflow diagrams.
For information on Composer Migration in general, see the IRD to Composer Migration Guide.
Also see the Composer chapter in the Genesys Migration Guide.
Routing Strategy Upgrade Limitations
From a routing standpoint:
- Composer 8.0.2 began support for the creation and testing of SCXML-based workflows for inbound voice use cases. Upgrading workflow diagrams created in the 8.0.2 release of Composer is therefore not supported.
- Composer 8.0.3 began support for Context Services and the processing of multimedia interactions. This release also introduced interaction process diagrams. Upgrading workflow diagrams created in the 8.0.3 release of Composer is therefore not supported.
Deploying Projects to Tomcat
If you already have a Project in the workspace and did not perform the Tomcat configuration described earlier in the Tomcat section of Workflow Post Installation, you must deploy the Project on Tomcat.
For more information, see the Testing Your Application section in Deploying Composer Applications.
Installing the Business Rules Plugin
As described in Business Rule Common Block, a Composer-compatible plug-in is available for developing Business Rule Templates.This plug-in is provided as part of the Genesys Rules System.
- To install the plugin, refer to the Genesys Rules System Deployment Guide. See Chapter 2, Installation.
- If you install the plugin, you will also have access to the Genesys Rules System Development Tool .
- Also see the Genesys Rules System Authoring Tool 8.1 Help .
Preferences and Options
Also see:
Hiding Data in Logs
The default log level in the Composer backend (log4j.xml) is set to ERROR so that INFO and DEBUG messages will not get printed by default.
- INFO level, if set, will only print the flow level statements.
- DEBUG level, if set, will print all the messages and also the password-related data in the log for debugging.
This applies to the the DB Data, Web Service, and Web Request blocks (Java and .NET Projects).

