Installing Context Services
This page details how you can install, then enable the Context Services APIs.
If your application needs the Customer Profile API due to backward compatibility issues, refer the migration page of this guide.
Contents
Installing the Genesys Mobile Services
Context Services uses the GMS platform to store data and implement additional features. In order to install the GMS/CS component, you must deploy GMS first. See the GMS Deployment Guide for details.
The Context Services installation CD contains a single installation package for both GMS and CS components. Follow GMS instructions prior to your installation. In particular, you must create a GMS application that you will use to enable and configure the Context Services.
Run the installation package of your GMS installation CD:
- Navigate to the installation directory \windows\b1\ip
- Double-click install.exe which is located in this directory.
- Follow instructions and enter the destination folder for the GMS installation.
Licensing
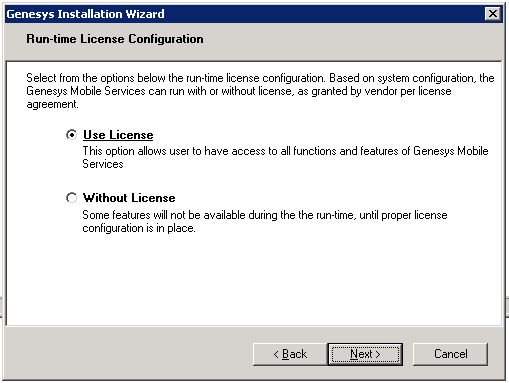
The GMS installation includes all Context Services materials, including licensing. The installation wizard displays the following information for licensing:
The licensing materials include Context Services. If you select the Use License option, your users will have access to Genesys Mobile Services Functions, including Context Services.
Enabling Context Services
Procedure:
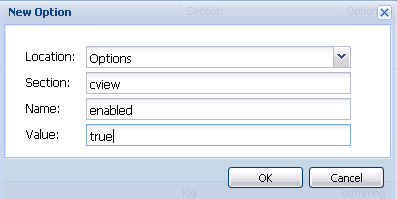
Purpose: To configure the cview variable which enables the Context Services.
Steps
Accessing Context Services
Once Context Services is installed, enabled, and started, the services are available at the <GMS_HOST_BASE_URL>/genesys/1/cs base URL of your GMS host. Note that the <GMS_HOST_BASE_URL> must map the server/external_url_base option set in your application.
Installing the Standalone Context Service
To install the Standalone Context Service and Journey Timeline,
- Download the contextservices.zip file.
- Extract the contents to a folder.
- Locate the url.txt file in the root folder. In url.txt, specify the GMS URL that you want to connect. For example, https://<gmshost>/genesys/1/cs
- If the Standalone Context Service code is hosted inside the GMS server, leave the url.txt file blank. This enables the Context Service code to connect to the GMS Server URL in which it is hosted.
Accessing the Context Service
- To launch the Standalone Context Service code as a standalone application,
- Install the nodeJS.
- Navigate to the root of the folder and run the command http-server, which would host the Standalone Context Service code. Ensure that cors does not block the host from accessing GMS API.
- You can also launch the Standalone Context Service from Nginx by configuring the nginx server in front of GMS to redirect the request to the Standalone Context Service. The nginx.conf file in the root of the unzipped contextservices.zip would help in such configuration.
- To access Context Service through the browser, enter the URL, http://<hostip>:<port>/.
- To access Journey Timeline through the browser, enter the URL, http://<hostip>:<port>/journey.


