Case Process
The tabbed sections below describe the processes for opening and managing Cases using My Support.
How to Open a New Case
Please report each issue separately so it can be individually tracked (by its Case Number); reporting multiple issues in one Case or adding new issues into correspondence about an existing Case may result in overlooked questions and incomplete determinations.
1. Login to the My Support Portal.
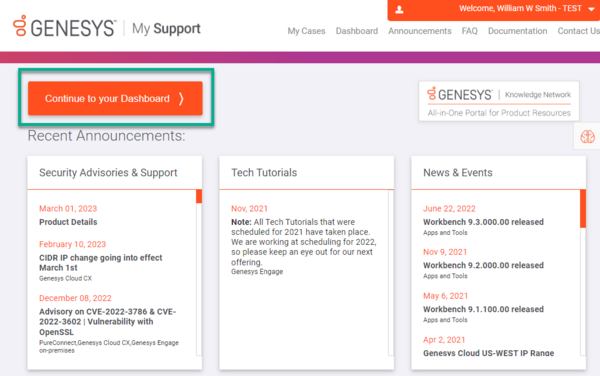
2. If any announcements pop-up, click Continue to your Dashboard.
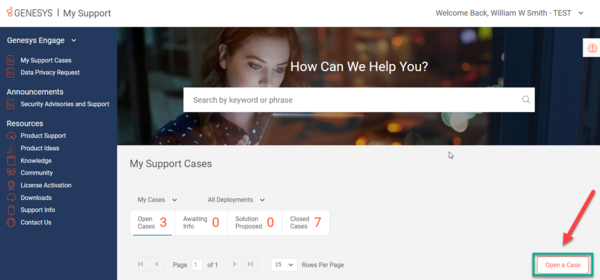
3. The Portal will automatically open to your My Support Cases page. From there, click the Open Case button.
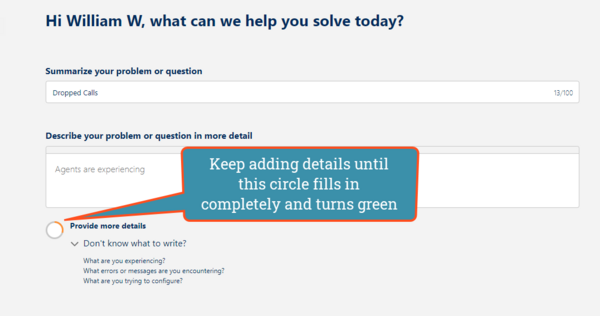
4. A new page will open that says, "Hi <your name>, what can we help you solve today?" Fill out the form on that page with details about your Case.
- Summarize your problem or question:
- There's a limit of 100 characters.
- Make your summary short, but as specific as possible.
- Describe your problem or question in more detail:
- Add as many specific details as possible. The more information, the better.
- After this field, there is a small yellow circle that will fill in as you type more in the description field. After the circle, there will be the words, "Provide more details." Once you have added a minimum of 10 words, the circle will fill in green and the words will change to "Thank you!"
- After the circle, there is a header that says, "Don't know what to write?" and provides a list of prompts that will help you think of details you should include in your description of your problem or question.
5. Component: Our AI will auto-select a component based on the text of your summary and description, but if it is incorrect, you can pick another component by clicking on another component's button, or More options.
6. Click Next
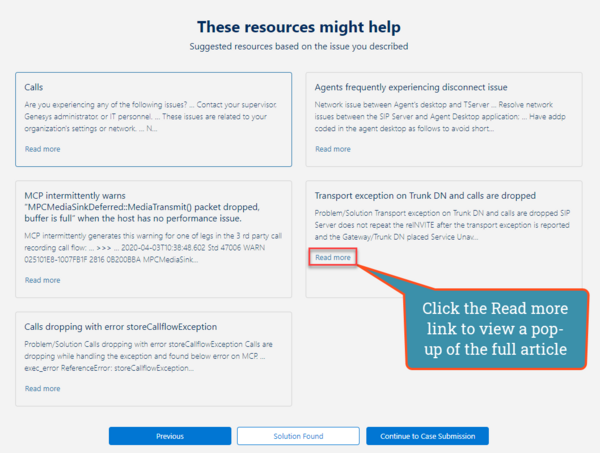
7. The next page, titled "These resources might help," will present you with a selection of tiles that include summaries of knowledge articles that may solve your problem.
- If you click Read more on any tile, a pop-up will appear, showing a preview of that article.
8. A link to the article page is included at the beginning of the pop-up.
- To close the pop-up, click X in the upper-right corner of the pop-up window.
- After closing the pop-up, a message will appear in that article box, asking, "Your opinion can help others. Was this helpful?" You can select Yes or No. Please take the time to click one, because it directly helps the AI learn which articles are helpful for specific situations.
9. After reviewing possible solutions, scroll to the end of the page and click either Solution Found or Continue to Case Submission.
- If you click Solution Found, a pop-up message will appear, saying, "We're glad you found the answer!"
- Click Confirm.
- If you click Continue to Case Submission, a new form will appear. Fill in the rest of the details to the best of your ability.
- Your Deployment, Component, Subject, and Description will all autofill from the previous form.
- Pick a Priority for your Case.
| PRIORITY | DEFINITION |
|---|---|
| High | You are able to perform job functions but performance is degraded or limited. |
| Medium | Your ability to perform job functions is largely unaffected, but noncritical functions or procedures are unusable or hard to use. A workaround is available. |
| Low | The Genesys Cloud Service is available and operational; trivial impact to your business operations or you require information or assistance on product capabilities or configuration. |
NOTE: You may notice that Critical is not a priority option. A Critical case is one where you are experiencing a severe problem resulting in an inability to perform a critical business function. There is no workaround. If you are experiencing a Critical problem, then submit the case as a High priority and call Product Support phone support directly: Cloud Customer Care phone support.
- Enter the remaining details on the form and click Submit.
How to Update an Existing Support Case
You can use either of these methods to update an Open Case:
My Support
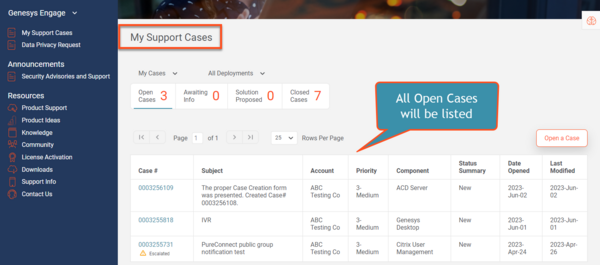
The My Support Cases page allows you to easily view all Non-Closed Cases raised against all Case Types that you are named as the Case Contact. By default, when you first log into the Support Portal, you will be directed to the My Support Cases page.
1. Login to the My Support Portal.
2. You will automatically be directed to the My Support Cases page.
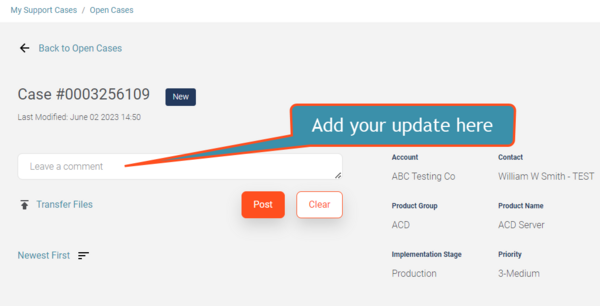
3. Select the Case for which you are providing an update.
4. Enter your comment in the Leave a comment field
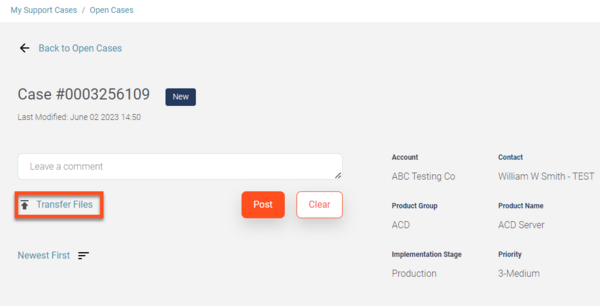
5. You can upload a file or a screenshot using the Transfer Files link.
6. Once you are done adding your comment and uploading any files or screenshots, click Post.
You can update an Open Case by Email if you reply to an Email originated from the Case by a Genesys Customer Care representative or to an automated Case notification. An Email originated from a Case includes a special Reference ID, which ties any reply back to the Case.
On the contrary, if you start a new Email and send it to Customer Care , it will not link to the Case automatically, even if you have specified a Case #. Such an Email will be processed by the Customer Care Admin team and may be manually linked to the Case specified, but automatic linkage will not occur unless the Email body contains the Reference ID.
NOTE: If the Case is in Awaiting Info or Solution Proposed status, and the Case contact replies to an Email originated from the Case, this will also change the Case Status to Open. In addition to this, will also see the Email updates in the Case Updates section of the Case.
Phone
A Designated Contact may update a case by calling Product Support, see the Contact Us page. You may be required to provide your PIN and the 10-digit Case Number.
How to Close an Existing Support Case
You can close a Case at any time by accessing the Case on My Support and clicking “Close Case."
If Customer Care requests information about a Case or proposes a solution, and you do not reply within two days, the Case Management system will send you an automated email reminding you about the requested action. If you do not respond to the reminder within ten business days, the Case will be automatically closed. See the Auto Follow-Up tab on this page for further details regarding Case closure through the Auto Follow-Up Process.
How to Reopen a Support Case
A previously closed Case may be reopened if an issue has not been resolved or if a Case was closed by accident. For the Case to be reopened, all new supporting information demonstrating that an issue has not been resolved should be supplied to Genesys Product Support within 30 days from Case closure. Without this information, the Case will not be reopened.
To reopen a Case:
1. Login to the My Support Portal.
2. You will automatically be directed to the My Support Cases page.
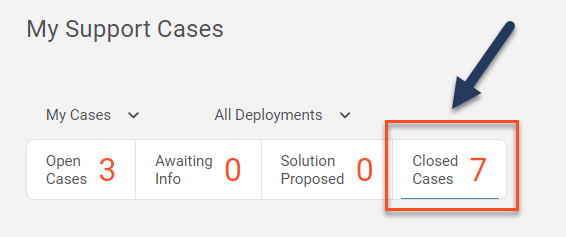
3. Select the Closed Cases tab to access your Closed Cases.
4. Click on the Case that you want to re-open.
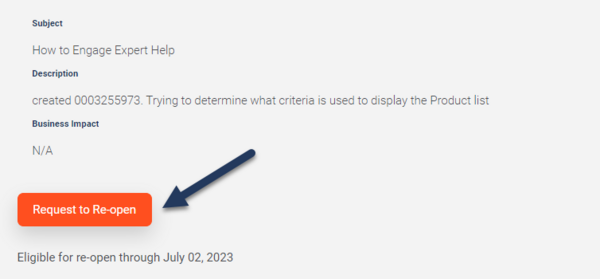
5. From the Case page, you should see a button that says Request to Re-open. (If you don't, it is likely because the Case has been closed for more than 30 days. In that circumstance, you will need to contact Product Support or create a new case.)
NOTE: This function will only be available for Cases closed within 30 days from Case closure.
6. Call Product Support.
How to Find Your Open Cases
The My Support Cases page allows you to easily view all Non-Closed cases raised against all Case Types that you are named as the Case Contact. By default, when you first log into the Support Portal, you will be directed to the My Support Cases page.
By default, My Support Cases displays up to 25 Cases. If you have more than 25 Cases open, you can navigate through them or change the number of Cases per page by using the navigation toolbar that appears after your list of open Cases.
View all your Organization's Cases
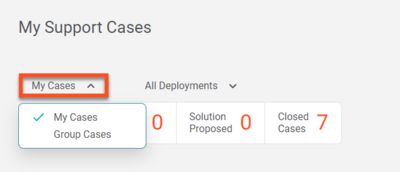
To view all the Cases open for your organization, click My Cases and select Group Cases from the drop-down menu.
Auto Follow-Up Service
The Auto Follow-Up Service is designed to provide timely and proactive follow-up between Customers and Customer Care. Auto Follow-Ups will be sent to the Designated Contact who opened the Case according to the process outlined below.
Auto Follow-Up #1: When Customer Care notifies you and requests a response (e. g. proposes a solution or requests information) regarding an open Case, a follow-up timer is started. If you do not respond to the request within two (2) days, an automated Email is sent to the Designated Contact who opened the Case, with a reminder of the requested action, and a link to access the Case.
Auto Follow-Up #2: If you do not respond to the request within five (5) days, a second automated Email is sent to the Designated Contact who opened the Case. This email contains a reminder of the requested action, and a link to access the Case.
Auto Follow-Up #3: If you do not respond to the request within ten (10) days, the Case is automatically closed and a final Auto Follow-Up Email is sent to the Designated Contact who opened the Case. All information about the Case will remain intact in My Support for one month (including any sanitized logs or attachments). Please remember that you can reopen a Closed Case only by a phone call to Customer Care.
NOTE:
- The Auto Follow-Up timer can start and stop several times for a given Case. Examples of requests that start the Auto Follow-Up timer include:
- Descriptions of what happened before the issue started
- Submission of sanitized product logs
- Notification or verification of a proposed solution
You may request an Incident Report using the same procedures as you would use to update a Case (i.e., request the report through My Support or by Email, all as specified in the How to Update an Existing Case section). The Incident Report will contain information such as: start and end date of the issue; description of the Case; timeline of interactions with the Customer; corrective measures undertaken; action items and estimated completion dates.

