Contents
Cases
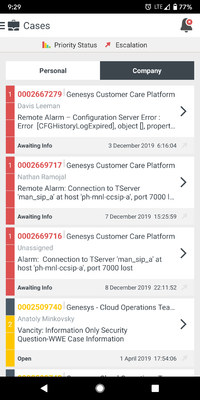
When you select Cases from the Menu ≡ of the Genesys Care Mobile App, you will see a list of your non-closed cases, including cases opened by other Designated Contacts at your company, and be able to perform other functions.
The following are the different functions that you can perform from the Cases window.
Designated Contacts and Case Management
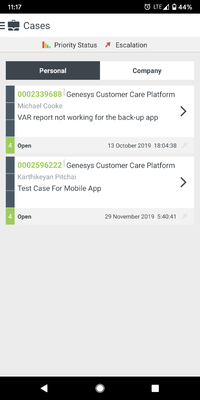
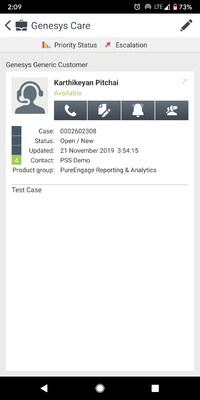
From the Cases screen, Designated Contacts should select "Personal" to view cases they have opened or select "Company" to view all the non-closed cases for the company. You can select any case to view the case details including the case severity level, case status and case notes. Remember, you must be a Designated Contact to make post case updates and request that a case be closed.
If you have Read-Only access, you can view non-closed cases on the "Company" view, but you cannot post updates or request that a case be closed.
If you are a Genesys partner who is a Designated Contact, the case list view can include all non-closed cases that your company has opened for all the end users your firm represents.
(left) Case List Screen and (right) Case Details Screen
Click to Call
On-Premises Users
You must be a Designated Contact to call Customer Care regarding a case.
To contact Genesys Customer Care, tap on the case you want and then select the telephone icon ![]() within the case details window for that case. This will direct you to the Contact Us screen, where you can choose your platform and preferred Customer Care center.
within the case details window for that case. This will direct you to the Contact Us screen, where you can choose your platform and preferred Customer Care center.
Cloud Users
If you are a Designated Contact using Business Edition Cloud (Genesys Engage cloud) and would like to contact Genesys Customer Care, tap on the case you want and then select the telephone icon ![]() within the case details window for that case.
within the case details window for that case.
Case Updates
You must be a Designated Contact to post updates to an open case.
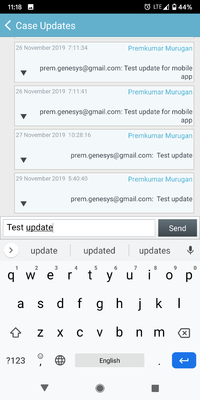
To post an update to a case, tap on the Update Case icon ![]() next to the telephone in the Case Details window. On the Case Updates screen, type your update in the message text box and then press Send.
next to the telephone in the Case Details window. On the Case Updates screen, type your update in the message text box and then press Send.
(left) Case Details Screen and (right) Post Case Update Screen
Using Chat (Genesys Engage on-premises and Genesys Cloud Only)
You must be a Designated Contact to use the Chat feature.
What is Chat?
Chat is a feature that gives Designated Contacts an additional option of engagement with the assigned Case Owner (or an available agent, if the case owner is unavailable) regarding the status of their on-premises Support Cases. A Chat session is requested by clicking the Chat icon within any non-closed Case. The Using Chat section explains how to use Chat via the Genesys Care Mobile App only. As a reminder, Chat is for Case facilitation (quick questions or status updates) and not for live troubleshooting.
Please read the Support Processes for On-Premises Licenses for additional tips on Chat via Computer.
Using Chat
Select and open any non-closed Case. Click the Chat icon to begin.
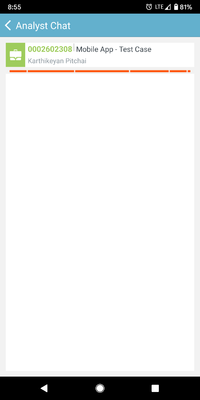
The Chat window will automatically start loading.
In the example below,
If the case owner is available, you can directly begin the chat session.
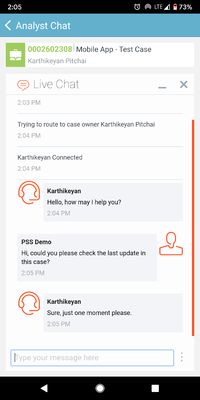
If the case owner is not available, then the chat will be routed to an available agent
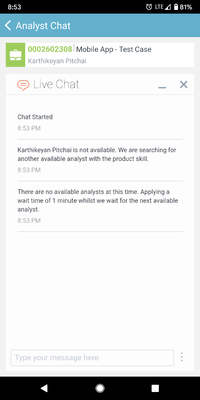
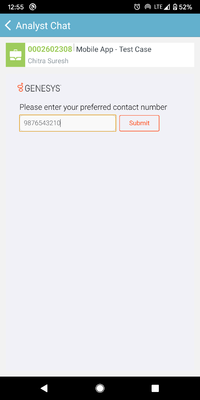
If both the Case Owner and the other agents are unavailable, you can leave a contact phone number so that we can get back to you.
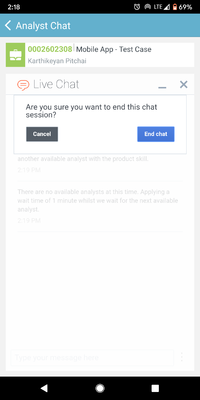
Once you have finished chatting, you can end your session by clicking the "End Chat" button above your chat dialogue.
After the Chat Session
After you end the Chat, a transcript of the Chat session will be emailed to you.
Case Closure and Escalation
You must be a Designated Contact to request a close be closed or escalated.
Case Closure:
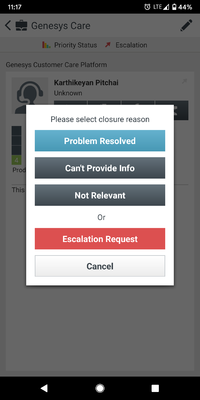
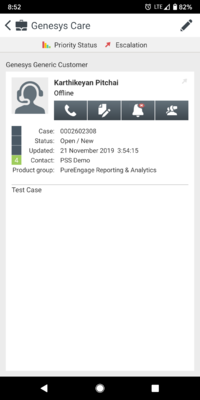
To request that Customer Care close a case, select the pencil ![]() icon at the top right of the Case Details window of that case. In the Request Case Closure window, select the appropriate reason for the closure. This will send your case closure request to the Customer Care.
icon at the top right of the Case Details window of that case. In the Request Case Closure window, select the appropriate reason for the closure. This will send your case closure request to the Customer Care.
(left) Case Details Screen and (right) Request Case Closure Screen
Escalation:
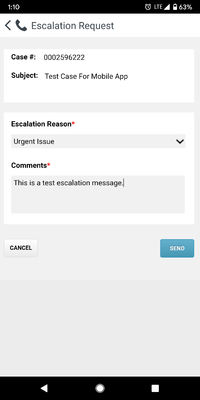
To request that Customer Care escalate a case, select the pencil ![]() icon at the top right of the Case Details window of that case. In the Request Case Closure window, select the Escalation Request option. The Escalation Request window will appear.
icon at the top right of the Case Details window of that case. In the Request Case Closure window, select the Escalation Request option. The Escalation Request window will appear.
The Case # and the Subject fields are auto-populated. Select an appropriate reason from the Escalation Reason drop-down list and provide a short brief for your reason in the Comments section. Click Send. This will send your escalation request to Customer Care
(left) Case Details Screen and (middle) Request Case Closure Screen and (right) Escalation Request Screen
Notifications
You must be a Designated Contact to subscribe to this feature.
Push Notification
This feature allows you to subscribe for the following notifications,
- Case Update Notification for an Individual Case
- Case Update Notification for all Personal Cases
- Case Update Notification for all the cases of a particular Account (Account Notification)
- Cloud Incident Notification
Case Update Notification - for an Individual Case:
Users can subscribe to receive update notifications of an individual case from the Case Details screen. Once subscribed they will receive notifications whenever there is an update to that case.
Steps to Subscribe/Unsubscribe
- To subscribe for updates of a particular case, open the Case Details screen of that case.
- Click the Bell icon next to the chat icon.
- A confirmation message will be displayed on the screen. Now, the Bell icon will be displayed with a cross sign on it to denote that the user has subscribed for the particular case updates.
- To unsubscribe from this case update, click the same Bell icon again.
Case Update Notification - for all Personal Cases:
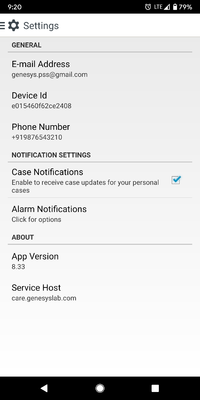
Users can subscribe to receive update notifications of all their personal cases from the App Settings Screen. Once subscribed they will receive notifications whenever there is an update to any of their personal case.
Steps to Subscribe/Unsubscribe
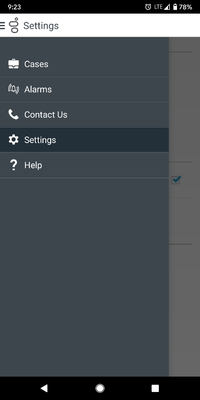
- Navigate to Applications Menu > App Settings screen in your iOS mobile.
- Enable the Personal Case Notifications toggle button.
- To unsubscribe from all the personal case notifications, disable the same toggle button.
Account Notification
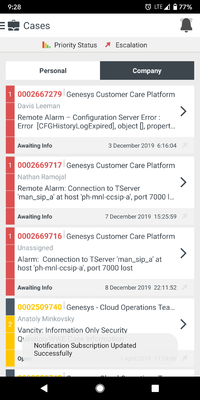
Users can subscribe to receive update notifications for all the company cases of an account through the Company Cases screen.
Steps to Subscribe/Unsubscribe
- To subscribe for case updates of your Company, open the Company Cases screen.
- Click the Bell icon at the right top corner of the window.
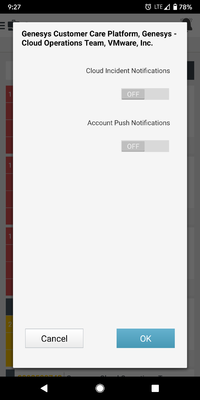
- A window with Account Push Notifications toggle option is displayed. By default this option is set to OFF.
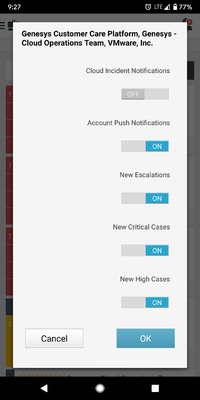
- Enable the Account Push Notifications toggle option. Once this option is set to ON, the below toggle options will become visible.
- New Escalations - By enabling this option, you will receive notifications if there are any escalation to the existing cases
- New Critical Cases - By enabling this option, you will receive notifications if there are new critical cases created for this account
- New High Cases - By enabling this option, you will receive notifications if there are new high cases created for this account
- Enable the required toggle options and click the OK button.
- Now, the Bell icon will be displayed with a cross sign on it to denote that the user has subscribed for all the case updates of the company.
- To unsubscribe from the account's case updates, click the same Bell icon and disable the New Escalations, New Critical Cases, and New High Cases toggle options. This will in turn disable the Account Push Notifications toggle option.
Cloud Incident Notification
Users can subscribe to receive update notifications for Cloud Incidents for the cloud accounts that they have. X
- To subscribe for cloud incident updates of your Company, open the Company Cases screen.
- Click the Bell icon at the right top corner of the window.
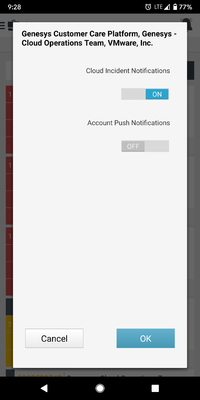
- A window with Cloud Incident Notifications toggle option is displayed. By default this option is set to OFF.
- Enable the Cloud Incident Notifications toggle option and click OK.
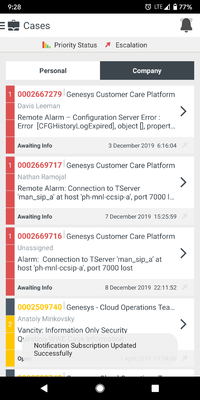
- A message will be received confirming the subscription of Cloud Incident Notifications.
- To Unsubscribe, follow the same steps as above and toggle OFF the Cloud Incident Notifications. Once done, the users will not be able to receive the Cloud Incident Notifications anymore.

